background image

Operating the camera 
22 


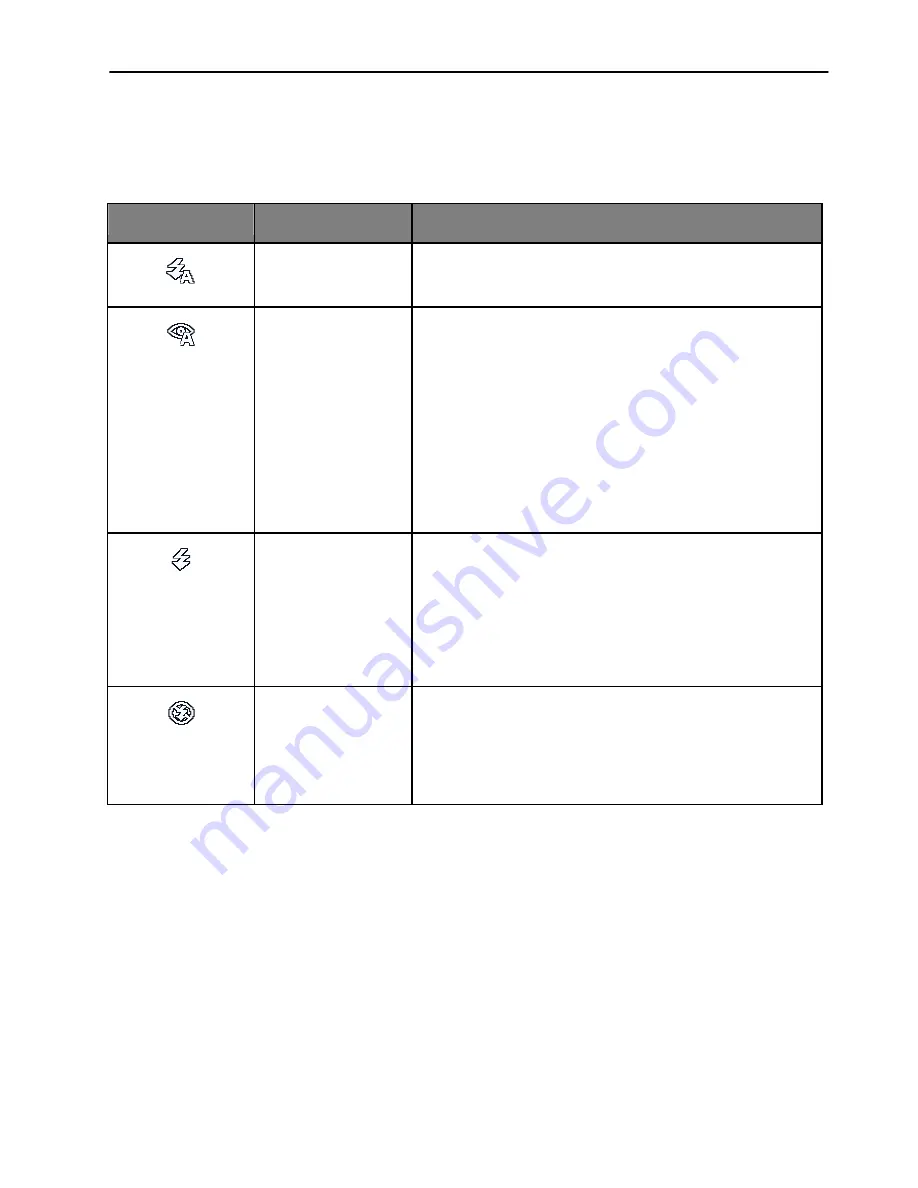
Flash mode


The flash offers additional light source (usually used in a low-light 
environment). You can capture an image using one of the following flash 
modes. 


Icon


Mode


Description


Auto Flash 

The flash fires automatically based on 
the photographic conditions. 


Auto Anti Red- 
eye 

Reduces the red-eye phenomenon when 
capturing natural-looking images of 
people and animals in low-light 
conditions. Be sure to ask the subject to 
look at the camera lens or get as close to 
the camera as possible. The flash fires 
automatically based on the photographic 
conditions. 


Force On 

The flash always fires regardless of the 
surrounding lighting conditions. Select 
this mode when capturing images with 
high contrast (backlighting) and deep 
shadows. 


Force Off 

The flash does not fire. Select this mode 
when flash photography is prohibited, or 
when the distance to the subject is 
beyond the effective range of the flash. 


Содержание VS1527

Страница 1: ...Touring the camera 12 What your camera package includes Carefully unpack your kit box and ensure that you have the following items...

Страница 2: ...r System Requirements for Windows Vista 7 To be able to download photos to your PC your will need the following minimum configuration Windows Vista or 7 800MHz processor and 512 MB of system memory 20...

Страница 3: ...Touring the camera 14 A quick look at your camera...

Страница 4: ...K 1 Left Self timer Scrolls left in menus Toggles through the 4 self timer options 2 Up Flash Scrolls up in menus Toggle through the flash options 3 Right Exposure Scrolls right in menus Selects an EV...

Страница 5: ...o the following 1 Insert one end of the neck strap through the strap eyelet 2 Route it through the buckle as the inner loop 3 Route the other end of the neck strap to the other strap buckle to secure...

Страница 6: ...ays turn off the camera before removing the batteries To install the batteries 1 Push the clip as the arrow showed and then slide the battery cover to the right to release and open it 2 Insert the bat...

Страница 7: ...more files To install an SD card 1 Locate the Memory Card slot at the side of the camera 2 Insert the Memory card into the slot in the correct direction 3 Push the card in until you feel it click into...

Страница 8: ...manually open the flash before switching the flash mode To open the flash Use hands to lift the flash to open it To close the flash Push down the flash to close it When the flash is closed flash mode...

Страница 9: ...focus Once the focus is set the focus frame color will turn from red unfocused to green focused If the focus frame color is red and you press the Shutter button down it might result in a blurred photo...

Страница 10: ...1 Capture mode A Item Description 1 Shooting mode 2 Flash mode 3 Focus mode 4 Image size 5 Image quality 6 Numbers of shots available 7 ISO 8 Face Tracking 9 White balance 10 Exposure value EV 11 Hist...

Страница 11: ...ing images of people and animals in low light conditions Be sure to ask the subject to look at the camera lens or get as close to the camera as possible The flash fires automatically based on the phot...

Страница 12: ...ired flash mode is displayed on the LCD monitor Focus mode Icon Mode Description Auto focus Adjusts focus automatically Macro Used when capturing images at a close distance Infinity Used when capturin...

Страница 13: ...an choose a shutter speed while the aperture value is automatically determined by the lighting condition of the subject details 4 Aperture Priority You can choose an aperture value while the shutter s...

Страница 14: ...Shutter priority is often used when shooting moving subjects In general use a shorter shutter speed to catch a fast moving object To adjust shutter speed in Shutter Priority 1 Set the mode dial to S...

Страница 15: ...he Shutter button When the photo size you select is VGA Speedy Burst will shoot continuously at the speed of 30 shots per second This will stop after 1second or when the memory card is full AEB Auto E...

Страница 16: ...ure Automatically takes a shot when a smile is detected Blink Detect Warns of eyes blinks if detected and lets you decided whether to save the image file HDR Increase the dynamic range and enhances th...

Страница 17: ...en s skin tones Building Enhances lines contracts to highlight the sense of the three dimensions 3D for a building Night scenery Captures photos in a low light environment such as in the evening or at...

Страница 18: ...2048 x 1536 12mega pixels 4000 x 3000 2 mega pixels 1920 x 1080 10mega pixels 3648 x 2736 VGA 640 x 480 8mega pixels 3264 x 2448 To select an image size 1 Press Menu button 2 Press Up Down button to s...

Страница 19: ...ubject area Center Detects the exposure of the entire shooting screen but gives more importance to the values near the center Spot Detects the exposure based on the center spot in the subject area To...

Страница 20: ...scent lighting without a flash Custom Used when you want to manually adjust white balance in a particular lighting condition Auto Adjusts white balance automatically Daylight Used in bright daylight c...

Страница 21: ...Description Automatically sets the ISO value Equivalent to color ISO 50 100 200 film Used for outdoor photography in bright sunlight Equivalent to color ISO 400 800 1600 film Used it in a low light e...

Страница 22: ...wn button to select an option 5 Press OK to confirm setting Image Sharpness This setting allows you to adjust the sharpness of images making edges more or less distinct To select image sharpness 1 Pre...

Страница 23: ...as if it is old Red The image becomes reddish Green The image becomes greenish Blue The image becomes bluish To select an effect 1 Press Menu button 2 Press Up Down button to select Color Effect 3 Pr...

Страница 24: ...tton to select Face detect 3 Press OK button to enter the submenu 4 Press Up Down button to select from Off Face detect Smile Detect Blinking Detect Object Detect 5 Press OK to confirm setting Recordi...

Страница 25: ...o select from off 2 seconds 5seconds 10seconds 3 Press OK button confirm setting Battery status Icon Description Battery power is full Battery power remains adequate Battery power is low Battery power...

Страница 26: ...Auto power off 1 min For power conservation the camera automatically enters the standby mode after it has been idle for a period of time Press any key to resume 3 min 5 min Off The camera remains on...

Страница 27: ...frequency to the site Battery Type To ensure the camera displays battery level correctly set the type to match the batteries used Carbon Zinc batteries are not recommended Alkaline When using Alkalin...

Страница 28: ...de 2 0 400 Item Description 1 Indicates that the camera is in Playback mode 2 Date and time when the file was created 3 File number 4 Histogram 5 File name file size shutter speed and aperture value 6...

Страница 29: ...s Left Right button to select the image you want to enlarge 3 Use the Zoom lever to zoom in out on the image 4 Press the 4 way button to move the area you want to see 5 Use the zoom lever to zoom back...

Страница 30: ...e playback mode To view a video clip 1 Press playback button to switch to Playback mode 2 Press left right button to select the video clip you want to view 3 Press UP button to start playing the video...

Страница 31: ...from left to right Applies a transition effect from upper left side to lower right side Applies a horizontal transition effect Applies a vertical transition effect Applies a horizontal transition eff...

Страница 32: ...o protect single lock all images unlock all images then press OK Voice memo Inserts a voice annotation to an image file To record a voice memo 1 Press playback button to switch to Playback mode 2 Pres...

Страница 33: ...rt image to black white Negative Colors become the opposite of what they were in the original image Mosaic Applies a mosaic tile effect to the image Vivid Red The image becomes reddish Vivid Green The...

Страница 34: ...ile to a smaller size and overwrites the image file or saves it as another new file To resize an image 1 Press playback button to switch to Playback mode 2 Press left right button to select the image...

Страница 35: ...t copies in advance using the camera This is extremely convenient for sending the images to a photo developing service or for printing on a direct print function compatible printer To set up DPOF 1 Pr...

Страница 36: ...rking with computer and AV system 60 edit files To connect the camera to a computer 1 Open the USB AV port cover 2 Connect the end of the smaller plug of the USB cable to the camera 3 Turn on the came...

Страница 37: ...o input jack left channel on your AV system 4 Turn on the AV system and then switch to the AV source connecting to the camera 5 Turn on the camera 6 Follow the on screen instructions to operate the ca...

Страница 38: ...rint 5 Turn on the camera 6 Select Printer and wait for the connection 7 Select one of the following options To print one image at a time select Print Select and press left or right button to select a...

Страница 39: ...e no power Replace the batteries The battery power is draining quickly The external temperature is extremely low Many shots are being captured in dark places requiring a flash The batteries or camera...

Страница 40: ...r running Windows and that the drive for loading image files has free space equal to or greater than the memory card in the camera There is no power being supplied to the camera Replace the batteries...

Страница 41: ...ity Normal Fine Super Fine Anti shake Yes White Balance Auto Daylight Cloudy Tungsten Fluorescent H Fluorescent L Manual Exposure 2 0 2 0 EV 0 3EV step ISO Auto ISO50 100 200 400 800 1600 Flash Auto F...

Страница 42: ...Englis h Interface Digital output USB 2 0 compatible Audio Video output NTSC PAL PictBridge compatible...

Отзывы: