Vivitar ViviCam X029 Скачать руководство пользователя страница 7


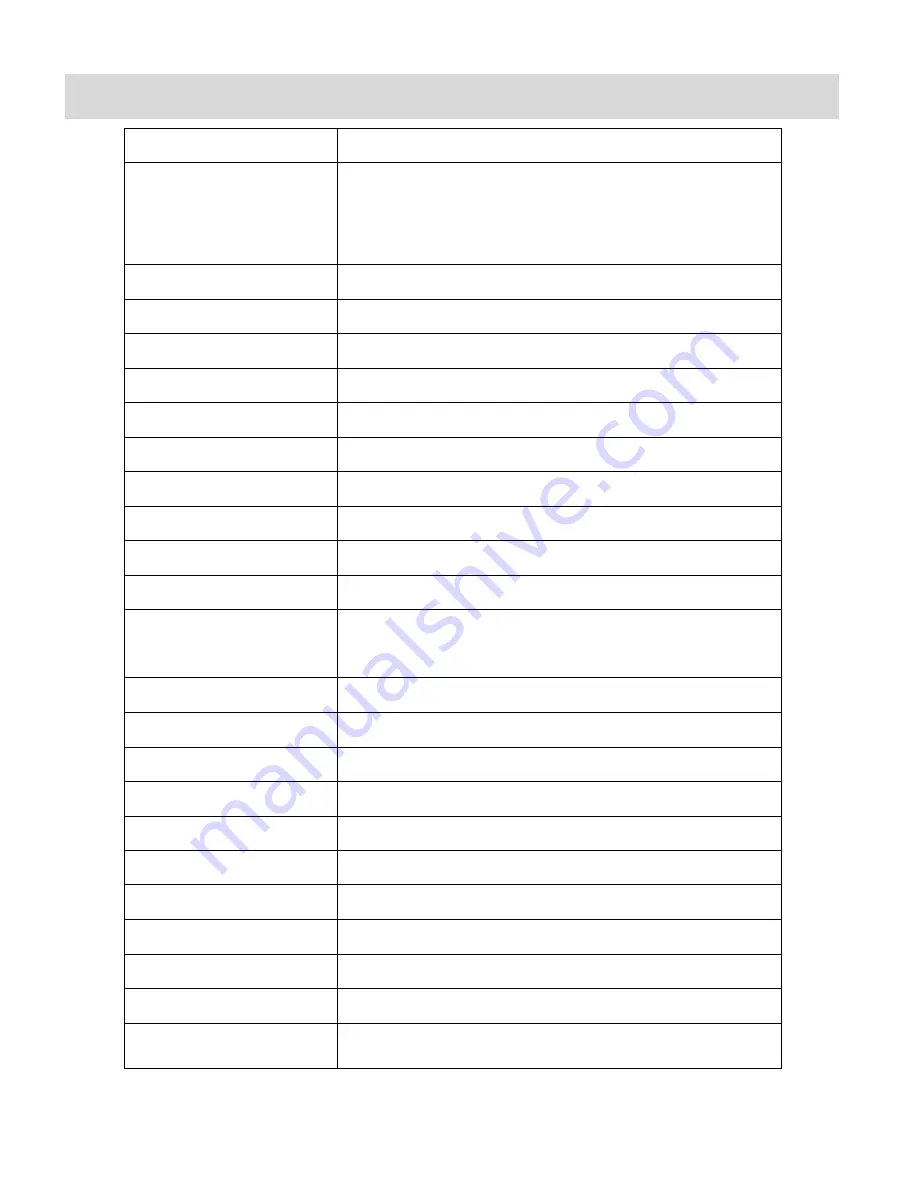
Camera Technical Specifications 


Image Sensor 

CMOS Sensor 

Image Resolution 

3648x2736(10M);3264x2448(8M);3648x2048(7MHD); 

2592x1944(5M);2048x1536(3M);  1920x1080  (2M  HD); 

640x480(VGA) 

Video Resolution 

640X480 pixels (30 fps), 320X240 pixels (30 fps) 

File Format 

JPEG/AVI 

Internal Memory 

1 Test Photo Use Only 

External Memory 

SD Card (up to 32GB) 

LCD Display 

2.7 Inch TFT LCD 

Lens 

f=7mm F3.0 

Zoom 

4X Digital Zoom 

Exposure 

-3.0EV ~ +3.0EV 

White Balance 

Auto, Daylight, Cloudy, Incandescent , Fluorescent 

ISO 

Auto / 100 / 200 / 400 

Scene 

Auto / Scenery / Portrait / Night Scenery / Night Portrait 

/ High Sensitivity / Sport / Beach / Party 

Flash 

Auto/Force/Red Eye/Off 

Self-Timer 

2,5or 10 sec delay 

Anti-Shake 

Yes 

Print Photos 

Yes 

Multi Snapshots 

Yes (6 continuous photos)   

Face Detect 

Yes 

Smile Capture 

Yes 

Interface 

USB 2.0 

System Requirements 

Windows XP and above / Mac OSX 10.5 and above     

Battery 

Lithium (BL-4C) 

Working Temperature 

0~40 


Содержание ViviCam X029

Страница 1: ...al Camera User Manual 2010 Sakar International Inc All rights reserved Windows and the Windows logo are registered trademarks of Microsoft Corporation All other trademarks are the property of their re...

Страница 2: ...nging Camera Mode 11 Navigating the Menus 11 Photo Capture Mode 12 Photo Playback Mode 29 Video Capture Mode 36 Video Playback Mode 49 Installing the Software 53 Connecting the Camera to the Computer...

Страница 3: ...our camera needs an SD Memory card up to 32GB for normal use SD Memory cards are not included and need to be purchased separately Please read this manual carefully first in order to get the most out o...

Страница 4: ...oom In 6 Multi Function Key 2 Zoom Out 7 Flash Up Slideshow 8 Playback Right Button 9 Video Mode Down Button 10 SET button 11 ViviLink Left Button 12 Microphone 13 Flash Light 14 USB Slot 15 Tripod So...

Страница 5: ...4 Quick Setup Installing the Battery Installing Memory Card Turning On the Camera Using the Camera SD Memory card up to 32GB needed for normal use Accessing the menu...

Страница 6: ...DE button once to open the Video Capture mode To take a video aim your camera as desired and press the Shutter button to start the record A red record indicator will appear on the LCD screen while rec...

Страница 7: ...7 Inch TFT LCD Lens f 7mm F3 0 Zoom 4X Digital Zoom Exposure 3 0EV 3 0EV White Balance Auto Daylight Cloudy Incandescent Fluorescent ISO Auto 100 200 400 Scene Auto Scenery Portrait Night Scenery Nig...

Страница 8: ...k space 1024 x 768 Recommended screen resolution 16 bit color or higher display adaptor CD ROM Drive QuickTime 6 or higher Microsoft Internet Explorer 7 or higher Windows Media Player 10 or higher Int...

Страница 9: ...the other end to the USB slot of the camera 3 Alternatively connect the USB cable to the USB slot on the camera and to the USB port of your computer 4 The LED on the back of the camera lights up 5 Whe...

Страница 10: ...would like to continue with the initial camera setup A message will appear Continue with Camera Setup Select Yes to continue or No to exit the setup Note If you select No and decide to leave the came...

Страница 11: ...on to confirm the selection 3 After the ViviLink Video option is confirmed the camera is now ready to use Using Your Digital Camera Make sure the batteries have been inserted properly into your digita...

Страница 12: ...o change the active camera mode make sure the camera is powered ON and press the MODE button on the back of the camera When in Photo Capture Mode this icon will display on the top left corner of the L...

Страница 13: ...Capture Mode The Photo Capture mode allows you to capture pictures with your digital camera Taking a Picture 1 While in Photo Capture mode use the LCD display on the back of the camera to direct the...

Страница 14: ...o capture images at very close range To enable the Macro mode slide the Macro Switch on the side of your camera to the flower icon When enabled the Macro mode will allow your camera to focus on an obj...

Страница 15: ...14 Photo Capture Mode Menus The following are the menus that appear in your camera s Photo Capture Mode...

Страница 16: ...on the LCD screen 6 Remember that this setting will be saved by your camera until you manually change the setting or restore the camera s default factory settings Image Resolution Menu The Image Reso...

Страница 17: ...select the desired option 5 A selected option icon will appear on the selected item 6 Press the LEFT or RIGHT button to select the next menu item 7 Press the the bottom Multi Function Key 2 button to...

Страница 18: ...gs Anti Shake Menu The Anti Shake feature reduces image distortion that can be caused by movement of the camera while capturing the image 1 Press the SET button to open the menus for the current mode...

Страница 19: ...he picture as seen on the LCD screen Facing the camera The face of the subject s you are photographing must be facing the camera and must hold the pose for at least 4 to 5 seconds until the green squa...

Страница 20: ...old the pose for at least 4 to 5 seconds until the green square s appears around the subject s face Once a smile is detected the camera will automatically take the picture Smile Capture will not work...

Страница 21: ...selected item 6 Press the LEFT or RIGHT button to select the next menu item 7 Press the the bottom Multi Function Key 2 button to exit the menu and return to your previous mode 8 An icon reflecting yo...

Страница 22: ...on control buttons to scroll through the menu options 4 Press the SET button or the top Multi Function Key 1 button to select the desired option 5 A selected option icon will appear on the selected it...

Страница 23: ...when the environment is lighter or darker than normal When the environment has more light than is needed reduce the exposure setting by using the negative count to reduce the amount of light allowed...

Страница 24: ...e menus for the current mode 2 Press the LEFT or RIGHT direction control buttons to scroll and select the chosen menu 3 Press the UP or DOWN direction control buttons to scroll through the menu option...

Страница 25: ...button to select the desired option 5 A selected option icon will appear on the selected item 6 Press the LEFT or RIGHT button to select the next menu item 7 Press the the bottom Multi Function Key 2...

Страница 26: ...n The timestamp will appear on photos taken Off The date stamp will not appear on photos taken To Enable Disable the Timestamp 1 Press the SET button to open the menus for the current mode 2 Press the...

Страница 27: ...ious screen Silent Mode Menu You have the option of activating the camera s silent mode to disable all of the sound effects that the camera emits when performing camera functions 1 Press the SET butto...

Страница 28: ...ext menu item 7 Press the the bottom Multi Function Key 2 button to exit the menu and return to your previous mode 8 Remember that this setting will be saved by your camera until you manually change t...

Страница 29: ...Press the SET button to open the menus for the current mode 2 Press the LEFT or RIGHT direction control buttons to scroll and select the chosen menu 3 Press the UP or DOWN direction control buttons t...

Страница 30: ...mode by default Press the RIGHT Playback direction button to open the Playback Mode The playback mode will allow you to review and edit photos and videos that you ve already taken with you camera View...

Страница 31: ...n Playback mode the following menus appear when pressing the SET button Button Action Left Displays the PREVIOUS image Up Views all the Photos as a Slide Show with 3 5 or 10 second intervals Right Dis...

Страница 32: ...stinastion will only be assigned to a photo or video if you manually set it from this menu or from the ViviLink menu in Capture mode accessible with the Vivilink Quick Function button in Capture mode...

Страница 33: ...4 Press the SET button or the top Multi Function Key 1 to open the crop option 5 The crop window will open on the selected picture 6 Use the directional buttons to move the crop box to define the desi...

Страница 34: ...image in the playback mode Photos that are not locked will not display the lock symbol 8 Remember that you cannot delete or edit photos while they are locked Delete Menu While in the playback mode yo...

Страница 35: ...lti Function Key 2 to exit the menu and return to your previous mode Print Photos Menu You can use the Print Photos menu to print the photos that are on your camera directly to a Pictbridge compatible...

Страница 36: ...menu allows you to set the interval length of time that each picture will display during the slideshow 1 Press the SET button to open the menus for the current mode 2 Press the LEFT or RIGHT directio...

Страница 37: ...In and the bottom Multi Function Key 2 to Zoom Out if desired 3 Press the Shutter button on the top of the camera to start the video capture 4 You will see a red icon at the top of the LCD indicating...

Страница 38: ...you to choose a scene settings that allows your camera to adapt properly to your current environment 1 Press the SET button to open the menus for the current mode 2 Press the LEFT or RIGHT direction...

Страница 39: ...in mind that images with a higher resolution will also take up more of your camera s memory 1 Press the SET button to open the menus for the current mode 2 Press the LEFT or RIGHT direction control b...

Страница 40: ...the menu and return to your previous mode 8 An icon reflecting your selection will display on the LCD screen 9 Remember that this setting will be saved by your camera until you manually change the set...

Страница 41: ...croll through the menu options 4 Press the SET button or the top Multi Function Key 1 button to select the desired option 5 A selected option icon will appear on the selected item 6 Press the LEFT or...

Страница 42: ...l buttons to scroll through the menu options 4 Press the SET button or the top Multi Function Key 1 button to select the desired option 5 A selected option icon will appear on the selected item 6 Pres...

Страница 43: ...ll be saved by your camera until you manually change the setting or restore the camera s default factory settings ISO Menu The ISO menu allows you to set the level of sensitivity that your camera has...

Страница 44: ...ndard conditions the camera divides and adjusts the settings of the image into several zones for light metering such as complex light conditions position of subject brightness background direct light...

Страница 45: ...red option 5 A selected option icon will appear on the selected item 6 Press the LEFT or RIGHT button to select the next menu item 7 Press the the bottom Multi Function Key 2 button to exit the menu a...

Страница 46: ...the SET button to open the menus for the current mode 2 Press the LEFT or RIGHT direction control buttons to scroll and select the chosen menu 3 Press the UP or DOWN direction control buttons to scro...

Страница 47: ...a will automatically power off When the camera sits idle for the designated period of time the camera will shut off completely and will need to be turned on again with the power button before the next...

Страница 48: ...n icon will appear on the selected item 6 Press the LEFT or RIGHT button to select the next menu item 7 Press the the bottom Multi Function Key 2 button to exit the menu and return to your previous mo...

Страница 49: ...been formatted clean Firmware Menu Use this menu to view the Firmware version on your camera or to reset your camera settings to the Factory Default Settings 1 Press the SET button to open the menus...

Страница 50: ...would like to play press the Shutter button to start playing the video 2 Press the Shutter button again to pause the video and continue playing and pausing as needed 3 To fully stop the video press t...

Страница 51: ...displayed Bottom Multi Function Key 2 Reverts back to the Photo Capture mode Down Opens the Thumnail view mode Video Playback Mode Menus After selecting a video in Playback mode the following menus ap...

Страница 52: ...site will also make the selected site the new default ViviLink option A new default can be selected at any time through this menu Protect Lock Menu Pictures and Videos taken with your camera can be pr...

Страница 53: ...ption 8 You will be asked to confirm your selection 9 Press the UP or DOWN direction control buttons to select Yes to delete or No to cancel the delete request 10 Press the SET button or the top Multi...

Страница 54: ...ation s CD DVD drive and click on Setup exe to launch the installer 3 On Macintosh Click the icon that appears on the desktop to install the Vivitar Experience Image Manager 4 If you do not have inter...

Страница 55: ...led and then click Install 11 Please wait while the application continues the installation process on your computer 12 On PC Click the Close button when the installation is complete Click the Launch V...

Страница 56: ...n it will be selected automatically 5 Select a location on the computer where to place the new photo and video files 6 Add the new photo and video files to albums if desired 7 Select to remove the med...

Страница 57: ...plication s Home page Transfer media from my camera to my computer manually Using Windows 1 Use the USB cable that came with your camera to connect your camera to your computer 2 MSDC appears on the L...

Страница 58: ...ur computer Optionally select the files and choose Copy from the Finder s Edit menu Then select a folder and choose Paste from the Edit menu 6 We recommend that you copy the images into the Pictures f...

Страница 59: ...se including but limited to repair by unauthorized parties tampering modification or accident What To Do When Service Is Required When returning your defective product postage pre paid for service you...

Страница 60: ...button to take some sample photos and then try downloading them again With test photos if the camera powers off before you upload them to the computer the photos are not stored in the camera s memory...

Отзывы: