4
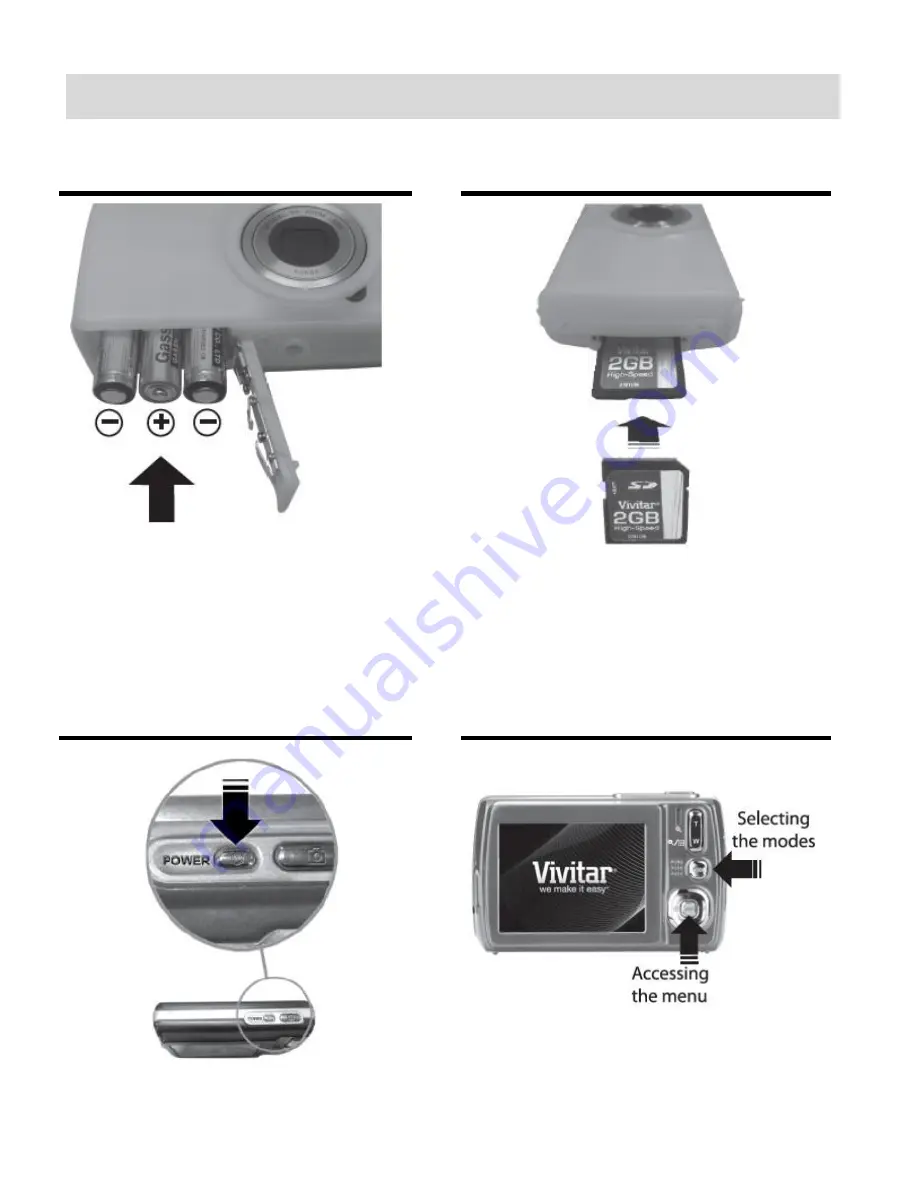
Initial Camera Setup
Installing the Batteries
Installing the Memory Card
Insert 3 X AAA (1.5V) batteries.
Alkaline batteries recommended.
Insert SD Memory card (up to 32GB)
before use.
Turning On the Camera
Using the Camera
Страница 1: ...Camera User Manual 2009 2012 Sakar International Inc All rights reserved Windows and the Windows logo are registered trademarks of Microsoft Corporation All other trademarks are the property of their...
Страница 2: ...Camera Mode 11 Navigating the Menus 12 Photo Capture Mode 13 Photo Playback Mode 31 Video Capture Mode 38 Video Playback Mode 51 Installing the Software 55 Connecting the Camera to the Computer 56 Ge...
Страница 3: ...ossible Please read this manual carefully first in order to get the most out of your digital camera Note Your camera needs an SD Memory card up to 32GB for normal use SD Memory cards are not included...
Страница 4: ...CD Screen 14 Flash Light 4 LED 15 USB Slot 5 Zoom In 16 Tripod Mount 6 Zoom Out 17 Optical Lens 7 MODE button 18 Battery Compartment 8 SET button 19 SD Memory Card Slot 9 Scene Left Button 20 Wrist St...
Страница 5: ...Camera Setup Installing the Batteries Installing the Memory Card Insert 3 X AAA 1 5V batteries Alkaline batteries recommended Insert SD Memory card up to 32GB before use Turning On the Camera Using t...
Страница 6: ...ome features such as Flash will not work if the battery power level is low When the battery power is low the battery icon turns red and the camera will automatically turn off a few seconds later Recha...
Страница 7: ...he SD card 3 Power On Press the POWER button to turn on the camera Setting the Camera Language 1 You will first be prompted to select a language for the camera The Language selection menu will appear...
Страница 8: ...e camera setup Setting the ViviLink Default Option Once the Date and Time have been set you will be asked to set the default ViviLink destination for photos and videos taken with your camera The ViviL...
Страница 9: ...DE button once to open the Video Capture mode To take a video aim your camera as desired and press the Shutter button to start the record A red record indicator will appear on the LCD screen while rec...
Страница 10: ...to 32GB LCD Display 2 7 Inch TFT Lens f 6 0 12 18mm F3 0 4 5 Zoom 3 X Optical Zoom 4 X Digital Zoom Exposure 3 0EV 3 0EV White Balance Auto Daylight Cloudy Fluorescent Incandescent ISO Auto 100 200 4...
Страница 11: ...lor monitor 1024 X 768 recommended screen resolution CD ROM Drive QuickTime 6 or higher Microsoft Internet Explorer 7 or higher Windows Media Player 10 or higher DirectX 9 or higher Internet connectio...
Страница 12: ...point to turn your camera OFF You will see a Goodbye splash screen and then the camera will power off completely Note Your digital camera also has an Auto Power Off feature that will automatically tu...
Страница 13: ...urrent mode 2 Press the LEFT or RIGHT direction control button to scroll between the various menus for the current mode 3 Press the UP or DOWN direction control button to highlight the desired menu se...
Страница 14: ...gular box on the right side of the LCD screen according to the zoom used The bottom section of the box shows the Optical Zoom and the top section displays the Digital Zoom To use the Optical Zoom Pres...
Страница 15: ...utter Captures the photo SET Opens the menu options for Photo Capture Mode Saves your selected menu option Note To navigate through the Menus use the UP DOWN LEFT RIGHT direction buttons MODE Toggles...
Страница 16: ...is OFF the mountain icon appears on the LCD display Flash Type Description Forced Off Default No flash will appear Use this when you do not want to activate Flash A Auto Flash When you want the camer...
Страница 17: ...16 Photo Capture Mode Menus The following are the menus that appear in your camera s Photo Capture Mode...
Страница 18: ...o select the next menu item 7 Press the MODE button to exit the menu and return to your previous mode 8 An icon reflecting your selection will display on the LCD screen 9 Remember that this setting wi...
Страница 19: ...icon will appear on the selected item 6 Press the LEFT or RIGHT button to select the next menu item 7 Press the MODE button to exit the menu and return to your previous mode 8 An icon reflecting your...
Страница 20: ...y movement of the camera while capturing the image 1 Press the SET button to open the menus for the current mode 2 Press the LEFT or RIGHT direction control button to scroll and select the Anti Shake...
Страница 21: ...rs from the camera and the face must cover at least 20 1 5th of the picture as seen on the LCD screen Facing the camera The face of the subject s you are photographing must be facing the camera and mu...
Страница 22: ...h the menu options 4 Press the SET button to select and save the desired option 5 A selected option icon will appear on the selected item 6 Press the LEFT or RIGHT button to select the next menu item...
Страница 23: ...roll and select the Color Effect menu 3 Press the UP or DOWN direction control button to scroll through the menu options 4 Press the SET button to select and save the desired option 5 A selected optio...
Страница 24: ...taken with your camera The sharpness level dictates if the edges of objects in the image are more or less distinct 1 Press the SET button to open the menus for the current mode 2 Press the LEFT or RIG...
Страница 25: ...button to select the next menu item 7 Press the MODE button to exit the menu and return to your previous mode 8 An icon reflecting your selection will display on the LCD screen 9 Remember that this s...
Страница 26: ...ivides and adjusts the settings of the image into several zones for light metering such as complex light conditions position of subject brightness background direct light and scenes Spot Meters the ar...
Страница 27: ...the image will include a time stamp with the date and time that the image was taken The Date Time menu allows you to set your camera s date and time as desired You can also disable the timestamp for f...
Страница 28: ...e the option of activating the camera s Silent mode to disable all of the sound effects except for beeps heard during the Self Timer countdown that the camera emits when performing camera functions NO...
Страница 29: ...irection control button to scroll through the menu options 4 Press the SET button to select and save the desired option 5 A selected option icon will appear on the selected item 6 Press the LEFT or RI...
Страница 30: ...that formatting the memory card will permanently delete all of the content on your camera s memory card This option will delete all of the content at one time If you would like to delete individual i...
Страница 31: ...to the factory default settings 6 If you would like to proceed with the reset select Yes and press the SET button to confirm The settings will be reset You will automatically exit the menu and return...
Страница 32: ...he LCD screen 2 Zooming In Out of your selected Photo Press the T Zoom In button to Zoom In and magnify the selected photo Use the UP DOWN LEFT RIGHT direction buttons to navigate around the photo Pre...
Страница 33: ...isplays the NEXT image Down ViviLink Opens the ViviLink for Photos menu Other W Zoom out Opens Thumbnail View To Navigate in the Thumbnail View press the UP DOWN LEFT RIGHT direction buttons To select...
Страница 34: ...want to delete the current image select No and press the SET button The photo will not be deleted and you will exit the menu and return to the Playback mode 6 To delete all the images videos and photo...
Страница 35: ...splay 8 Remember that the ViviLink feature is deactivated by default A ViviLink destination will only be assigned to a photo or video if you manually set it from this menu or from the ViviLink menu in...
Страница 36: ...he cropped picture appear press the Shutter button again to save or press the SET button to cancel and return to the previous menu 10 If you selected to save the cropped picture will now be saved as a...
Страница 37: ...ridge printer 7 Connect the USB cable provided in the package from the camera to the Pictbridge port of the printer 8 Once connected follow the instructions on the printer to proceed with the printing...
Страница 38: ...button to exit the menu and return to your previous mode 8 While in Playback mode press the UP Quick Function button to initiate the slide show 9 Press any button to exit the slide show and return to...
Страница 39: ...n according to the zoom used The bottom section of the box shows the Optical Zoom and the top section displays the Digital Zoom To use the Optical Zoom Press the T Zoom In and W Zoom Out buttons The O...
Страница 40: ...her Shutter STARTS STOPS the video capture SET Opens the menu options for Video Capture Mode Saves your selected menu option Note To navigate through the Menus use the UP DOWN LEFT RIGHT direction but...
Страница 41: ...40 Video Capture Mode Menus The following are the menus that appear in your camera s Video Capture Mode...
Страница 42: ...nge the setting or restore the camera s default factory settings Image Size Menu The Image Size menu allows you to choose the desired size of the images taken by your camera Keep in mind that images w...
Страница 43: ...reen 9 Remember that this setting will be saved by your camera until you manually change the setting or restore the camera s default factory settings Macro Menu With the Macro feature you can capture...
Страница 44: ...the SET button to open the menus for the current mode 2 Press the LEFT or RIGHT direction control button to scroll and select the White Balance menu 3 Press the UP or DOWN direction control button to...
Страница 45: ...pness menu 3 Press the UP or DOWN direction control button to scroll through the menu options 4 Press the SET button to select and save the desired option 5 A selected option icon will appear on the s...
Страница 46: ...the level of sensitivity that your camera has to light in the surrounding environment When the ISO level is increased the image sensor in your camera will be more sensitive to light and allow you to...
Страница 47: ...2 Press the LEFT or RIGHT direction control button to scroll and select the Metering menu 3 Press the UP or DOWN direction control button to scroll through the menu options 4 Press the SET button to...
Страница 48: ...the Timestamp 1 Press the SET button to open the menus for the current mode 2 Press the LEFT or RIGHT direction control button to scroll and select the Date Time menu 3 Press the UP or DOWN direction...
Страница 49: ...next use 1 Press the SET button to open the menus for the current mode 2 Press the LEFT or RIGHT direction control button to scroll and select the Auto Power Off menu 3 Press the UP or DOWN direction...
Страница 50: ...Card menu to delete all of the content that is currently on your camera s memory card Keep in mind that formatting the memory card will permanently delete all of the content on your camera s memory ca...
Страница 51: ...to the factory default settings 6 If you would like to proceed with the reset select Yes and press the SET button to confirm The settings will be reset You will automatically exit the menu and return...
Страница 52: ...eo Press the Shutter button to START playing the video Press the Shutter button again to PAUSE the video and to continue playing and pausing as needed While the Video is playing all the icons on the t...
Страница 53: ...os menu Other Shutter PLAYS and PAUSES a playing video W Zoom out Opens Thumbnail View To Navigate in the Thumbnail View press the UP DOWN LEFT RIGHT direction buttons To select a JPG in the Thumbnail...
Страница 54: ...s of your choice with the accompanying Vivitar Experience Image Manager application 1 Press the SET button to open the menus for the current mode 2 Press the LEFT or RIGHT direction control button to...
Страница 55: ...control button to scroll and select the Protect Lock menu 4 Press the UP or DOWN direction control button to scroll through the menu options 5 Press the SET button to select and save the desired optio...
Страница 56: ...ation s CD DVD drive and click on Setup exe to launch the installer 3 On Macintosh Click the icon that appears on the desktop to install the Vivitar Experience Image Manager 4 If you do not have inter...
Страница 57: ...led and then click Install 11 Please wait while the application continues the installation process on your computer 12 On PC Click the Close button when the installation is complete Click the Launch V...
Страница 58: ...n it will be selected automatically 5 Select a location on the computer where to place the new photo and video files 6 Add the new photo and video files to albums if desired 7 Select to remove the med...
Страница 59: ...mera to my Computer Manually Transferring Photos and Videos WINDOWS 1 Use the supplied USB cable to connect your camera to your computer 2 MSDC appears on the LCD indicating that your camera is now co...
Страница 60: ...Please check your device packaging for compatibility with the iPad Apple iPad Camera Connection For models that are compatible with the iPad photos and videos can be imported from your digital camera...
Страница 61: ...resulting from defects in material or workmanship and damages or malfunctions from other than normal use including but limited to repair by unauthorized parties tampering modification or accident Wha...
Страница 62: ...some sample photos and then try downloading them again With test photos if the camera powers off before you upload them to the computer the photos are not stored in the camera s memory These photos s...