background image


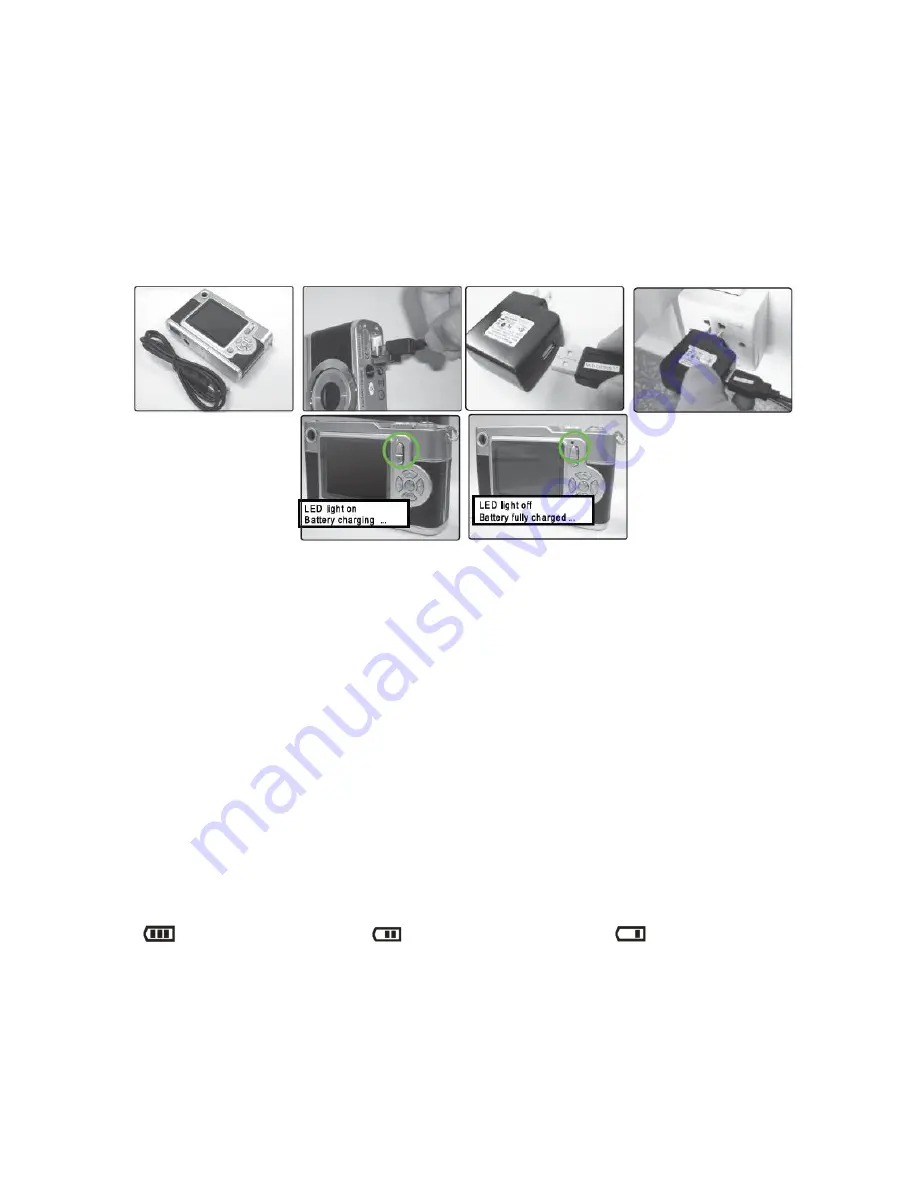
- The charge light will turn off when the battery is fully charged. 

- The LED charge light is ON while the battery is recharging. 

- The LED charge light turns off when the battery is fully charged. 


B. Charge the battery using the USB connection cable (included) and the AC Adapter 

(included). 


- Connect one end of the USB connection cable to the USB port on your camera. 

- Connect the other end to the AC Adapter and then plug the AC Adapter into a power 

socket. 

- The LED charge light is ON while the battery is recharging. 

- The LED charge light turns off when the battery is fully charged. 


Note: 


Some features, such as Flash, will not work if the battery power level is low. 


When the battery power is low the battery icon turns red and the camera will 

automatically turn off a few seconds later.   


The energy status of the power is displayed on LCD as shown below:   


Full battery power         

  Medium battery power     

  Low battery power   


Содержание ViviCam S327

Страница 1: ...Camera User Manual 2009 2012 Sakar International Inc All rights reserved Windows and the Windows logo are registered trademarks of Microsoft Corporation All other trademarks are the property of their...

Страница 2: ...vigating the Menus 14 Photo Capture Mode 15 Photo Playback Mode 32 Video Capture Mode 37 Video Playback Mode 50 Installing the Software 53 Connecting the Camera to the Computer 54 Getting Photos and V...

Страница 3: ...ote Your camera needs an SD Memory card up to 32GB for normal use SD Memory cards are not included and need to be purchased separately Please read this manual carefully first in order to get the most...

Страница 4: ...reen 14 Flash Light 4 LED Charge Lamp 15 USB Slot 5 Zoom In 16 Tripod Mount 6 Zoom Out 17 Digital Lens 7 MODE Button 18 Battery Compartment 8 SET Button 19 SD Memory Card Slot 9 Scene Left Button 20 F...

Страница 5: ...rity is correct Power off the camera Connect the camera with the USB cable either to the AC charger or to the computer Charge light will turn off when battery is fully charged Turning On the Camera Us...

Страница 6: ...y in accordance with the polarity indicated Make sure to insert the lithium battery all the way into the battery compartment The battery latch should cover the battery if inserted correctly Then close...

Страница 7: ...r camera Connect the other end to the AC Adapter and then plug the AC Adapter into a power socket The LED charge light is ON while the battery is recharging The LED charge light turns off when the bat...

Страница 8: ...e SD card has been inserted correctly Note After the camera is powered on an SD icon will appear on the LCD display If you do not see the SD icon on the display please check if the card was inserted p...

Страница 9: ...of your choice by pressing the UP and DOWN direction control buttons Then press the SET button to confirm the selection 2 After selecting a language you will be asked if you would like to continue wit...

Страница 10: ...s photos and videos to the social networks of your choice with the accompanying software application 1 First you will be asked to choose the default ViviLink social network for Photos Press the UP or...

Страница 11: ...DE button once to open the Video Capture mode To take a video aim your camera as desired and press the Shutter button to start the record A red record indicator will appear on the LCD screen while rec...

Страница 12: ...ly External Memory SD Card up to 32GB LCD Display 2 4 Inch TFT Lens f 36 108mm F2 8 4 8 Zoom 4X Digital Zoom 3X Optical Zoom Exposure 3 0EV 3 0EV White Balance Auto Daylight Cloudy Incandescent Fluore...

Страница 13: ...lor monitor 1024 X 768 recommended screen resolution CD ROM Drive QuickTime 6 or higher Microsoft Internet Explorer 7 or higher Windows Media Player 10 or higher DirectX 9 or higher Internet connectio...

Страница 14: ...Photo Capture Mode will be active The icons that appear on the LCD screen are the best default settings so that you can begin to capture and enjoy clear quality photos To change the active camera mode...

Страница 15: ...selection 4 Press the SET button to confirm and select the highlighted menu option 5 If the selection can be remembered by the camera a selection icon will appear to the right of the selected menu op...

Страница 16: ...gular box on the right side of the LCD screen according to the zoom used The bottom section of the box shows the Optical Zoom and the top section displays the Digital Zoom To use the Optical Zoom Pres...

Страница 17: ...s the ViviLink for Photos menu Flash Options There are several Flash options available on your camera The options appear on the Photo Capture Mode LCD screen in the sequence To change the Flash mode p...

Страница 18: ...f flash is needed a second flash will appear upon taking the photo Forced On The flash is enabled for each photo Note If you use this option in a well lit environment your photo may be appear too brig...

Страница 19: ...18 Photo Capture Mode Menus The following are the menus that appear in your camera s Photo Capture Mode...

Страница 20: ...he MODE button to exit the menu and return to your previous mode 8 An icon reflecting your selection will display on the LCD screen 9 Remember that this setting will be saved by your camera until you...

Страница 21: ...ton to select the next menu item 7 Press the MODE button to exit the menu and return to your previous mode 8 An icon reflecting your selection will display on the LCD screen 9 Remember that this setti...

Страница 22: ...Press the SET button to select the desired option 5 A selected option icon will appear on the selected item 6 Press the LEFT or RIGHT button to select the next menu item 7 Press the MODE button to ex...

Страница 23: ...Press the UP or DOWN direction control button to scroll through the menu options 4 Press the SET button to select the desired option 5 A selected option icon will appear on the selected item 6 Press...

Страница 24: ...The White Balance feature allows your camera to adjust the coloring of the captured images depending on the type of light source in the current environment Properly adjusting the White Balance setting...

Страница 25: ...bled the Multi SnapShots feature allows you to take five rapid snapshots in a row with a single click of the Shutter button This feature can be effective when trying to capture a particular moment in...

Страница 26: ...setting or restore the camera s default factory settings Light Exposure Menu The Light Exposure setting helps you control the amount of light that enters your camera s lens This setting should be adj...

Страница 27: ...button to open the menus for the current mode 2 Press the LEFT or RIGHT direction control button to scroll and select the ISO menu 3 Press the UP or DOWN direction control button to scroll through the...

Страница 28: ...exit the menu and return to your previous mode 8 An icon reflecting your selection will display on the LCD screen 9 Remember that this setting will be saved by your camera until you manually change t...

Страница 29: ...now appears to the right of the option name 6 Press the LEFT or RIGHT button to select the next menu item 7 Press the MODE button to exit the menu and return to your previous mode 8 Remember that this...

Страница 30: ...button to select the desired option 5 A selected option icon will appear on the selected item 6 Press the LEFT or RIGHT button to select the next menu item 7 Press the MODE button to exit the menu an...

Страница 31: ...he LEFT or RIGHT direction control button to scroll and select the Frequency menu 3 Press the UP or DOWN direction control button to scroll through the menu options 4 Press the SET button to select th...

Страница 32: ...rmatted 9 A message will appear confirming that your memory card has been formatted clean Firmware Factory Default Settings Menu Use this menu to view the Firmware version on your camera or to reset y...

Страница 33: ...vigate around the photo Press the W Zoom Out button to zoom out on a photo on your camera Thumbnail View Easily navigate and select the image you wish to view by using the Thumbnail View The images on...

Страница 34: ...elect the image you would like to delete 2 Press the SET button to open the menus 3 Scroll to the Delete Menu 4 Press the UP or DOWN direction control buttons to scroll through the menu options 5 To d...

Страница 35: ...ViviLink feature is deactivated by default A ViviLink destination will only be assigned to a photo or video if you manually set it from this menu or from the ViviLink menu in Capture mode accessible...

Страница 36: ...nu 11 If you selected to save the cropped picture will now be saved as a new picture to your memory card Protect Lock Menu Pictures and Videos taken with your camera can be protected or locked to prev...

Страница 37: ...printing process 9 Select the Cancel option to exit the menu and return to the previous mode Slide Show Menu You can view a slideshow of all the pictures taken with your camera by pressing the Up Quic...

Страница 38: ...r box on the right side of the LCD screen according to the zoom used The bottom section of the box shows the Optical Zoom and the top section displays the Digital Zoom To use the Optical Zoom Press th...

Страница 39: ...ectional pad that functions as Quick Function buttons Button Action Left Scene Selection Opens the Scene menu Up Light Exposure Opens the Light Exposure menu Right Delete Opens the Video Playback Dele...

Страница 40: ...39 Video Capture Mode Menus The following are the menus that appear in your camera s Video Capture Mode...

Страница 41: ...ge the setting or restore the camera s default factory settings Image Size Menu The Image Size menu allows you to choose the desired size of the images taken by your camera Keep in mind that images wi...

Страница 42: ...reen 9 Remember that this setting will be saved by your camera until you manually change the setting or restore the camera s default factory settings Anti Shake Menu The Anti Shake feature reduces ima...

Страница 43: ...n to scroll through the menu options 4 Press the SET button to select the desired option 5 A selected option icon will appear on the selected item 6 Press the LEFT or RIGHT button to select the next m...

Страница 44: ...e Color Effect menu 3 Press the UP or DOWN direction control button to scroll through the menu options 4 Press the SET button to select the desired option 5 A selected option icon will appear on the s...

Страница 45: ...ount of light allowed into the lens by your camera If the environment has less light darker than is needed increase the exposure setting by using the positive count to increase the amount of light all...

Страница 46: ...Press the LEFT or RIGHT button to select the next menu item 7 Press the MODE button to exit the menu and return to your previous mode 8 An icon reflecting your selection will display on the LCD screen...

Страница 47: ...desired language from the Language menu 1 Press the SET button to open the menus for the current mode 2 Press the LEFT or RIGHT direction control button to scroll and select the Language menu 3 Press...

Страница 48: ...s default factory settings To Set the Date and Time 1 Highlight the Date Setup menu option 2 Press the SET button to select the desired option 3 The Date Setup submenu will open 4 Scroll through the w...

Страница 49: ...era is set to a frequency that does not match your country s electric current you may see flickering or waves on the images taken by your camera 50Hz UK Europe and Australia 60Hz US Canada and South A...

Страница 50: ...would like to proceed with the format select Yes and press the SET button 5 You will be asked to confirm your wish to format your memory card 6 Select No to exit without formatting 7 Select Yes and p...

Страница 51: ...eo Press the Shutter button to START playing the video Press the Shutter button again to PAUSE the video and to continue playing and pausing as needed While the Video is playing all the icons on the t...

Страница 52: ...from your camera through the Delete menu 1 View the image you would like to delete 2 Press the SET button to open the menus for the current mode 3 Press the LEFT or RIGHT direction control button to s...

Страница 53: ...this menu or from the ViviLink menu in Capture mode accessible with the ViviLink Quick Function button in Capture mode 9 Changing the ViviLink destination site will also make the selected site the new...

Страница 54: ...ation s CD DVD drive and click on Setup exe to launch the installer 3 On Macintosh Click the icon that appears on the desktop to install the Vivitar Experience Image Manager 4 If you do not have inter...

Страница 55: ...lled and then click Install 11 Please wait while the application continues the installation process on your computer 12 On PC Click the Close button when the installation is complete Click the Launch...

Страница 56: ...n it will be selected automatically 5 Select a location on the computer where to place the new photo and video files 6 Add the new photo and video files to albums if desired 7 Select to remove the med...

Страница 57: ...screen Transferring media from my camera to my computer manually Transferring Photos and Videos WINDOWS 1 Use the USB cable that came with your camera to connect your camera to your computer 2 MSDC a...

Страница 58: ...vice packaging for compatibility with the iPad Apple iPad Camera Connection For models that are compatible with the iPad photos and videos can be imported from your digital camera to your iPad by foll...

Страница 59: ...resulting from defects in material or workmanship and damages or malfunctions from other than normal use including but limited to repair by unauthorized parties tampering modification or accident Wha...

Страница 60: ...ake some sample photos and then try downloading them again With test photos if the camera powers off before you upload them to the computer the photos are not stored in the camera s memory These photo...

Отзывы: