background image


Note

:   


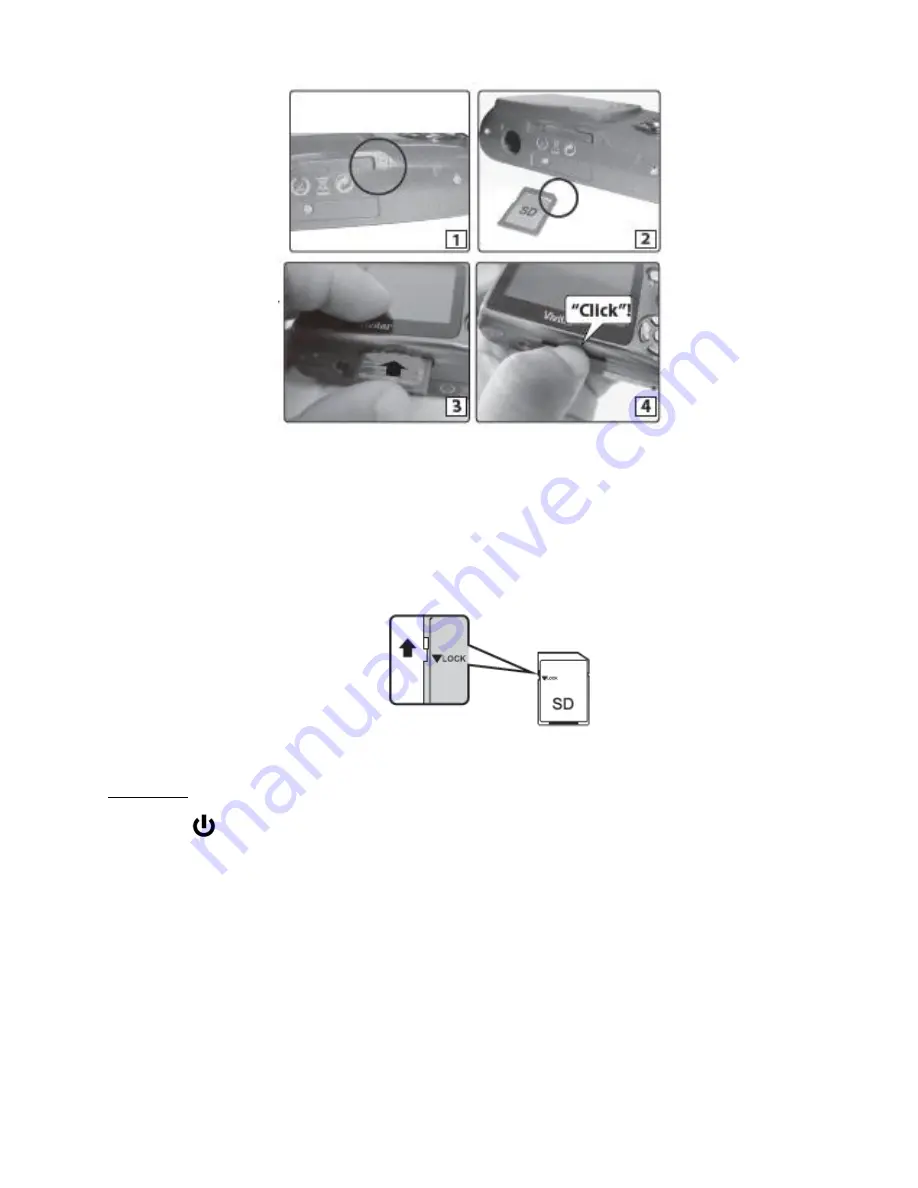
After the camera is powered on, an SD icon will appear on the LCD display. If you do not 

see the SD icon on the display, please check if the card was inserted properly. 


Make sure the SD card is not locked (check the lock switch on the side of the SD card). If 

the SD card is locked this will prevent the camera from saving captured photos to the SD card. 


3) 

Power On 

Press the 


POWER

 button to turn on the camera. 


Setting the Camera Language 

1) 

You will first be prompted to select a language for the camera. The Language selection 

menu will appear. Select the language of your choice by pressing the 

UP

 and 

DOWN


direction control buttons. Then press the 

SET

 button to confirm the selection. 

2) 

After selecting a language, you will be asked if you would like to continue with the initial 

camera setup. A message will appear: “Continue with Camera Setup?”   

Содержание ViviCam 7122

Страница 1: ...Camera User Manual 2009 2012 Sakar International Inc All rights reserved Windows and the Windows logo are registered trademarks of Microsoft Corporation All other trademarks are the property of their...

Страница 2: ...Camera Mode 12 Navigating the Menus 13 Photo Capture Mode 14 Photo Playback Mode 31 Video Capture Mode 38 Video Playback Mode 51 Installing the Software 56 Connecting the Camera to the Computer 57 Ge...

Страница 3: ...ossible Please read this manual carefully first in order to get the most out of your digital camera Note Your camera needs an SD Memory card up to 32GB for normal use SD Memory cards are not included...

Страница 4: ...t 4 Self Timer LED 16 Digital Lens 5 W Zoom Out 17 Battery Compartment 6 T Zoom In 18 SD Memory Card Slot 7 MODE Button 19 MACRO Switch 8 SET Button 20 Wrist Strap Connector 9 Scene Left Button 21 Sel...

Страница 5: ...e Batteries Installing the Memory Card Insert 3 AAA 1 5V batteries Alkaline batteries recommended not included SD Memory card up to 32GB needed for normal use Turning On the Camera Using the Camera Se...

Страница 6: ...ome features such as Flash will not work if the battery power level is low When the battery power is low the battery icon turns red and the camera will automatically turn off a few seconds later Recha...

Страница 7: ...ing captured photos to the SD card 3 Power On Press the POWER button to turn on the camera Setting the Camera Language 1 You will first be prompted to select a language for the camera The Language sel...

Страница 8: ...e to the next part of the camera setup Setting the ViviLink Default Option Once the Date and Time have been set you will be asked to set the default ViviLink destination for photos and videos taken wi...

Страница 9: ...DE button once to open the Video Capture mode To take a video aim your camera as desired and press the Shutter button to start the record A red record indicator will appear on the LCD screen while rec...

Страница 10: ...Display 1 8 Inch TFT Lens f 7 0mm F 3 0 Zoom 4X Digital Zoom Exposure 3 0EV 3 0EV White Balance Auto Daylight Cloudy Fluorescent Incandescent ISO Auto 100 200 400 Scene Auto Scenery Portrait Night Sce...

Страница 11: ...nitor 1024 X 768 recommended screen resolution CD ROM Drive QuickTime 6 or higher Microsoft Internet Explorer 7 or higher Windows Media Player 10 or higher DirectX 9 or higher Internet connection requ...

Страница 12: ...ter powering on the camera emits a sound and the LED light turns on briefly The LCD screen turns on with your camera in Photo Capture mode to start Powering the camera OFF While the camera is on you c...

Страница 13: ...wered ON the Photo Capture Mode will be active The icons that appear on the LCD screen are the best default settings so that you can begin to capture and enjoy clear quality photos To change the activ...

Страница 14: ...nu selection 4 Press the SET button to confirm and save the highlighted menu option 5 If the selection can be remembered by the camera a selection icon will appear to the right of the selected menu op...

Страница 15: ...apture 2 Press the T Zoom In and W Zoom Out buttons to zoom in out if desired Note The actual shape of the zoom buttons may vary per camera model You can magnify your subject up to 4 times using the d...

Страница 16: ...Opens the Delete This Photo option and allows you to view and delete the last photo taken Down ViviLink Opens the ViviLink for Photos menu Other Shutter Captures the photo SET Opens the menu options f...

Страница 17: ...activate Flash NOTE A Turn On Flash message appears when the camera detects a need for flash When this message appears it is recommended to press the Flash Up button and select one of the flash optio...

Страница 18: ...is ON MACRO OFF To turn the Macro mode OFF Slide the Macro Switch on the side of the camera DOWN to the mountain icon The mountain icon will appear on the LCD display When Macro mode is off images ca...

Страница 19: ...18 Photo Capture Mode Menus The following are the menus that appear in your camera s Photo Capture Mode...

Страница 20: ...select the next menu item 7 Press the MODE button to exit the menu and return to your previous mode 8 An icon reflecting your selection will display on the LCD screen 9 Remember that this setting wil...

Страница 21: ...ptions 4 Press the SET button to select and save the desired option 5 A selected option icon will appear on the selected item 6 Press the LEFT or RIGHT button to select the next menu item 7 Press the...

Страница 22: ...gs Anti Shake Menu The Anti Shake feature reduces image distortion that can be caused by movement of the camera while capturing the image 1 Press the SET button to open the menus for the current mode...

Страница 23: ...ton to exit the menu and return to your previous mode 8 An icon reflecting your selection will display on the LCD screen 9 Remember that this setting will be saved by your camera until you manually ch...

Страница 24: ...t the menu and return to your previous mode 8 An icon reflecting your selection will display on the LCD screen 9 Remember that this setting will be saved by your camera until you manually change the s...

Страница 25: ...ent mode 2 Press the LEFT or RIGHT direction control button to scroll and select the Light Exposure menu 3 Press the UP or DOWN direction control button to scroll through the menu options 4 Press the...

Страница 26: ...The Metering setting will affect how your camera focuses when capturing an image Depending on your selection the camera will be more sensitive to focusing on particular areas in the display and adjus...

Страница 27: ...control button to scroll through the menu options 4 Press the SET button to select and save the desired option 5 A selected option icon will appear on the selected item 6 Press the LEFT or RIGHT butto...

Страница 28: ...ontrol button to scroll and select the Date Time menu 3 Press the UP or DOWN direction control button to highlight the Date Setup menu option then press the SET button to select the option 4 The Date...

Страница 29: ...ll automatically power off When the camera sits idle for the designated period of time the camera will shut off completely and will need to be powered on again with the power button before the next us...

Страница 30: ...your previous mode 8 Remember that this setting will be saved by your camera until you manually change the setting or restore the camera s default factory settings Format Memory Card Menu You can use...

Страница 31: ...r the current mode 2 Press the LEFT or RIGHT direction control button to scroll and select the Firmware menu 3 The Default Setting is selected 4 Press the SET button to reset the camera to the factory...

Страница 32: ...appear with a JPG icon on the top left of the LCD screen 2 Zooming In Out of your selected Photo Press the T Zoom In button to Zoom In and magnify the selected photo Use the UP DOWN LEFT RIGHT directi...

Страница 33: ...To exit the Slide Show press any button Right Displays the NEXT image Down ViviLink Opens the ViviLink for Photos menu Other W Zoom out Opens Thumbnail View To Navigate in the Thumbnail View press th...

Страница 34: ...photo Select Delete This Photo and press SET button You will be asked to confirm the deletion of the photo If you would like to proceed with deleting the current image select Yes and press the SET bu...

Страница 35: ...tton to open the menus for the current mode 3 Press the LEFT or RIGHT direction control button to scroll and select the ViviLink menu 4 Press the UP or DOWN direction control button to scroll through...

Страница 36: ...open the menus for the current mode 3 Press the LEFT or RIGHT direction control button to scroll and select the Crop menu 4 Press the UP or DOWN button to highlight the Crop option 5 Press the SET but...

Страница 37: ...lay the lock symbol 9 Remember that you cannot delete or edit photos while they are locked Print This Photo Menu You can use the Print Photos menu to print the photos that are on your camera directly...

Страница 38: ...ection control button to scroll and select the Slide Show menu 3 Press the UP or DOWN direction control button to scroll through the menu options 4 Press the SET button to select and save the desired...

Страница 39: ...n and W Zoom Out buttons to better set the camera display if desired Note The actual shape of these buttons may vary per camera model You can magnify your subject up to 4 times using the digital zoom...

Страница 40: ...r STARTS STOPS the video capture SET Opens the menu options for Video Capture Mode Saves your selected menu option Note To navigate through the Menus use the UP DOWN LEFT RIGHT direction control butto...

Страница 41: ...40 Video Capture Mode Menus The following are the menus that appear in your camera s Video Capture Mode...

Страница 42: ...ge the setting or restore the camera s default factory settings Image Size Menu The Image Size menu allows you to choose the desired size of the images taken by your camera Keep in mind that images wi...

Страница 43: ...9 Remember that this setting will be saved by your camera until you manually change the setting or restore the camera s default factory settings White Balance Menu The White Balance feature allows you...

Страница 44: ...ton to exit the menu and return to your previous mode 8 Remember that this setting will be saved by your camera until you manually change the setting or restore the camera s default factory settings I...

Страница 45: ...T direction control button to scroll and select the Light Exposure menu 3 Press the UP or DOWN direction control button to scroll through the menu options 4 Press the SET button to select and save the...

Страница 46: ...The Metering setting will affect how your camera focuses when capturing an image Depending on your selection the camera will be more sensitive to focusing on particular areas in the display and adjus...

Страница 47: ...control button to scroll through the menu options 4 Press the SET button to select and save the desired option 5 A selected option icon will appear on the selected item 6 Press the LEFT or RIGHT butto...

Страница 48: ...ll and select the Date Time menu 3 Press the UP or DOWN direction control button to highlight the Date Setup menu option then press the SET button to select the option 4 The Date Setup submenu will op...

Страница 49: ...cent lighting sources in your locale If your camera is set to a frequency that does not match your country s electric current you may see flickering or waves on the images taken by your camera 50Hz UK...

Страница 50: ...e format select Yes and press the SET button You will be asked to confirm the formatting of the memory card Select No to exit without formatting Select Yes and press the SET button to begin The memory...

Страница 51: ...button You will automatically exit the menu and return to the previous mode Note After RESETTING to the default settings it is recommended to select your system Language Date Time and ViviLink for Pho...

Страница 52: ...n the LCD screen Videos appear with an AVI icon on the top left of the LCD screen 2 Play your selected video Press the Shutter button to START playing the video Press the Shutter button again to PAUSE...

Страница 53: ...PREVIOUS image Up STOPS a playing video Right Displays the NEXT image Down ViviLink Opens the ViviLink for Videos menu Other Shutter PLAYS and PAUSES a playing video W Zoom out Opens Thumbnail View To...

Страница 54: ...oceed with deleting the current image select Yes and press the SET button to confirm The video will be deleted and you will exit the menu and return to the Playback mode If you do not want to delete t...

Страница 55: ...tton to scroll and select the ViviLink menu 4 Press the UP or DOWN direction control button to scroll through the menu options 5 Press the SET button to select and save the desired option 6 A selected...

Страница 56: ...ontrol button to scroll and select the Protect Lock menu 4 Press the UP or DOWN direction control button to scroll through the menu options 5 Press the SET button to select and save the desired option...

Страница 57: ...ation s CD DVD drive and click on Setup exe to launch the installer 3 On Macintosh Click the icon that appears on the desktop to install the Vivitar Experience Image Manager 4 If you do not have inter...

Страница 58: ...led and then click Install 11 Please wait while the application continues the installation process on your computer 12 On PC Click the Close button when the installation is complete Click the Launch V...

Страница 59: ...n it will be selected automatically 5 Select a location on the computer where to place the new photo and video files 6 Add the new photo and video files to albums if desired 7 Select to remove the med...

Страница 60: ...s Home screen Transferring Images from my Camera to my Computer Manually Transferring Photos and Videos WINDOWS 1 Use the USB cable that came with your camera to connect your camera to your computer...

Страница 61: ...tionally select the files and choose Copy from the Finder s Edit menu Then select a folder and choose Paste from the Edit menu 6 We recommend that you copy the images into the Pictures folder and the...

Страница 62: ...se including but limited to repair by unauthorized parties tampering modification or accident What To Do When Service Is Required When returning your defective product postage pre paid for service you...

Страница 63: ...me sample photos and then try downloading them again With test photos if the camera s power is off before you upload them to the computer the photos are not stored in the camera s memory These photos...

Отзывы: