Vivitar Vivicam 6300 Скачать руководство пользователя страница 34

EN-34

ADVANCED SHOOTING

Burst

This mode is used for continuous shooting. Pictures are taken continuously while the shutter release
button is pressed.

1. Rotate the mode dial to 

A

 , 

P

 , 

SCENE

 , 

Tv

 , 

Av

 or 

M

 and turn

your ViviCam 6300 on by pressing the   button.

„

„

„

„

„

In 

(Auto) Mode, press   to access in menu directly.
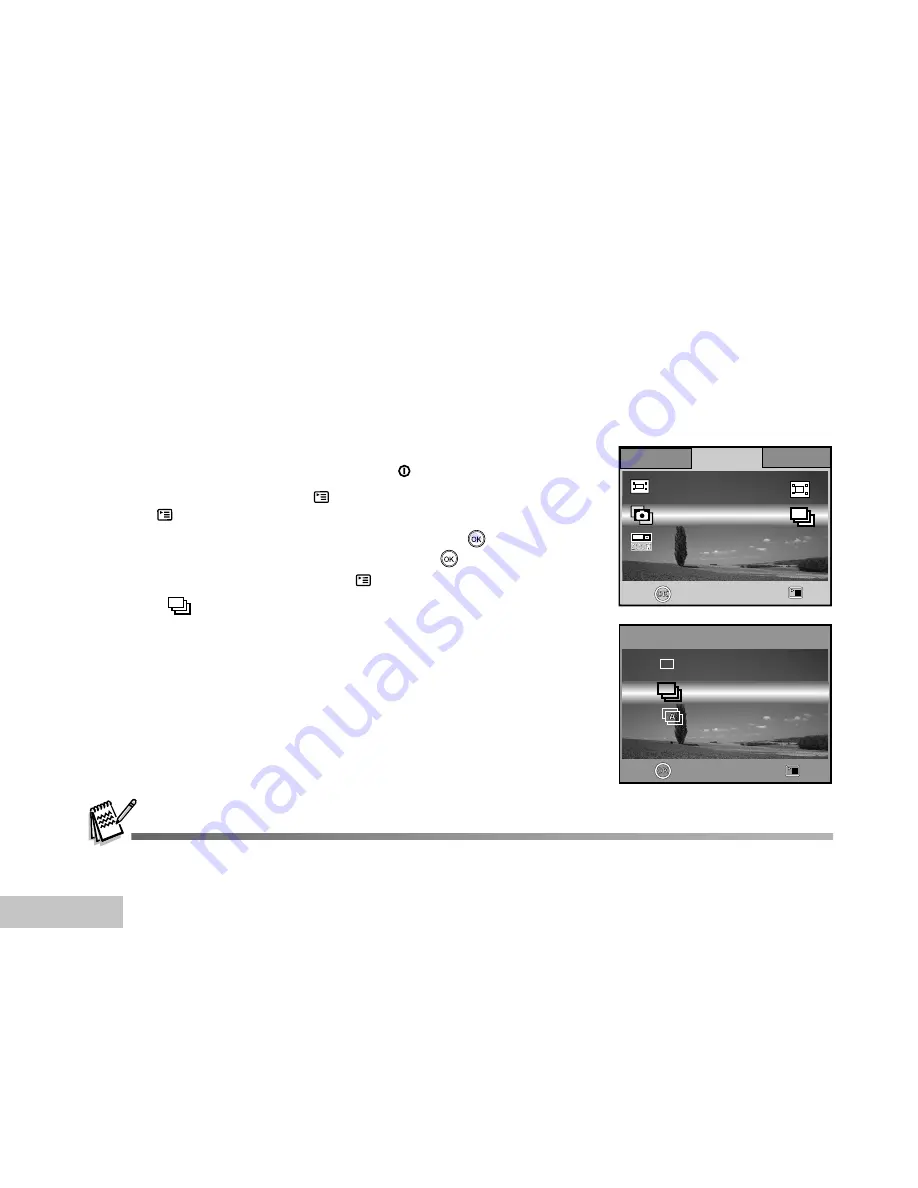
2. Press   , then use 

X

 to select the [Mode2] menu.

3. Use 

T

 to select [Capture Mode], then press the 

 button.

4. Use 

S

 or 

T

 to select [Burst], then press the 

 button.

5. To exit from the menu, press the   button.

„

„

„

„

„

The 

 indicator is displayed on the monitor screen.

6. Press the shutter button halfway to lock the focus.
7. Press the shutter button all the way to shoot.

„

„

„

„

„

Shooting will stop when the shutter button is released.

„

In Burst mode, the flash mode will be set to 

OFF

 automatically.

Capture Mode

Burst

Single

X1

AEB

2 / 3

Set :

Exit :

Mode1

Mode2

2 / 3

Mode3

Capture Mode

Metering

Set :

Exit :

Digital Zoom

Digital Zoom

On

Содержание Vivicam 6300

Страница 1: ...cations However there is no guarantee that interference will not occur in a particular installation If this equipment does cause harmful interference to radio or television reception which can be dete...

Страница 2: ...rom those described in this manual This is due to the fact that different retailers often specify slightly different product inclusions and accessories to suit their market requirements customer demog...

Страница 3: ...ire or electric shock For repair or internal inspection ask the store of purchase Use the supplied AC adapter only with the indicated power supply voltage Use with any other power supply voltage might...

Страница 4: ...mera This might cause damage to the camera Do not use the camera in humid steamy smoky or dusty places This might cause fire or electric shock Do not remove the battery immediately after long period o...

Страница 5: ...r hands carefully if you touch the battery fluid When using batteries carefully read and strictly observe the Safety Instructions and the notes described below Ni MH rechargeable batteries are highly...

Страница 6: ...Screen Language 19 Setting the Date and Time 20 Formatting an SD Memory Card or Internal Memory 21 Using the LCD Monitor 22 PHOTOGRAPHY MODE 23 Shooting Images The Basics 23 Setting Image Resolution a...

Страница 7: ...MPUTER 51 Step 1 Install the USB driver 52 Step 2 Connect the ViviCam 6300 to your computer 53 Step 3 Download images or video clips 54 EDITING SOFTWARE INSTALLATION 55 Installing Photo Explorer 55 In...

Страница 8: ...memory Images can be captured without using a memory card Support for SD memory card for memory expansion You may wish to expand the memory capacity up to 1GB capacity by using an external memory card...

Страница 9: ...sories that come with your ViviCam 6300 may be different from those described in this manual This is due to the fact that different retailers often specify slightly different product inclusions and ac...

Страница 10: ...TO KNOW YOUR VIVICAM 6300 Front View 2 3 4 1 9 8 7 6 5 10 1 Shutter button 2 Flash 3 Microphone 4 Lens 5 Power button 6 Mode dial 7 Self timer LED 8 Viewfinder window 9 PC USB AV Out terminal 10 DC i...

Страница 11: ...wide angle button Thumbnail button 5 Playback button 6 Strap holder 7 S Arrow button Up Focus button 8 W Arrow button Left Flash button 9 X Arrow button Right Self timer button 10 T Arrow button Down...

Страница 12: ...elect this mode to record video clips 5 Setup Select this mode to adjust VIVICAM 6300 settings 6 M Manual Select this mode to permit full manual control over exposure aperture and other settings 7 Av...

Страница 13: ...internal memory SD Status of SD memory card 6 Remaining battery status Full battery power Medium battery power Low battery power No battery power 7 Self timer mode OFF 2 sec delay 10 sec delay 10 2 1...

Страница 14: ...memory card indicator if present 3 Battery power indicator 4 Playback information Video Playback 1 Playback mode 2 Video mode 3 SD memory card indicator if present 4 Battery power indicator 5 Playbac...

Страница 15: ...eries 1 Make sure the ViviCam 6300 is turned off 2 Open the battery cover 3 Insert the batteries in the correct orientation as shown in the illustration 4 Close the battery cover To remove the batteri...

Страница 16: ...0V 3 Connect the other end to an electrical outlet Make sure to use only the AC power adapter specified for the ViviCam 6300 Damage caused by the use of an incorrect adapter is not covered under the...

Страница 17: ...the ViviCam 6300 is turned off Press lightly on the edge of the memory card and it will eject Be sure to format an SD memory card with this ViviCam 6300 before using it Refer to section in the manual...

Страница 18: ...tion Activity LED indicator Solid red The ViviCam 6300 is powering up Solid green The ViviCam 6300 is ready to record images or movies LED indicator Blinking green USB communication transfer in progre...

Страница 19: ...screen will be displayed in the monitor Follow the steps below to choose the desired language 1 Rotate the mode dial to and turn your ViviCam 6300 on by pressing the button The Set up1 menu is displa...

Страница 20: ...then press the button You may press W or X to switch the date types 3 Press the W X buttons to select Year Month Day and Time fields To increase a value press the S button To decrease a value slide th...

Страница 21: ...mat then press the button 3 Use S or T to select Yes then press the button to confirm When you format an SD memory card be aware that all data of which will be permanently erased Protected images are...

Страница 22: ...ial to A P SCENE Tv Av M or 2 Press the button to turn on the power 3 Compose your scene on the LCD monitor 4 Press the shutter button The LCD monitor darkens in strong sunlight or bright light This i...

Страница 23: ...you press the shutter button down half way the ViviCam 6300 s Auto Focus feature automatically focuses the image and exposure 4 Press the shutter button the rest of the way down to capture the image...

Страница 24: ...E Tv Av or M and turn your ViviCam 6300 on by pressing the button 2 Press the button then use W or X to select the Mode1 Mode2 Mode3 menu In A Auto Mode press to access in menu directly 3 Use T to sel...

Страница 25: ...al zoom factor 3x A useful feature as it is however the more the image is magnified the grainer the image may become To capture a zoomed image perform the following steps 1 Press the button to turn on...

Страница 26: ...Focus Select auto focus for most occasions when you want the ViviCam 6300 to automatically determine the focus setting Using auto focus any object at a range of focus is 50 cm or greater can be in fo...

Страница 27: ...de Description AUTO FLASH The flash fires automatically according to suit the photographic conditions RED EYE Use this mode to reduce the red eye phenomenon when you want to take natural looking photo...

Страница 28: ...e button to turn on the power 4 Toggle X until your desired self timer mode appears on the LCD monitor OFF 2 10 10 2 No Indication 5 Compose your scene and press the shutter button The self timer func...

Страница 29: ...trast different between light and dark between the subject and the background is extremely large The EV compensation value can be set in the range from 2 0EV to 2 0EV 1 Rotate the mode dial to P SCENE...

Страница 30: ...ton to turn on the power 3 Press then the Mode1 menu is displayed 4 Use T to select W Balance then press the button 5 Use S or T to select the desired setting then press the button to confirm 6 To exi...

Страница 31: ...u press the shutter button down half way the ViviCam 6300 s Auto Focus feature automatically focuses the image Proper exposure is determined and locked at the same time 4 Press the shutter button the...

Страница 32: ...tured with the priority given to aperture The shutter speed is automatically set according to the aperture The aperture will affect the depth of field of the picture If you set a large aperture lower...

Страница 33: ...ne There are 4 available modes in Picture mode Night scene This mode allows you to take photographs of people against a dusk or night time background Landscape This mode allows you to take photographs...

Страница 34: ...3 Use T to select Capture Mode then press the button 4 Use S or T to select Burst then press the button 5 To exit from the menu press the button The indicator is displayed on the monitor screen 6 Pres...

Страница 35: ...am 6300 on by pressing the button In A Auto Mode press to access in menu directly 2 Press then use X to select the Mode2 menu 3 Use T to select Capture Mode then press the button 4 Use S or T to selec...

Страница 36: ...select the desired metering mode then press the button Center Weighted Averages the light metered from the entire frame but gives greater weight to the subject matter at the center Spot Meters the ar...

Страница 37: ...ears on the LCD monitor 3 Use W or X to select the desired images To view the previous image press the W button To view the next image press the X button The playback information displayed on the LCD...

Страница 38: ...nitor To view the previous image press the W button To view the next image press the X button 2 Adjust the zoom ratio by using the Zoom button To enlarge the selected image press the button To return...

Страница 39: ...tton The last recorded image appears on the LCD monitor 2 Press the button once Nine thumbnail images are displayed simultaneously For recorded video clips the video mode icon will be displayed 3 Use...

Страница 40: ...CD monitor 2 Press The Playback1 menu is displayed 3 Use T to select Slide Show and press the button 4 Use S or T to set the playback interval then press the button The slide show starts The video cli...

Страница 41: ...In Playback mode use W or X to select the desired images To view the previous image press the W button To view the next image press the X button 3 Press then use X to select the Playback2 menu 4 Use S...

Страница 42: ...utton 2 Press the shutter button to start recording 3 To stop recording press the shutter button again The zoom function of optical zoom 3x can be activated before you start to record video clips Pres...

Страница 43: ...xt image press the X button 3 Press the button to start playing back the video clips To pause or resume video playback press the button again The playback information displayed on the LCD monitor will...

Страница 44: ...going to connect to the ViviCam 6300 then turn all connected devices off 1 Connect one end of the A V cable to the A V terminal of the ViviCam 6300 2 Connect the other end to the A V input socket of...

Страница 45: ...n by pressing the button 2 Press the button The last recorded image appears on the LCD monitor 3 Use W or X to select the image you want to delete 4 Press the button 5 Use S or T to select This Image...

Страница 46: ...k1 menu is displayed 4 Use T to select Protect and press the button 5 Use S or T to choose the desired setting then press the button Protect One Protect one image movie Protect All Protect all images...

Страница 47: ...T to select USB Mode 3 Use S or T to select PictBridge then press the button 4 Connect your camera and the printer via a supplied USB cable The screen turns off automatically and the setting screen w...

Страница 48: ...l the print settings use S or T to select Cancel After the step 4 finished you can still use W or X to select other images by your preference Follow the same instructions of print settings in step 4 t...

Страница 49: ...This function only lets you print the specified image based on the previous DPOF settings Step Figure Procedure Use S or T to select the Print With DPOF mode then press the button The Print Paper scre...

Страница 50: ...t then press the button to confirm The Transferring screen is displayed This starts printing and displays the message Transferring on the monitor screen The message will disappear after the printing f...

Страница 51: ...to install the software you need to check your system according to the table as shown below System Requirements System Requirements Windows Macintosh CPU Pentium III 600 MHz processor or higher Power...

Страница 52: ...B driver 1 Insert the enclosed CD ROM into your CD ROM drive 2 When the welcome screen appears click Install USB PC Cam Driver Follow the on screen instructions to complete the installation 3 After th...

Страница 53: ...then press the button 4 Connect one end of the USB cable to an available USB port on your computer 5 There will be a new Removable Disk icon detected in My Computer in which contains your recorded im...

Страница 54: ...es are inside these folder s Select the desired still images or video clips and then choose Copy from the Edit menu Open the destination location folder and choose Paste from the Edit menu You may als...

Страница 55: ...in one tool for owners of ViviCam 6300 WebCams DV camcorders scanners or anyone who strives to effectively organize a large collection of digital media 1 Insert the enclosed CD ROM into your CD ROM d...

Страница 56: ...photographic filters and special effects Embellish projects by adding creative design elements such as frames callouts and stamp objects Share results with family and friends via e mail and multiple p...

Страница 57: ...talled in your computer Adobe Acrobat Reader is included on the ViviCam 6300 CD ROM Using Adobe Acrobat Reader you can read the user s manual and print sections of interest 1 Insert the CD ROM that ca...

Страница 58: ...anual on the CD ROM is that you have Acrobat Reader Adobe Reader installed on your computer Updates to this manual and versions in other languages may be found on the Vivitar website www vivitar com 1...

Страница 59: ...or Internet connection Video conferencing or video editing software is not included with the ViviCam 6300 This mode is not supported for Mac Step 1 Install the PC camera driver The PC camera driver in...

Страница 60: ...our application software i e Windows NetMeeting To use Windows NetMeeting for videoconferencing 1 Go to Start Programs Accessories Communications NetMeeting to launch the NetMeeting program 2 Click th...

Страница 61: ...ity Q 6M Mode3 Mode3 Set Exit W W Balance Balance ISO ISO 100 100 Mode1 Mode1 Mode2 Mode2 2 3 Mode3 Capture Mode Metering Set Exit Digital Zoom Digital Zoom On Mode1 Mode2 Mode3 Set Exit 1 4 Sharpness...

Страница 62: ...NS Item Functional Description Capture Sets the recording method at the time of taking pictures Mode X1 Single Burst AEB Q In P SCENE Tv Av or M Mode W Balance Sets the white balance photographing und...

Страница 63: ...IST OF MENU OPTIONS Mode Digital Zoom This sets whether or not to use digital zoom at the time of shooting On Off ISO Sets the sensitivity for taking pictures When the sensitivity is raised and the IS...

Страница 64: ...es of color to match with your preference Your images will demonstrate different impression by selecting different degrees of color This is called Saturation High Medium Low Date Imprint The date of r...

Страница 65: ...option item then press the button 3 Use S or T to select the desired setting and press the button 4 To exit from the playback menu press the button Set Exit Video Color R G B 1 2 Digital Zoom On Item...

Страница 66: ...k1 Playback2 Set Exit 1 3 COPY R Protect Set Exit Playback2 SLIDE SHOW Slide Show Playback1 1 2 Item Functional Description Slide Show You can play back recorded images in order with a selected interv...

Страница 67: ...mpression rate of a recoded image Compresses images down to half of their size or more overwrites an old size images with a newly compressed image Only quality changing to the lower quality level is a...

Страница 68: ...Version Set up1 Set up3 Set up2 Item Functional Description Format Erases all images and reformats the SD card loaded in your ViviCam 6300 Protected images are also erased SD card cannot be formatted...

Страница 69: ...rsion This displays the current firmware version of the ViviCam 6300 Set up3 settings Item Functional Description USB Mode Selects to choose one of the following modes for further settings PC PictBrid...

Страница 70: ...EN 70 CONNECTING THE VIVICAM 6300 TO OTHER DEVICES USB Cable Notebook Computer TV PCMCIA Adapter SD Card Reader SD Card Reader AV Cable SD Memory Card Printer...

Страница 71: ...22 5mm Equivalent 36 108mm Focus range Normal 50 cm infinity Wide 6 cm infinity Tele 30 cm infinity LCD monitor 2 0 LTPS color LCD High resolution 130K pixels display Self timer 10 sec delay 2 sec de...

Страница 72: ...the desired files to your computer and then delete unnecessary files or use a different memory card Select a different flash mode Select Single in the capture mode Insert a new SD memory card Check al...

Отзывы: