Vivitar DVR 918M Скачать руководство пользователя страница 3


Introduction 

Thank you for purchasing this digital camcorder. Everything you need to take quality digital 

photos and videos is included with your digital camcorder. 
 

Vivitar makes capturing those special moments as easy as possible.   


Note:


Your digital camcorder requires a SD Memory card (up to 32GB) for normal use. SD 

Memory cards are not included and need to be purchased separately. 

Important: You must use only a Class 4 

  SD Memory card or higher. 


This camcorder is a Plug and Play device. You can download the pictures and videos 

captured by your camcorder without the software by directly accessing the camcorder

’s 

memory card from your computer. It is recommended however that you install the Vivitar 

Experience™ Image Manager Software to enjoy the full Vivitar experience. 


Please read this manual carefully first in order to get the most out of your digital camcorder. 
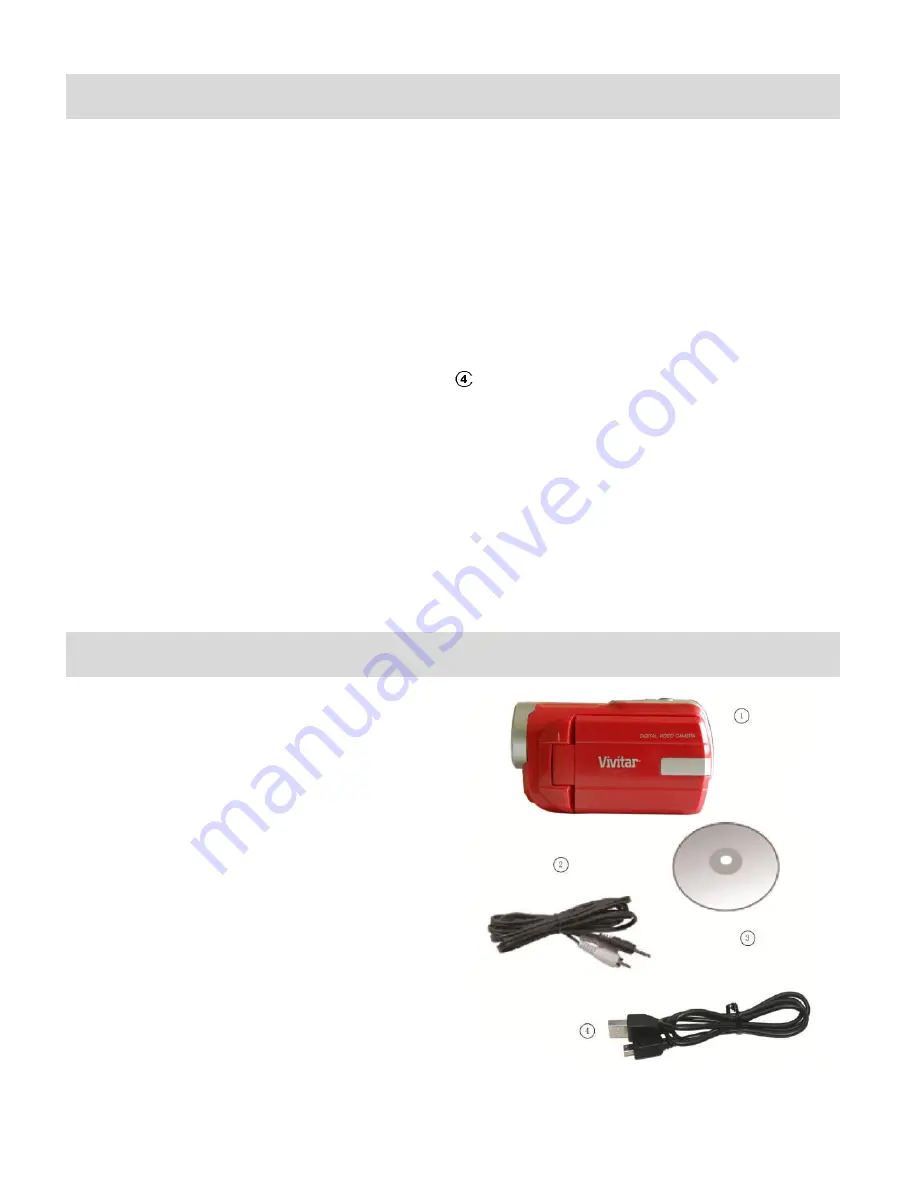
 

What

’s Included 


1) 

Digital Camcorder   

2) 

AV Cable 

3) 

Vivitar Experience Image Manager   

Software Installation CD   

4) 

USB Cable 

5) 

Attached Hand Strap (not shown) 


Note:

 SD Memory Card and batteries not included. 

Содержание DVR 918M

Страница 1: ...mcorder User Manual 2009 2015 Sakar International Inc All rights reserved Windows and the Windows logo are registered trademarks of Microsoft Corporation All other trademarks are the property of their respective companies ...

Страница 2: ...amcorder Options ViviLink LED Flash Display 13 Video Capture Mode 15 Video Playback Mode 29 Photo Capture Mode 35 Photo Playback Mode 51 Installing the Software 60 Connecting the Camcorder to the TV 62 Connecting the Camcorder to the Computer 62 Getting Photos and Videos from the Camcorder to the Computer 63 Getting Started 64 Transferring Images from the Camcorder to the Computer Manually 64 Camc...

Страница 3: ...ard or higher This camcorder is a Plug and Play device You can download the pictures and videos captured by your camcorder without the software by directly accessing the camcorder s memory card from your computer It is recommended however that you install the Vivitar Experience Image Manager Software to enjoy the full Vivitar experience Please read this manual carefully first in order to get the m...

Страница 4: ...t Thumbnail View Button 15 Digital Lens 5 MODE M Button 16 Self Timer LED Indicator Light 6 OK MENU SET Button 17 Microphone 7 Left Scene Button 18 LED Fill Light 8 Up LED Fill Light On Off Button 19 SD Memory Card Slot 9 Right Delete Button 20 Tripod Mount 10 Down ViviLink Button 21 Hand Strap 11 LCD Screen 22 Battery Compartment ...

Страница 5: ...ent cover Insert 3 AAA 1 5V batteries Alkaline batteries recommended Batteries not included SD Memory card up to 32GB needed for normal use It is recommended to use a Class 4 SD card or higher SD card Please turn off the camcorder before inserting the SD Memory Card Turning On the Camcorder Using the Camcorder ...

Страница 6: ...urns off a few seconds later The energy status of the power is displayed on LCD as shown below Full battery power Medium battery power Low battery power INSTALLING THE SD CARD Make sure the SD Memory card up to 32GB has been properly inserted into your digital camcorder SD Memory card not included To properly insert the SD Card 1 Push the SD card into the slot in the direction shown on the digital...

Страница 7: ...ction menu appears 2 Press the UP or DOWN button to select the language of your choice 3 Press the OK button to confirm the selection 4 After selecting a language you will be asked if you would like to continue with the initial camcorder setup The following message appears Continue with Camera Setup Select Yes to continue or No to exit the setup Note If you select No and decide to leave the setup ...

Страница 8: ... photos and videos taken with your digital camcorder The ViviLink technology allows you to quickly and easily upload your camcorder s photos and videos to the social networks of your choice with the accompanying Vivitar Experience Image Manager software application 1 First you will be asked to choose the default ViviLink social network for Photos and then for Videos 2 Use the UP and DOWN buttons t...

Страница 9: ...ENU SET button while in the Video Capture mode PHOTO CAPTURE MODE Use this mode to capture pictures with your digital camcorder After turning on your camcorder press the MODE M button once to open the Photo Capture mode To take a picture aim your camcorder as desired and press the Shutter button The picture is automatically saved to your camcorder s memory card To access the various menus for the ...

Страница 10: ...descent Fluorescent ISO Auto 100 200 400 Scene Auto Scenery Portrait Night Scenery Night Portrait High Sensitivity Sport Beach Party Language English French Spanish Portuguese German Dutch Italian Russian Turkish Polish Flash 2 LED lamps Self Timer 2 5 or 10 second delay Anti Shake Yes Multi Snapshots Burst Yes Auto Power Off 1 minute 3 minutes 5 minutes Disable TV Out PAL NTSC Interface USB 2 0 S...

Страница 11: ... available hard disk space 16 bit Color monitor 1024 X 768 recommended screen resolution CD ROM Drive QuickTime 6 or higher MICROSOFT Internet Explorer 7 or higher Windows Media Player 10 or higher DirectX 9 or higher Internet connection required MACINTOSH OS Intel Processor running MACINTOSH OS X v10 5 x or later 1 GB RAM 250 MB available hard disk space Display 1024 x 768 or higher resolution mo...

Страница 12: ...er emits a sound and the LCD screen turns on The camcorder will be in Video Capture mode to start POWERING THE CAMCORDER OFF While the camcorder is on you can press the Power button again at any point to turn your camcorder OFF You will see a Goodbye splash screen and then the camcorder will power off completely AUTO POWER OFF POWER SAVING Your digital camcorder also has an Auto Power Off feature ...

Страница 13: ...the MODE M button to toggle between the Video Capture Mode Photo Capture Mode and Playback Mode When in Video Capture Mode this icon displays on the top left corner of the LCD display When in Photo Capture Mode this icon displays on the top left corner of the LCD display When in Playback Mode this icon displays on the top left corner of the LCD display Navigating the Menus Each camcorder mode has ...

Страница 14: ... OPTION The ViviLink technology allows you to quickly and easily upload your camcorder s photos and videos to the social networks of your choice with the accompanying Vivitar Experience Image Manager application A ViviLink destination can be assigned to a photo or video in Capture mode prior to capturing your image or in Playback Mode VIVILINK VIDEO OR PHOTO CAPTURE MODE Press the DOWN Quick Funct...

Страница 15: ...g to the scene you would like to capture The following icon appears on the bottom left of the LCD when the Flash is on LED Light On To increase the lighting in dark situations press the UP button to activate the 2 LED Flash Lights on the front of the camcorder below the lens LED Light Off Press the UP button again to turn the LED Flash Lights off HIDE SHOW THE LCD ICONS The display of the icons on...

Страница 16: ...the LCD screen indicating the selected zoom 3 Capturing the Video Press the Shutter button to START the video capture A red blinking icon appears at the top of the LCD screen indicating that the recording is in progress To STOP the video recording press the Shutter button again The video is automatically saved to the camcorder s SD Memory card Note The amount of recording time available for the re...

Страница 17: ...ideo option and allows you to view and delete current video Down VIVILINK Opens the ViviLink for Videos menu Other Shutter STARTS STOPS the video capture OK MENU SET MENU Opens the menu options for Video Capture Mode SAVE SELECTION Saves your selected menu option To navigate through the Menus use the UP DOWN LEFT RIGHT direction control buttons MODE M MODE SELECTION Toggles between the Photo Captu...

Страница 18: ...your camcorder s Video Capture Mode Once you change a setting the setting is saved by your camcorder until you manually change the setting or restore the camcorder s Factory Default Settings The selection icon displays the Factory Default Settings in the menus shown below ...

Страница 19: ...continue within the menus and select a different menu option Press the LEFT or RIGHT button to select the next menu item 6 To exit the menu view Press the MODE button to exit the menu and return to your previous mode An icon reflecting your selection is displayed on the LCD screen IMAGE SIZE MENU The Image Size menu allows you to choose the desired size of the images taken by your camcorder Keep i...

Страница 20: ...enu 3 Press the UP or DOWN button to highlight a specific option 4 Press the OK button to confirm and select the highlighted menu option A selected option icon appears on the selected item 5 To continue within the menus and select a different menu option Press the LEFT or RIGHT button to select the next menu item 6 To exit the menu view Press the MODE button to exit the menu and return to your pre...

Страница 21: ...a color effect to add to the images taken with your camcorder The Color Effect options include Standard Sepia Monochrome Vivid 1 Press the OK button to open the menus for the current mode 2 Press the LEFT or RIGHT button to scroll and select the Color Effect menu 3 Press the UP or DOWN button to highlight a specific option 4 Press the OK button to confirm and select the highlighted menu option A s...

Страница 22: ...ns This setting should be adjusted when the environment is lighter or darker than normal When the environment has more light than is needed reduce the exposure setting by using the negative count to reduce the amount of light allowed into the lens by your camcorder If the environment has less light darker than is needed increase the exposure setting by using the positive count to increase the amou...

Страница 23: ...uto ISO 100 ISO 200 ISO 400 1 Press the OK button to open the menus for the current mode 2 Press the LEFT or RIGHT button to scroll and select the ISO menu 3 Press the UP or DOWN button to highlight a specific option 4 Press the OK button to confirm and select the highlighted menu option A selected option icon appears on the selected item 5 To continue within the menus and select a different menu ...

Страница 24: ...ct the highlighted menu option A selected option icon appears on the selected item 5 To continue within the menus and select a different menu option Press the LEFT or RIGHT button to select the next menu item 6 To exit the menu view Press the MODE button to exit the menu and return to your previous mode An icon reflecting your selection is displayed on the LCD screen LANGUAGE MENU You can select y...

Страница 25: ...l not appear on photos taken To Enable Disable the Timestamp 1 Press the OK button to open the menus for the current mode 2 Press the LEFT or RIGHT button to scroll and select the Date Time menu 3 Press the UP or DOWN button to highlight a specific option 4 Press the OK button to confirm and select the highlighted menu option A selected option icon appears on the selected item 5 To continue within...

Страница 26: ...ill automatically power off When the camcorder sits idle for the designated period of time the camcorder will shut off completely and will need to be powered on again with the power button before the next use The Auto Power Off options include 1 Minute 3 Minutes 5 Minutes Disable 1 Press the OK button to open the menus for the current mode 2 Press the LEFT or RIGHT button to scroll and select the ...

Страница 27: ...ected item 5 To continue within the menus and select a different menu option Press the LEFT or RIGHT button to select the next menu item 6 To exit the menu view Press the MODE button to exit the menu and return to your previous mode TV OUTPUT MENU TV Output menu allows you to select the TV option appropriate for you to view your captured images on your television See Connecting the Digital Camcord...

Страница 28: ...in the camcorder s Playback mode Note Restoring factory defaults or formatting the camcorder may result in the loss of data Please ensure you have backed up your images before you attempt this 1 Press the OK button to open the menus for the current mode 2 Press the LEFT or RIGHT button to scroll and select the Format Memory Card menu 3 Press the UP or DOWN button to highlight a specific option CAN...

Страница 29: ...gs You will be asked to reconfirm the resetting to the Factory Default Settings CANCEL Select No to exit the menu and return to the previous mode without resetting to the default settings RESET Select Yes and press the OK button to proceed with the reset You will then automatically exit the menu and return to the previous mode with the digital camcorder settings set to the Factory Default Settings...

Страница 30: ...he LEFT button to display the previous image Press the RIGHT button to display the next image Each captured image video and photo is displayed on the LCD screen Videos appear with an AVI icon on the top left of the LCD screen 2 Playing Your Selected Video Press the Shutter button to START playing the video Press the Shutter button again to PAUSE the video and to continue playing and pausing as nee...

Страница 31: ...ction Left PREVIOUS Displays the PREVIOUS image when not playing a selected video Up STOP Stops a playing video Right NEXT Displays the NEXT image Down N A Other Shutter PLAY PAUSE Plays and pauses a playing video OK MENU SET MENU Opens the menu options for Video Playback Mode SAVE SELECTION Saves your selected menu option To navigate through the Menus press the UP DOWN LEFT RIGHT direction contro...

Страница 32: ...DEO To delete the selected video Select Delete This Video and press the OK button You will be asked to confirm the deletion of the video If you would like to proceed with deleting the current image select Yes and press the OK button to confirm The video will be deleted and you will exit the menu and return to the Playback mode If you do not want to delete the current image select No and press the ...

Страница 33: ...ink technology allows you to quickly and easily upload your camcorder s photos and videos to the social networks of your choice with the accompanying Vivitar Experience Image Manager application The ViviLink for Videos options include YouTube Photobucket Flickr None 1 Select the video to which you would like to add a ViviLink 2 Press the OK button to open the menus for the current mode 3 Press the...

Страница 34: ... include Lock This Video Unlock This Video Lock All Images Unlock All Images 1 View the video you would like to lock 2 Press the OK button to open the menus for the current mode 3 Press the LEFT or RIGHT button to scroll and select the Protect Lock menu 4 Press the UP or DOWN button to highlight a specific option LOCK THIS VIDEO To Lock the Selected Image Use the UP or DOWN button to highlight Loc...

Страница 35: ...pear in Playback Mode without the lock icon 5 Press the MODE button at any time to exit the menu and return to your previous mode Note Any image that is locked displays a lock symbol on the LCD screen when viewing that image in the Playback Mode Videos that are not locked do not display the lock symbol Remember that you cannot delete images while they are locked ...

Страница 36: ...d like to capture 2 Zoom Options Use the T Zoom In and W Zoom Out buttons located to the left of the LCD screen to better set the camcorder display if desired You can magnify your subject up to 4 times using the digital zoom A magnifying glass icon appears on the bottom right of the LCD screen indicating the selected zoom 3 Capturing the Photo Press the Shutter button to take the picture The pictu...

Страница 37: ...to option and allows you to view and delete current photo Down VIVILINK Opens the ViviLink for Photos menu Other Shutter Captures the photo OK MENU SET MENU Opens the menu options for Photo Capture Mode SAVE SELECTION Saves your selected menu option To navigate through the Menus use the UP DOWN LEFT RIGHT direction control buttons MODE M MODE SELECTION Toggles between the Photo Capture Mode Video ...

Страница 38: ...your camcorder s Photo Capture Mode Once you change a setting the setting is saved by your camcorder until you manually change the setting or restore the camcorder s Factory Default Settings The selection icon displays the Factory Default Settings in the menus shown below ...

Страница 39: ...enus and select a different menu option Press the LEFT or RIGHT button to select the next menu item 6 To exit the menu view Press the MODE button to exit the menu and return to your previous mode An icon reflecting your selection is displayed on the LCD screen IMAGE RESOLUTION MENU The Image Resolution menu allows you to choose the desired size of the images taken by your camcorder Keep in mind th...

Страница 40: ...ess the LEFT or RIGHT button to scroll and select the Image Quality menu 3 Press the UP or DOWN button to highlight a specific option 4 Press the OK button to confirm and select the highlighted menu option A selected option icon appears on the selected item 5 To continue within the menus and select a different menu option Press the LEFT or RIGHT button to select the next menu item 6 To exit the me...

Страница 41: ...ur previous mode An icon reflecting your selection is displayed on the LCD screen ANTI SHAKE MENU The Anti Shake feature reduces image distortion that can be caused by movement of the camcorder while capturing the image The Anti Shake options include On Off 1 Press the OK button to open the menus for the current mode 2 Press the LEFT or RIGHT button to scroll and select the Anti Shake menu 3 Press...

Страница 42: ...ton to exit the menu and return to your previous mode An icon reflecting your selection is displayed on the LCD screen Note The Multi Snapshots icon replaces the Camera icon on the top left of the LCD screen indicating that the Multi Snapshots is On This feature remains on in the Photo Capture Mode until you manually select the Multi Snapshots Off option which then returns the camcorder to the sin...

Страница 43: ...aken with your camcorder The Color Effect options include Standard Sepia Monochrome Vivid 1 Press the OK button to open the menus for the current mode 2 Press the LEFT or RIGHT button to scroll and select the Color Effect menu 3 Press the UP or DOWN button to highlight a specific option 4 Press the OK button to confirm and select the highlighted menu option A selected option icon appears on the se...

Страница 44: ... setting should be adjusted when the environment is lighter or darker than normal When the environment has more light than is needed reduce the exposure setting by using the negative count to reduce the amount of light allowed into the lens by your camcorder If the environment has less light darker than is needed increase the exposure setting by using the positive count to increase the amount of l...

Страница 45: ...uto ISO 100 ISO 200 ISO 400 1 Press the OK button to open the menus for the current mode 2 Press the LEFT or RIGHT button to scroll and select the ISO menu 3 Press the UP or DOWN button to highlight a specific option 4 Press the OK button to confirm and select the highlighted menu option A selected option icon appears on the selected item 5 To continue within the menus and select a different menu ...

Страница 46: ...ct the highlighted menu option A selected option icon appears on the selected item 5 To continue within the menus and select a different menu option Press the LEFT or RIGHT button to select the next menu item 6 To exit the menu view Press the MODE button to exit the menu and return to your previous mode An icon reflecting your selection is displayed on the LCD screen LANGUAGE MENU You can select y...

Страница 47: ...l not appear on photos taken To Enable Disable the Timestamp 1 Press the OK button to open the menus for the current mode 2 Press the LEFT or RIGHT button to scroll and select the Date Time menu 3 Press the UP or DOWN button to highlight a specific option 4 Press the OK button to confirm and select the highlighted menu option A selected option icon appears on the selected item 5 To continue within...

Страница 48: ... camcorder functions Note This does not affect the sound during video recording The Silent Mode options include On Off 1 Press the OK button to open the menus for the current mode 2 Press the LEFT or RIGHT button to scroll and select the Silent Mode menu 3 Press the UP or DOWN button to highlight a specific option 4 Press the OK button to confirm and select the highlighted menu option A selected o...

Страница 49: ... menu and return to your previous mode FREQUENCY MENU The options in the Frequency menu represent the frequency of the electrical current in fluorescent lighting sources in your locale If your camcorder is set to a frequency that does not match your country s electric current you may see waves on the images taken by your camcorder The Frequency options include 50Hz UK Europe and Australia 60Hz US ...

Страница 50: ...ss the LEFT or RIGHT button to select the next menu item 6 To exit the menu view Press the MODE button to exit the menu and return to your previous mode FORMAT MEMORY CARD MENU You can use the Format Memory Card menu to delete all of the content that is currently on your camcorder s memory card Keep in mind that formatting the memory card will permanently delete all of the content on your camcorde...

Страница 51: ...en the menus for the current mode 2 Press the LEFT or RIGHT button to scroll and select the Firmware menu 3 The Default Setting option is automatically selected 4 Press the OK button to reset the camcorder to the Factory Default Settings You will be asked to confirm the resetting to the Factory Default Settings CANCEL Select No to exit the menu and return to the previous mode without resetting to ...

Страница 52: ...u find the image you would like to view Press the LEFT button to display the previous image Press the RIGHT button to display the next image Each captured image video and photo is displayed on the LCD screen Photos appear with a JPG icon on the top left of the LCD screen 2 Zooming In Out of Your Selected Photo Press the T Zoom In button to Zoom In and magnify the selected photo Use the UP DOWN LEF...

Страница 53: ...age full size 4 Once the selected photo is full size you can Zoom In and Zoom Out of the photo PHOTO PLAYBACK MODE QUICK FUNCTION BUTTONS Your digital camcorder has a four directional pad that functions as Quick Function buttons Quick Function Button Function Left PREVIOUS Displays the PREVIOUS image Up SLIDE SHOW Views all the Photos as a Slide Show with 3 5 or 10 second intervals To exit the Sli...

Страница 54: ...cted photo W ZOOM Zooms Out of selected photo THUMBNAIL Opens Thumbnail View To navigate in the Thumbnail View press the UP DOWN LEFT RIGHT direction buttons To select an image in the Thumbnail View press the OK button RIGHT direction buttons PHOTO PLAYBACK MODE MENUS The following are the menus that appear in your camcorder s Photo Playback Mode ...

Страница 55: ...age select No and press the OK button The photo will not be deleted and you will exit the menu and return to the Playback mode DELETE ALL IMAGES To delete all the images videos and photos you have saved on your SD Memory card Select Delete All Images and press the OK button If you would like to proceed with deleting all the videos and photos select Yes and press the OK button to confirm All of you...

Страница 56: ...e within the menus and select a different menu option Press the LEFT or RIGHT button to select the next menu item 7 To exit the menu view Press the MODE button to exit the menu and return to your previous mode Note An icon appears on the image with the selected ViviLink destination site when you return to the Playback display Remember that the ViviLink feature is deactivated by default A ViviLink ...

Страница 57: ...on 5 Press the OK button to select and open the Crop option 6 The Crop window opens on the selected picture To define the desired crop area Use the W T Zoom buttons on the camcorder to increase or decrease the Crop box size Use the directional buttons to move the Crop box up down right or left Note If the Crop box turns red while pressing the T Zoom In button to designate the Crop box size this in...

Страница 58: ... Image Use the UP or DOWN button to highlight Unlock This Photo and then press the OK button The image now appears in Playback Mode without the lock icon LOCK ALL IMAGES To Lock All Images videos and photos Use the UP or DOWN button to highlight Lock All Images and then press the OK button All images now appear in Playback Mode with the lock icon indicating that the images are protected locked UNL...

Страница 59: ...e port of the printer Once connected follow the instructions on the printer to proceed with the printing process CANCEL Select the Cancel option to exit the menu and return to the previous mode SLIDE SHOW MENU You can view a Slide Show of all the pictures taken with your camcorder by pressing the UP Quick Function button while in Playback mode The Slide Show menu allows you to set the interval len...

Страница 60: ...tem 7 To exit the menu view Press the MODE button to exit the menu and return to your previous mode Note While in Playback Mode press the UP Quick Function button to initiate the Slide Show To exit the Slide Show and return to the previous mode press any button ...

Страница 61: ... Experience Image Manager Installer window appears If the window does not appear open the application s CD DVD drive and click on Setup exe to launch the installer MACINTOSH Click the icon that appears on the desktop to install the Vivitar Experience Image Manager 3 If you do not have Internet access at the time of inserting the CD ROM connect to the Internet and then click the Install Vivitar Exp...

Страница 62: ...rms On WINDOWS and MACINTOSH Click the I accept the terms of this license agreement and then click Next to continue 9 WINDOWS only Let the Vivitar Experience Image Manager installer create the folder to where the program will be installed and then click Install 10 Please wait while the application continues the installation process on your computer 11 WINDOWS Click the Close button when the instal...

Страница 63: ...he TV to AV mode 3 You will need to set the TV format on the camcorder to suit the TV format of your TV set Make sure the camcorder is set to the correct TV Output setting On plugging in the TV out cable a message appears on the LCD screen to select NTSC or PAL for the type of TV you are using Select the option as per the format of the TV set you are using and press the OK button 4 When the camcor...

Страница 64: ...then it will be selected automatically 5 Select a location on the computer where to place the new photo and video files 6 Add the new photo and video files to albums if desired 7 Select to remove the media files from the selected device removable disk after the import 8 Click the Get Media button to transfer the photos and videos from your camcorder to your computer 9 A media download progress bar...

Страница 65: ...tion s Home screen Transferring Images from the Camcorder to the Computer Manually TRANSFERRING PHOTOS AND VIDEOS WINDOWS 1 Use the supplied USB cable to connect your camcorder to your computer 2 MSDC appears on the LCD 3 A window appears with a list of options select Open folder to view files and click OK 4 Open the DCIM folder and the folder inside to view the media files 5 Select the media and ...

Страница 66: ... packaging for compatibility with the iPad APPLE IPAD CAMERA CONNECTION For models that are compatible with the iPad photos and videos can be imported from your digital camera to your iPad by following either one of the options below 1 Connecting your digital camera to your iPad using an iPad Camera Connector Plug the Camera Connector into the dock connector port on your iPad then attach your digi...

Страница 67: ...tions not resulting from defects in material or workmanship and damages or malfunctions from other than normal use including but limited to repair by unauthorized parties tampering modification or accident What To Do When Service Is Required When returning your defective product postage pre paid for service your package should include 1 Copy of original bill of sale 2 A detailed written descriptio...

Страница 68: ...er button to take some sample photos and then try downloading them again With test photos if the camera s power is off before you upload them to the computer the photos are not stored in the camera s memory These photos should be uploaded quickly before the camera s power is off If the photos are saved to the SD memory card then all the photos should appear Q How do I make sure I don t lose import...

Страница 69: ...ules Operation is subject to the following two conditions 1 this device may not cause harmful interference and 2 this device must accept any interference received including interference that may cause undesired operation Caution changes or modifications not expressly approved by the party responsible for compliance could void the user s authority to operate the equipment NOTE This equipment has be...

Отзывы: