background image

13 


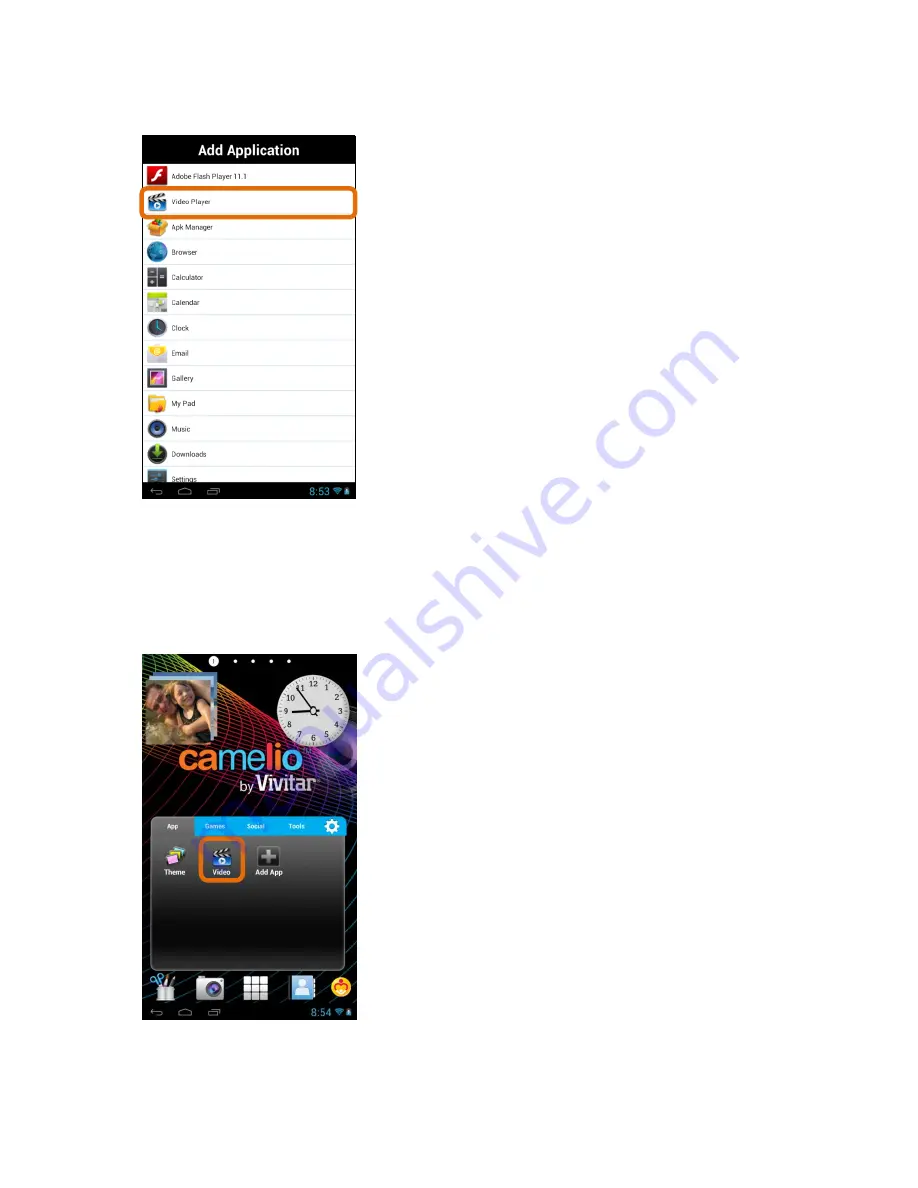
2.


Select an Application to Add: 


The list of all your applications on your tables appears on the screen. Touch an 
App to choose the one you would like to display in the selected Tab.  


3.


View the Shortcut: 


View the added shortcut of your selected App on the Tabbed Apps Manager. 


Содержание Camelio

Страница 1: ...Android Family Tablet with Quick Start Guide ...

Страница 2: ...en as you want Supports 5 users each with their own theme and application preferences Separate Parental Controls for each theme High Resolution 1024x600 7 Inch display Front Rear Cameras Built In Google Play Store lets you download hundreds of thousands of free apps and apps available for purchase Extra Long Life Battery Getting to Know Your Camelio Tablet CAMELIO TABLET FRONT BACK ...

Страница 3: ...en it turns into a circle drag it towards the left to the Camera icon Initial Setup The first time you power on your tablet you will be taken through the initial setup Note It is recommended to fully charge your tablet before first use CHOOSE LANGUAGE Touch one of the language options to select the on screen language for your Camelio tablet The language options include English Spanish French and P...

Страница 4: ...ce connected the WiFi icon will appear on the status bar Note If you do not wish to connect to WiFi during the Setup touch Skip The WiFi connection can be set at any time using the Android Settings menu CONNECT TO GOOGLE You must sign into a Google Account to use Gmail Google Talk and other Google Apps that require an active Google Account If you don t have a Google Account you can create one Touc...

Страница 5: ...ogle Play terms and touch Next to continue 2 Setup Google Play Touch Set up credit card and enter your details to enable easy purchasing of apps from the Google Play Application Download Store If you choose not to setup Google Play touch Not now 3 Backup and restore You can backup your tablet s data apps and settings to the Google Cloud and also restore your data apps and settings from the Google ...

Страница 6: ... to continue 5 Date time Touch Central Time to select your time zone Touch Current date to set the date Touch Current time to set the time Once the time and date are set touch Next to continue 6 Google Services Setup Complete Touch Next to agree to Google updates and complete the Initial Setup Touch Finish to begin using your tablet ...

Страница 7: ...ou would like to create a Google account at another time touch Not now 2 Enter Name You will be prompted to enter your first and last name Touch Done once complete 3 Choose username Enter an email then touch Next or Done Note The email entered will be checked for availability 4 Create Password Recovery information Type your password for your account minimum of 8 characters and retype to confirm yo...

Страница 8: ...ia Circles Instant Upload and Messenger Touch Not Now to continue without enabling Google 6 Terms of Service Authenticate Touch Next to accept the Google Terms of Service Privacy Policy and Google Play Terms of Service Then to authenticate your account type the word displayed in the text field Touch Next or Done to continue 7 Setup Google Play Touch Set up credit card and enter your details to ena...

Страница 9: ...t the desired restore and backup options and then touch Next to continue 9 Google location Touch the appropriate box to check off and select the desired Google location service options and then touch Next to continue 10 Google Services Setup Complete Touch Next to agree to Google updates Then touch Finish to complete the new Google Account Setup ...

Страница 10: ...ch I Agree to complete the Initial Setup and to begin your experience with the ever changing Camelio tablet Home Screen Once you have completed the Initial Setup the Home Screen appears The orientation of the display screen rotates with the tablet as you turn it ...

Страница 11: ...get 11 Apps 3 Theme Digital Clock Widget 12 Contacts 4 Settings 13 Parental Control 5 Tabbed Apps Manager 14 USB Connected 6 Back 15 Time 7 Home 16 Wi Fi Connection Signal 8 Recent Apps 17 Battery Power Level 9 Image Editor 1 2 3 4 5 6 7 8 9 10 11 12 13 14 15 16 17 ...

Страница 12: ...r You can organize and manage your Apps by placing the shortcuts in the selected tab The Tab Apps Manager includes the following tabs Apps Games Social Tools 1 Select a Tab First touch a Tab to select it For example the App Tab is the default Tab and is selected in the image above Then touch the Add App icon Note You can also touch the App Setting icon which also can remove an App ...

Страница 13: ...e list of all your applications on your tables appears on the screen Touch an App to choose the one you would like to display in the selected Tab 3 View the Shortcut View the added shortcut of your selected App on the Tabbed Apps Manager ...

Страница 14: ...e you can then control which apps can be launched without a code and which apps require a lock code to be entered in order to launch 1 Parental Control Setup Selecting ON OFF By default the Parental Control feature is turned OFF which means that all apps can be accessed To activate the Parental Control touch the Turn Parental Control On option to ON Then touch the Set Up button to continue the Par...

Страница 15: ... create a new account Your lock code details will be sent to the account specified 3 Parental Control Setup Setting the Lock Code Enter a 4 digit Parental Lock Code and touch Next from the onscreen keyboard Then reenter the Lock Code to confirm and touch Done from the onscreen keyboard Touch Next to continue 4 Parental Control Setup Selecting the Locked Apps Touch ON or OFF to select the Parental ...

Страница 16: ...omplete the Parental Control Setup Note An email notification will be sent to your Google Account with your name and Parental Control Lock Code Theme Manager The Theme Manager is a special feature that allows your tablet to change into your favorite character with a Theme App Card sold separately You can add as many Themes as you like from a large catalog of characters such as Hello Kitty My Littl...

Страница 17: ... to open the online catalog of Themes From this online list you can choose to add and download new Themes You can also select a purchased Theme and switch your tablet to that Theme 3 Add Change Theme Add a New Theme To activate a new Theme touch the ADD button by the selected Theme ...

Страница 18: ...h the Activate button to download and begin using your new Theme Note Download may take several moments Collect all your favorite characters 5 Add Change Theme Purchased Theme Once the download is complete the new Theme appears with the Purchased button This indicates a Theme that you have purchased and a Theme that can be applied to your tablet at any time Monster High App Card sold separately ...

Страница 19: ...hased and added new Themes you can select to change the Theme at any time by touching the Purchased button of the Theme you want The selected Theme will then appear with the highlighted Selected button and your tablet will automatically change into the Theme you have selected Once you have selected your new Theme your tablet is now personalized and activated with this Theme Current Theme Vivitar ...

Страница 20: ...ime See the Add Users section of this Quick Start Guide for more details Add Users You can add up to 5 different users on your tablet Each user can have his her own Theme profile picture and application preferences To add edit or change a user follow these instructions 1 Launch the Theme Manager To manage the users of your tablet touch the Theme Manager app shortcut icon on the Tabbed Apps Manager...

Страница 21: ...er app is open touch Manage Users 3 Add First User Add Name Select Profile Picture Select Theme The first time Manage Users is activated the Add User screen appears Touch Add User to add a new user Note that the current theme appears on the right ...

Страница 22: ...s name and last name When complete touch the down Arrow on the bottom left of the status bar Select Profile Image You can change the profile picture by touching the Profile Image itself and selecting an existing photo from your tablet ...

Страница 23: ... Theme the Theme is displayed with a Purchased button To change to a different Theme touch one of the Purchased Theme buttons Note The User s Theme can be changed at any time to a different Purchased Theme Each User can select his her own Theme Once all the User information is complete touch OK to create the new User Note If you have selected a different Theme your chosen Theme automatically appea...

Страница 24: ...ame to select and highlight a User from the list then touch Delete 5 Multiple Users Power Off Standby Mode Selecting a User If you have added multiple Users to your tablet the User will need to be selected after the tablet has either been powered off or been in standby mode After powering on or reactivating the tablet you will need to unlock it Once you have unlocked your tablet the list of Users ...

Страница 25: ...ill be repaired or replaced at no charge for parts or labor for a period of one year WHAT IS NOT COVERED BY WARRANTY Damages or malfunctions not resulting from defects in material or workmanship and damages or malfunctions from other than normal use including but limited to repair by unauthorized parties tampering modification or accident TO OBTAIN WARRANTY SERVICE AND TROUBLESHOOTING INFORMATION ...

Страница 26: ... IN NO EVENT WILL DISTRIBUTOR ITS MANUFACTURERS OR SAKAR INT BE LIABLE FOR ANY INCIDENTAL DIRECT INDIRECT SPECIAL PUNITIVE OR CONSEQUENTIAL DAMAGES SUCH AS BUT NOT LIMITED TO DAMAGES FOR LOSS OF PROFITS BUSINESS SAVINGS DATA OR RECORDS CAUSED BY THE USE MISUSE OR INABILITY TO USE THE PRODUCT EXCEPT AS STATED HEREIN NO OTHER WARRANTIES SHALL APPLY NOTWITHSTANDING THE FOREGOING CONSUMER S RECOVERY A...

Страница 27: ...energy and if not installed and used in accordance with instructions May cause harmful interference to radio or television reception which can be determined by turning the equipment off and on the user is encouraged to try to correct the interference by one or more of the following measures __ Reorient or relocate the receiving antenna __ Increase the separation between the equipment and receiver ...

Страница 28: ... Fi network for password information Consult the full User s Manual of your device for precise information on connecting to Wi Fi Unfortunately if your device is out of the range of any nearby networks you will not be able to access any online features Q I am having issues with an app which I have downloaded What should I do A For support on any third party apps software or accessories you will ne...

Отзывы: