Vitrifrigo IM CL OCX2 REFILL Скачать руководство пользователя страница 24


EN 


      EN


Содержание IM CL OCX2 REFILL

Страница 1: ...ICE MAKER IM CL IM XT IM XR Produttori di ghiaccio MANUALE DI INSTALLAZIONE USO ED ASSISTENZA Leggere attentamente prima dell uso IT...

Страница 2: ...IT...

Страница 3: ...RICO 7 AVVIAMENTO 7 1 AVVIAMENTO MODELLO REFILL 7 2 AVVIAMENTO MODELLO HYDRO 8 UTILIZZO DELL ICE MAKER 8 1 MODALIT PRODUZIONE GHIACCIO 8 2 MODALIT FREEZER 9 INATTIVIT DEL FABBRICATORE 10 PULIZIA DEL F...

Страница 4: ...tamente i nostri uffici Vitri Alceste Modelli IM CL IM XT IM XR 2 AVVERTENZE Il manuale fa riferimento ai modelli della serie IM Per una lista completa dei modelli e delle loro dimensioni fare riferim...

Страница 5: ...ficato Verificare che l imballo sia integro in caso contrario segnalarlo al trasportatore Estrarre l apparecchio dall imballo operando con massima cautela si consiglia per evitare ferite accidentali l...

Страница 6: ...sere pulito con un getto d acqua L ambiente in cui viene installato l apparecchio deve essere se possibile adeguatamente ventilato Se l ambiente nel quale viene utilizzato un apparecchio contenente re...

Страница 7: ...questo manuale e da una pulizia e manutenzione costante ed attenta Alcune informazioni o figure di questo manuale potrebbero mostrare dettagli e particolari che possono differenziarsi leggermente da...

Страница 8: ...zzontale L apparecchio deve essere posizionato in luogo asciutto lontano da fonti di calore assicurando al medesimo sufficiente aerazione Incasso dell apparecchio con condensatore ventilato IM CL e IM...

Страница 9: ...tale del frontalino deve rimanere totalmente libera Per situazioni di incasso con presenza di ripiani a contatto con le parti superiori ed inferiori dell apparecchio realizzare le aperture di ventilaz...

Страница 10: ...ilazione da prevedere per la versione IM XT sono La parte frontale del frontalino deve rimanere totalmente libera in quanto si ha sia l ingresso che l uscita aria fig 1c La distanza minima tra le vari...

Страница 11: ...tta circolazione dell aria tramite ventilazione forzata come indicato in fig 1d L incasso deve assicurare che tutte le eventuali parti in tensione dell apparecchio non siano direttamente accessibili c...

Страница 12: ...re a filo porta o filo cassa e serrare le viti nei pre fori gi presenti nella cassa fig 2 Figura 2 Installazione e posizionamento profilo ad incasso Fissaggio dell apparecchio Per il fissaggio dell ap...

Страница 13: ...qualificato il quale dovr accertare che la sezione dei cavi della presa sia idonea alla potenza assorbita dall apparecchio Non interconnettere nessun altro tipo di apparecchio al produttore di ghiacc...

Страница 14: ...e il fabbricatore produce le mezze lune di ghiaccio Modalit FREEZER nella quale il fabbricatore non produce le mezze lune di ghiaccio ma pu essere usato come freezer 8 1 MODALIT PRODUZIONE GHIACCIO Du...

Страница 15: ...ccolta del ghiaccio C Attendere che la brina presente all interno della vasca sia completamente sciolta Asciugare accuratamente le pareti interne del fabbricatore Lasciare la porta semi aperta utilizz...

Страница 16: ...on vibrino contro l apparecchio 11 3 FABBRICATORE CON RESA INSUFFICIENTE Controllare che la porta chiuda ermeticamente il fabbricatore non sia vicino a fonti di calore che il fabbricatore sia sufficie...

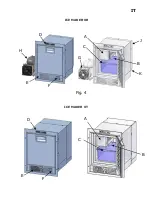
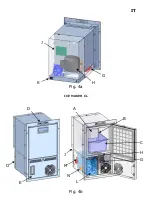
Страница 17: ...IT ICE MAKER XR ICE MAKER XT D C H A E I C E M A K E R X R F B G Fig 4 A C E I C E M A K E F B D J K...

Страница 18: ...IT Fig 4a ICE MAKER CL Fig 4b H G J K E I C E M A C I C E M A K E R X R A B D H G M I C E M A K E R N I C E M A K E L I C E M A J O I C E M A K E R...

Страница 19: ...IT Fig 4c Fig 4d D1 D2 D3 D4 D5 Fig 5 I P I C E M A K E R X R Q I C E M A K E R X R M I C E M A K E R X R N I C E M A K E R X R Q I C E M A K E R X R Fig 5a...

Страница 20: ...1 mm IM CL 375 645 515 IM XT 375 490 630 IM XR 375 490 515 profondit incasso con porta all interno del profilo di fissaggio vedi fig 2 Modello A mm B mm C mm IM CL 370 641 435 IM XT 370 486 555 IM XR...

Страница 21: ...in via Mazzini 75 61022 frazione Montecchio VALLEFOGLIA Italy dichiara sotto la propria responsabilit che il prodotto conforme alla Direttiva Bassa Tensione LVD 2014 35 CE conforme alla Direttiva Comp...

Страница 22: ...IT...

Страница 23: ...EN ICE MAKER IM CL IM XT IM XR Ice makers INSTALLATION USE AND SERVICE MANUAL Read carefully before using the product EN...

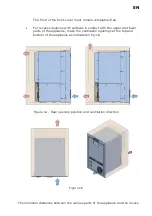
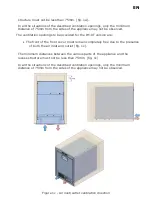
Страница 24: ...EN...

Страница 25: ...ONNECTION 7 START 7 1 REFILL MODEL START UP 7 2 HYDRO MODEL START UP 8 USING THE ICE MAKER 8 1 ICE PRODUCTION MODE 8 2 FREEZER MODE 9 ICE MAKER INACTIVITY 10 CLEANING THE ICE MAKER 11 WHAT TO DO IF TH...

Страница 26: ...es or any of our offices directly Vitri Alceste Models IM CL IM XT IM XR 2 WARNINGS This manual refers to models from the IM series For a full list of the models and their sizes refer to Annex 1 Read...

Страница 27: ...ng operating with utmost caution to avoid accidental injuries the use of protective gloves is recommended Check that the product has not been damaged Any damage must be reported to the reseller within...

Страница 28: ...ent in which the appliance is installed must be adequately ventilated if possible If the environment in which an appliance containing a flammable refrigerant is used is not ventilated the environment...

Страница 29: ...lly reading this manual and on regular and careful cleaning and maintenance Some information or diagrams in this manual may show details or particular aspects that might differ slightly from the produ...

Страница 30: ...place away from heat sources ensuring sufficient ventilation Recessed appliance with ventilated condenser IM CL and IM XT The dimensions of the front opening that are required for installation of the...

Страница 31: ...n contact with the upper and lower parts of the appliance make the ventilation openings at the top and bottom of the appliance as indicated in fig 1b Figure 1a Rear opening position and ventilation di...

Страница 32: ...version are The front of the front cover must remain completely free due to the presence of both the air inlet and outlet fig 1c The minimum distances between the various parts of the appliance and th...

Страница 33: ...in the correct circulation of the air via forced ventilation as indicated in fig 1d The recess must ensure that all possible live parts of the appliance are not directly accessible as well as the vent...

Страница 34: ...it flush with the door or the casing and tighten the screws in the pre holes already present in the casing fig 2 Figure 2 Installation and positioning of the recessed profile Fixing the appliance To s...

Страница 35: ...ne This operation must be done by a suitably qualified person who must ensure that the cable section of the plug is appropriate to the power absorbed by the appliance Do not interconnect any other typ...

Страница 36: ...produce crescents of ice but can be used as a freezer 8 1 ICE PRODUCTION MODE During the production of ice the production D2 command must be active LED on see fig 5 The production cycle proceeds as fo...

Страница 37: ...see figures 5 and 5a so that an air change can take place and so that no humidity is created inside the tray For the REFILL versions empty and clean the tank L see fig 4b 4c 10 CLEANING THE ICE MAKER...

Страница 38: ...loses hermetically the ice maker is not near heat sources the ice maker is sufficiently ventilated the condenser is not clogged with dust the fan turns freely 11 4 THE ICE MAKER DOES NOT MAKE ICE Chec...

Страница 39: ...EN ICE MAKER XR ICE MAKER XT D C H A E I C E M A K E R X R F B G Fig 4 A C E I C E M A K E F B D J K...

Страница 40: ...EN Fig 4a ICE MAKER CL Fig 4b H G J K E I C E M A C I C E M A K E R X R A B D H G M I C E M A K E R N I C E M A K E L I C E M A J O I C E M A K E R...

Страница 41: ...EN Fig 4c Fig 4d D1 D2 D3 D4 D5 Fig 5 I P I C E M A K E R X R Q I C E M A K E R X R M I C E M A K E R X R N I C E M A K E R X R Q I C E M A K E R X R Fig 5a...

Страница 42: ...1 mm B1 mm C1 mm IM CL 375 645 515 IM XT 375 490 630 IM XR 375 490 515 recessed depth with door inside the fixing profile see fig 2 Model A mm B mm C mm IM CL 370 641 435 IM XT 370 486 555 IM XR 370 4...

Страница 43: ...in via Mazzini 75 61022 locality Montecchio VALLEFOGLIA Italy declares under its own responsibility that the product is compliant with the Low Voltage Directive LVD 2014 35 EC is compliant with the El...

Страница 44: ...EN...

Страница 45: ...DE ICE MAKER IM CL IM XT IM XR Eisbereiter MONTAGE BEDIENUNGS UND WARTUNGSANLEITUNG Vor Gebrauch sorgf ltig lesen DE...

Страница 46: ...DE...

Страница 47: ...1 STARTEN MODELL REFILL 7 2 STARTEN MODELL HYDRO 8 VERWENDUNG DES EISBEREITERS 8 1 EISPRODUKTIONSMODUS 8 2 GEFRIERMODUS 9 UNAKTIVIT T DES EISBEREITERS 10 REINIGUNG DES EISBEREITERS 11 WAS MUSS GEMACHT...

Страница 48: ...irekt mit unseren B ros in Verbindung setzen Vitri Alceste Modelle IM CL IM XT IM XR 2 WARNHINWEISE Dieses Handbuch bezieht sich auf die Modelle der Baureihe IM Die vollst ndige Liste aller Modelle un...

Страница 49: ...igt ist Andernfalls m ssen Sie umgehend das Transportunternehmen dar ber informieren Nehmen Sie das Ger t aus der Verpackung und arbeiten Sie mit u erster Vorsicht zur Vermeidung von Unfallverletzunge...

Страница 50: ...ng in der das Ger t installiert wird muss ausreichend wenn m glich bel ftet sein Wenn die Umgebung in der ein Ger t mit entz ndbaren K hlmitteln verwendet wird nicht bel ftet ist muss diese kompatibel...

Страница 51: ...hs und einer st ndigen und sorgf ltigen Reinigung und Wartung ab Einige Informationen oder Abbildungen in diesem Handbuch k nnen Details und Einzelheiten enthalten die geringf gig von denen des Produk...

Страница 52: ...in einer horizontalen Ebene auf Das Ger t muss an einem trockenen von W rmequellen entfernten Ort aufgestellt werden und f r eine ausreichende Bel ftung sorgen Einbauger t mit bel ftetem Kondensator I...

Страница 53: ...iehe Abb 1a Der vordere Teil der Frontplatte muss v llig frei bleiben In Einbausituationen mit Regalen die mit dem Ober und Unterteil des Ger ts in Ber hrung kommen m ssen die Bel ftungs ffnungen ober...

Страница 54: ...ion vorzusehenden L ftungs ffnungen sind Der vordere Teil der Frontplatte muss v llig frei bleiben da es sowohl einen Lufteinlass als auch einen Luftauslass gibt Abb 1c Der Mindestabstand zwischen den...

Страница 55: ...ftzirkulation durch Zwangsbel ftung zu erreichen wie in Abb 1d dargestellt Der Einbau muss sicherstellen dass alle spannungsf hrenden Teile des Ger ts sowie die L ftungs ffnungen nicht direkt zug ngli...

Страница 56: ...der T r oder b ndig mit dem Geh use verschiebt und die Schrauben in den bereits im Geh use vorhandenen Vorbohrungen anzieht Abb 2 Abbildung 2 Installation und Positionierung des eingelassenen Profils...

Страница 57: ...rgang muss von qualifiziertem Personal ausgef hrt werden das sicherstellen muss dass der Querschnitt der Kabel f r die vom Ger t aufgenommene Leistung geeignet ist Schlie en Sie keine anderen Ger tety...

Страница 58: ...reiter Halbmonde von Eis produziert GEFRIERMODUS in dem der Eisbereiter keine Halbmonde von Eis produziert sondern als Gefrierschrank verwendet werden kann 8 1 EISPRODUKTIONSMODUS W hrend der Eisprodu...

Страница 59: ...Warten Sie bis der Frost im Inneren der Schale vollst ndig geschmolzen ist Trocknen Sie die Innenw nde des Eisbereiters gr ndlich ab Lassen Sie die T r halb offen indem Sie die L ftungsposition am B g...

Страница 60: ...punkte haben und nicht gegen das Ger t vibrieren 11 3 EISBEREITER MIT UNZUREICHENDER LEISTUNG Kontrollieren Sie dass die T r dicht schlie t der Eisbereiter sich nicht in der N he von W rmequellen befi...

Страница 61: ...DE ICE MAKER XR ICE MAKER XT D C H A E I C E M A K E R X R F B G Abb 4 A C E I C E M A K E F B D J K...

Страница 62: ...DE Abb 4a ICE MAKER CL Abb 4b H G J K E I C E M A C I C E M A K E R X R A B D H G M I C E M A K E R N I C E M A K E L I C E M A J O I C E M A K E R...

Страница 63: ...DE Abb 4c Abb 4d D1 D2 D3 D4 D5 Abb 5 I P I C E M A K E R X R Q I C E M A K E R X R M I C E M A K E R X R N I C E M A K E R X R Q I C E M A K E R X R Abb 5a...

Страница 64: ...C1 mm IM CL 375 645 515 IM XT 375 490 630 IM XR 375 490 515 Einbautiefe mit T r innerhalb des Befestigungsprofils siehe Abb 2 Modell A mm B mm C mm IM CL 370 641 435 IM XT 370 486 555 IM XR 370 486 4...

Страница 65: ...Ortsteil Montecchio VALLEFOGLIA Italien erkl rt unter eigener Verantwortung dass das Produkt den Anforderungen der Niederspannungsrichtlinie LVD 2014 35 EG entspricht den Anforderungen der Richtlinie...

Страница 66: ...DE...

Страница 67: ...FR ICE MAKER IM CL IM XT IM XR Machines gla ons MANUEL D INSTALLATION DE MODE D EMPLOI ET D ASSISTANCE Lire attentivement avant utilisation FR...

Страница 68: ...FR...

Страница 69: ...ARRAGE MOD LE REFILL 7 2 D MARRAGE MOD LE HYDRO 8 UTILISATION DE LA MACHINE GLA ONS 8 1 MODE PRODUCTION DES GLA ONS 8 2 MODE FREEZER 9 INACTIVIT DE LA MACHINE GLA ONS 10 NETTOYAGE DE LA MACHINE GLA ON...

Страница 70: ...s bureaux Vitri Alceste Mod les IM CL IM XT IM XR 2 AVERTISSEMENTS Le manuel se r f re aux mod les de la s rie IM Pour la liste compl te des mod les et leurs dimensions se r f rer Annexe 1 Lire attent...

Страница 71: ...emballage en agissant avec la plus grande pr caution il est conseill pour viter les blessures accidentelles de porter des gants de protection V rifier que le produit ne soit pas endommag Tout dommage...

Страница 72: ...isamment ventil Si l environnement dans lequel on utilise un appareil contenant un r frig rant inflammable n est pas ventil l environnement doit tre compatible de sorte que toute fuite de gaz ne puiss...

Страница 73: ...e manuel et d un nettoyage et entretien constants et soigneux Certaines informations ou figures de ce manuel peuvent pr senter des d tails et des composants l g rement diff rents de ceux du produit en...

Страница 74: ...toujours la machine gla ons sur un plan horizontal L appareil doit tre positionn dans un lieu sec loin des sources de chaleur en garantissant une a ration suffisante de la machine Encaissement de l ap...

Страница 75: ...u r frig rateur pour la largeur voir fig 1a La partie avant du panneau frontal doit rester totalement libre Pour les situations d encaissement avec des tag res en contact avec les parties sup rieure e...

Страница 76: ...tilation pr voir pour la version IM XT sont La partie avant du panneau frontal doit rester totalement libre car elle pr sente l arriv e et la sortie de l air fig 1c La distance minimum entre les diff...

Страница 77: ...on d air correcte par ventilation forc e comme indiqu dans la figure 1d L encaissement doit garantir que toutes les parties sous tension de l appareil ne soient pas directement accessibles ainsi que l...

Страница 78: ...e la porte ou au ras de la caisse et serrer les vis dans les pr perforations d j pr sentes sur la caisse fig 2 Figure 2 Installation et positionnement profil encaissement Fixation de l appareil Pour l...

Страница 79: ...assurer que la section des c bles de la prise est adapt e la puissance absorb e par l appareil Ne connecter aucun autre type d appareil la machine gla ons 7 D MARRAGE Au moment de l installation la ma...

Страница 80: ...ons avec lequel la machine produit des gla ons en forme de demi lune Mode FREEZER avec lequel la machine produit les gla ons en demi lune mais peut aussi tre utilis comme cong lateur 8 1 MODE PRODUCTI...

Страница 81: ...int rieur de la cuve ait compl tement fondu Essuyer soigneusement les parois int rieures de la machine gla ons Laisser la porte moiti ouverte en utilisant la vent position pr sente sur le support I vo...

Страница 82: ...de contact et be vibrent pas contre l appareil 11 3 LA MACHINE A UN RENDEMENT INSUFFISANT Contr ler que la porte se ferme herm tiquement la machine gla ons ne soit pas pr s de sources de chaleur la m...

Страница 83: ...16 FR ICE MAKER XR ICE MAKER XT D C H A E I C E M A K E R X R F B G Fig 4 A C E I C E M A K E F B D J K...

Страница 84: ...17 FR Fig 4a ICE MAKER CL Fig 4b H G J K E I C E M A C I C E M A K E R X R A B D H G M I C E M A K E R N I C E M A K E L I C E M A J O I C E M A K E R...

Страница 85: ...18 FR Fig 4c Fig 4d D1 D2 D3 D4 D5 Fig 5 I P I C E M A K E R X R Q I C E M A K E R X R M I C E M A K E R X R N I C E M A K E R X R Q I C E M A K E R X R Fig 5a...

Страница 86: ...75 645 515 IM XT 375 490 630 IM XR 375 490 515 Profondeurprofondeur encaissement avec porte l int rieur du profil de fixation voir fig 2 Mod le A mm B mm C mm IM CL 370 641 435 IM XT 370 486 555 IM XR...

Страница 87: ...est situ via Mazzini 75 61022 frazione Montecchio VALLEFOGLIA Italie d clare sous sa propre responsabilit que le produit est conforme la Directive Basse Tension LVD 2014 35 CE est conforme la directiv...

Страница 88: ...FR...

Страница 89: ...ES ICE MAKER IM CL IM XT IM XR Fabricadores de hielo MANUAL DE INSTALACI N USO Y ASISTENCIA Leer atentamente antes del uso ES...

Страница 90: ...ES...

Страница 91: ...EN MARCHA 7 1 PUESTA EN MARCHA MODELO REFILL 7 2 PUESTA EN MARCHA MODELO HYDRO 8 USO DEL ICE MAKER 8 1 MODALIDAD FABRICACI N DE HIELO 8 2 MODALIDAD CONGELADOR 9 INACTIVIDAD DEL FABRICADOR 10 LIMPIEZA...

Страница 92: ...e con nuestras oficinas Vitri Alceste Modelos IM CL IM XT IM XR 2 ADVERTENCIAS El manual hace referencia a los modelos de la serie IM Para la lista completa de los modelos y sus dimensiones hacer refe...

Страница 93: ...icado Controlar que el embalaje est ntegro de lo contrario comunicarlo al transportista Sacar el aparato del embalaje operando con m xima precauci n se recomienda para evitar heridas accidentales el u...

Страница 94: ...no debe limpiarse con un chorro de agua El ambiente en el que se instala el aparato debe estar si es posible adecuadamente ventilado Se el ambiente en el cual es utilizado un aparato que contiene ref...

Страница 95: ...ura cuidadosa de este manual y de una limpieza y mantenimiento constante y cuidadoso Algunas informaciones o figuras de este manual pueden mostrar detalles y piezas que pueden diferir levemente de las...

Страница 96: ...e ser colocado en un lugar seco alejado de fuentes de calor asegurando al mismo suficiente ventilaci n Empotrado del aparato con condensador ventilado IM CL e IM XT Las dimensiones de la abertura fron...

Страница 97: ...rente debe permanecer totalmente libre Para situaciones de montaje empotrado con estantes en contacto con las partes superior e inferior del aparato realizar las aberturas de ventilaci n por encima y...

Страница 98: ...tilaci n a prever para la versi n IM XT son La parte delantera del frente debe permanecer totalmente libre ya que se tiene tanto la entrada como la salida del aire fig 1c La distancia m nima entre las...

Страница 99: ...ta circulaci n de aire mediante ventilaci n forzada como se muestra en la fig 1d El empotrado debe garantizar que no se pueda acceder directamente a todas las partes en tensi n del aparato as como a l...

Страница 100: ...borde de la puerta o de la caja y apretar los tornillos en los agujeros anteriores presentes en la caja fig 2 Figura 2 Instalaci n y colocaci n perfil de empotrado Fijaci n del aparato Para la fijaci...

Страница 101: ...e la toma sea adecuada a la potencia absorbida del aparato No interconectar ning n otro tipo de aparato al fabricador de hielo 7 PUESTA EN MARCHA En el momento de la instalaci n el Ice Maker realiza u...

Страница 102: ...hielo en la cual el fabricador produce las medias lunas de hielo Modalidad CONGELADOR en la cual el fabricador no produce las medias lunas de hielo pero puede ser usado como congelador 8 1 MODALIDAD P...

Страница 103: ...laci n el ctrica Vaciar la cubeta de recogida del hielo C Esperar a que la escarcha presente dentro de la cubeta est completamente derretida Secar cuidadosamente las paredes internas del fabricador De...

Страница 104: ...de contacto y no vibren contra el aparato 11 3 FABRICADOR CON RENDIMIENTO INSUFICIENTE Controlar que la puerta cierre herm ticamente el fabricador no est cerca de fuentes de calor que el fabricador es...

Страница 105: ...ES ICE MAKER XR ICE MAKER XT D C H A E I C E M A K E R X R F B G Fig 4 A C E I C E M A K E F B D J K...

Страница 106: ...ES Fig 4a ICE MAKER CL Fig 4b H G J K E I C E M A C I C E M A K E R X R A B D H G M I C E M A K E R N I C E M A K E L I C E M A J O I C E M A K E R...

Страница 107: ...ES Fig 4c Fig 4d D1 D2 D3 D4 D5 Fig 5 I P I C E M A K E R X R Q I C E M A K E R X R M I C E M A K E R X R N I C E M A K E R X R Q I C E M A K E R X R Fig 5a...

Страница 108: ...1 mm IM CL 375 645 515 IM XT 375 490 630 IM XR 375 490 515 profundidad empotrado con puerta dentro del perfil de fijaci n v ase fig 2 Modelo A mm B mm C mm IM CL 370 641 435 IM XT 370 486 555 IM XR 37...

Страница 109: ...via Mazzini 75 61022 frazione Montecchio VALLEFOGLIA Italy declara bajo su responsabilidad que el producto est conforme con la Directiva Baja Tensi n LVD 2014 35 CE est conforme con la Directiva Comp...

Страница 110: ...ES...

Страница 111: ...tta Dati Prodotto Product Identification IM Series Product Data Label Identifizierung des Produktes Serie IM Typenschild des Produktes Identification du produit S rie IM tiquette de donn es produit Id...

Страница 112: ...9600 0024 Rev 00 Vitrifrigo s r l Via Mazzini 75 fraz Montecchio 61022 VALLEFOGLIA PU Italia Tel 39 0721 154500 Fax 39 0721 497739 E Mail info vitrifrigo com www vitrifrigo com...

Отзывы: