


6
ENGLISH
ATTENTION!
If the steam is not constantly supplied during
operation, check whether the temperature con-
trol knob (11) is set properly and there is water in
the water tank (10).
BURST OF STEAM
The burst of steam function is useful for ironing
folds and can only be used at high ironing temper-
atures (when the temperature control knob (11) is
set to the position «
•••
», «
МАХ
»).
•
When pressing the burst of steam button (4)
steam will go out of the iron soleplate more
intensively.
Note:
To avoid water leakage from the steam openings,
press the burst of steam button (4) with an interval
no less than 4-5 sec.
VERTICAL STEAM
Vertical steam function can be used only at high
ironing temperatures (that is, when the tempera-
ture control knob (11) is set to «
•••
» or «
MAX
»).
Hold the iron vertically at the distance of 10-30 cm
from the clothes and press the burst of steam
button (4) with an interval no less than 4-5 sec.,
steam will be released from the openings of the
iron soleplate (13) intensively.
IMPORTANT INFORMATION: Vertical steaming
is not recommended for synthetic fabrics.
•
To avoid fabric melting, do not touch it with the
iron soleplate while steaming.
•
Never steam clothes on a person as tempera-
ture of the released steam is very high, use a
clothes hanger or a coat rack.
•
After you finish ironing, switch the iron off, wait
until it cools down completely, then open the
water inlet lid (2), turn over the iron and pour
out the remaining water.
STEAM CHAMBER CLEANING
To prolong lifetime of the iron we recommend
cleaning the steam chamber regularly.
•
Set the continuous steam supply knob (3) to
the position
O
.
•
Fill the water tank (10) up to the maximal mark
«MAX».
•
Place the iron on its base (9).
•
Insert the power plug into the mains socket.
•
Set the control knob (11) to the maximum sole-
plate temperature «
MAX
», the indicators (7
and 8) will light up.
•
When the soleplate (13) reaches the desired
temperature value, the indicator (8) will go out,
you can start cleaning.
•
Switch the iron off setting the temperature con-
trol knob (11) to the «OFF» position (SWITCHED
OFF). Remove the power plug from the mains
socket.
•
Hold the iron above the sink horizontally, then
press and hold the self-clean button (12) «self-
clean»
.
•
Boiling water and steam with scale will be
released from the iron soleplate (13) open-
ings.
•
Slightly sway the iron back and forth until all the
water leaves the water tank (10). Release
the button (12).
•
Place the iron on its base (9) and let it cool
down completely.
•
When the iron soleplate (13) cools down com-
pletely, wipe it with a dry cloth.
•
Before you take the iron away for storage,
make sure that there is no water in the water
tank (10) and that the iron soleplate (13) is
completely dry.
AUTO SWITCH-OFF FUNCTION
•
If the iron remains still for about 30 seconds
in horizontal position or for about 8 minutes in
vertical position, it will switch off automatically,
and the indicator (7) will be flashing. To switch
the iron on again just start ironing.
Note: - after switching the iron on the preset
soleplate temperature will be restored after some
time depending on the temperature control knob
position.
CLEANING AND CARE
•
Before cleaning the iron, make sure that
it is unplugged and has cooled down com-
pletely.
•
Wipe the iron body with a slightly damp cloth
and then wipe it dry.
•
Do not immerse the iron, the power cord
and the power plug into water or any other
liquids.
•
Scale on the iron soleplate can be removed
with a cloth soaked in vinegar.
•
After removing scale, polish the iron soleplate
surface with a dry cloth.
•
Do not use abrasives to clean the iron sole-
plate and body.
•
Avoid contact of the iron soleplate with sharp
metal objects.
Содержание VT-8356
Страница 1: ...1 VT 8356 Iron 3 8 14 20 26 31...
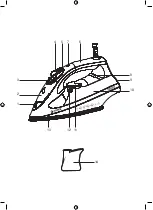
Страница 2: ...14 1 2 3 13 12 11 8 10 9 4 5 7 6...
Страница 8: ...8 VT 8356 1 2 3 4 5 6 7 8 9 10 11 12 13 14 30...
Страница 9: ...9 www vitek ru 13 10 3 2 O 4 5 11 OFF 10 10...
Страница 10: ...10 11 OFF 3 O 2 14 10 2 MAX 2 13 10 60 40 9 11 7 8 13 8...
Страница 11: ...11 8 5 10 9 3 O 11 7 8 13 8 11 OFF 9 3 O 10 11 7 8 13 8 3 13 11 OFF 3 O 11 10 11 4 4 4 5 11 10 30 4 4 5 13 2...
Страница 14: ...14 VT 8356 1 2 3 4 5 6 7 8 9 10 11 12 13 14 30...
Страница 15: ...15 www vitek ru 13 10 3 2 O 4 5 11 OFF 10...
Страница 16: ...16 10 11 OFF 3 O 2 2 14 10 2 MAX 2 13 10 MAX 60 40 9...
Страница 18: ...18 2 3 O 10 MAX 9 11 MAX 7 8 13 8 11 OFF 12 13 10 12 9 13 10 13 30 7 11 OFF 3 O 2 10 2 9 1 1 1 1...
Страница 19: ...19 220 240 50 2000 2400 2600 info vitek ru 3 i i i i i i i i i i i i...
Страница 20: ...20 VT 8356 1 2 3 4 5 6 7 8 9 10 11 12 13 14 30 i...
Страница 21: ...21 www vitek ru 13 10 3 2 O 4 5 11 OFF 10 10...
Страница 22: ...22 11 OFF 3 O 2 2 14 10 2 MAX 2 13 10 60 40 9 11 7 8 13 8...
Страница 23: ...23 8 5 10 9 3 O 11 7 8 13 8 11 OFF 9 3 O 10 11 7 8 13 8 3 13 11 OFF 3 O 11 10 11 4 4 4 5 11 10 30 4 4 5 13...
Страница 24: ...24 2 3 O 10 MAX 9 11 7 8 13 8 11 OFF 12 13 10 12 9 13 10 13 30 7 11 OFF 3 O 2 10 2 9 1 1 1 1...
Страница 25: ...25 220 240 50 2000 2400 2600 3 info vitek ru 2014 30 2014 35...
Страница 26: ...26 VT 8356 1 2 3 4 5 6 7 8 9 10 11 12 13 14 30...
Страница 27: ...27 www vitek ru 13 10 3 2 O 4 5 11 OFF 10 10 11 OFF 3 O 2 2 14 10 2 MAX 2...
Страница 28: ...28 13 10 60 40 9 11 7 8 13 8 8 5 10 9 3 O 11 7 8 13 8 11 OFF 9 3 O...
Страница 30: ...30 11 OFF 3 O 2 10 2 9 1 1 1 1 220 240 50 2000 2400 2600 info vitek ru 3...


