for more than 20 cups of coffee. However, do not grind a full load on the "Fine"
setting, as it may clog. For best flavor results, grind only as much coffee as
you'll need for your particular brew.
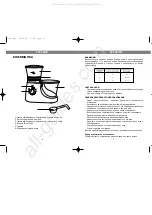
2. Turn the Grind Select Ring so that the Marker lines up with you
selected texture (A). A coarse grind works well for slower brewing in
a percolator; medium grind will get the best flavor extraction for
brewing in automatic drip coffeemakers or a French press; and fine
grind will produce a good texture for espresso or Turkish coffee.
Experiment with the texture of your grind to see what works best
with your coffeemaker.
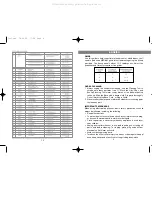
3. Plug in the Grinder. Turn the Timer Dial to your desired time (use the
chart to help you estimate) (B). You will have to experiment to find
the best processing time for your coffeemaker, taste preference,
and size brew.
4. Press the On/Off button and the beans will process, then the Mill will
shut off automatically. Note that the Timer Dial will not "count down
or move." If the Bean Cup is empty before the timer runs out, or if
you want to shorten the timing or turn the unit off, press the On/Off
button. If the Mill stops BEFORE your selected amounts of beans
are all ground, just hit On to restart.
5. When grinding is done, remove the Lid from the lower Coffee Grind
Cup and use the Cleaning Tool end of the Scoop to scrape grinds
from the chute into the Coffee Grind Cup(C).
6. Remove the Coffee Grind Cup by pulling it away from the unit and
lifting up. Use the Scoop to place grounds or brew basket.
7. Whole coffee beans should be stored in an air ting container in the
freezer for the freshest flavor. When ready to use, beans can be
ground, while still frozen. Extra ground coffee should be stored in an
airtight container in the refrigerator to retain flavor.
SPECIFICATION
Power requirement
230V ~ 50Hz
Max. power
120 W
SERVICE LIFE OF THE COFFEE GRINDER
2 YEAR
5
ENGLISH
Перед эксплуатацией прибора убедитесь, что все детали кофемолки
надежно закреплены на своих местах.
РЕКОМЕНДАЦИИ ПО ИСПОЛЬЗОВАНИЮ
1. В емкость для кофейных зерен засыпьте необходимое количество
зерен, согласно данным таблицы. Максимальный вес, который может
обработать кофемолка W 113 г. (приблизительно 20 кофейных кружек).
Для достижения наилучшего вкуса напитка рекомендуется
перемалывать
требуемое
количество
кофейных
зерен
непосредственно перед варкой.
2. С помощью регулятора режимов помола зерен выбирете
подходящий вам. При этом помните, что режим “Coarse” W подходит
для грубого помола кофейных зерен для приготовления напитка в
кофеварке. Режим “Medium” является универсальным и также
предназначен
для
приготовления
перемолотого
кофе
в
автоматической кофеварке. Режим “Fine” W подходит для мелкого
перемола зерен для приготовления эспрессо или турецкого кофе.
3. Подключите прибор к сети. Установите таймер на желаемое время
поворотом регулятора основываясь на данных таблицы.
4. Для начала помола нажмите на кнопку “Вкл./Выкл.”
По истечении заданного времени кофемолка отключится
автоматически. Если вы хотите сократить время помола нажмите на
кнопку “Вкл./Выкл.”.
5. Слегка постучите по стенкам емкости для молотого кофе, чтобы
осыпался прилипший к ним порошок. Откройте крышку емкости и
извлеките молотый кофе с помощью мерной ложки.
Примечание:
Аромат кофе будет максимальным, если хранить кофе в зернах и
молоть непосредственно перед приготовлением. Рекомендуется
хранить кофе плотно упакованным или в вакуумной упаковке, так как
кислород, содержащийся в воздухе, оказывает негативное влияние
на кофейные масла и ухудшает аромат.
СПЕЦИФИКАЦИЯ
Питание
230В ~ 50Гц
Максимальная мощность
120 Вт
СРОК СЛУЖБЫ КОФЕМОЛКИ
2 ГОДА
РУССКИЙ
8
1541.qxd 18.05.02 17:08 Page 10
All manuals and user guides at all-guides.com


