background image

www.vitamobilitywerks.com 

19 


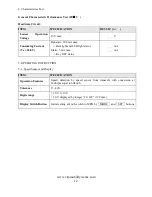
5-8, 9, 10. Indicators and Parking-Lamp Control 

ITEM 

SPECIFICATION 

Operation Feature 

Take  exterior  left-right  indicators  and  parking-lamps  switch  as  the 
determinant signal.   

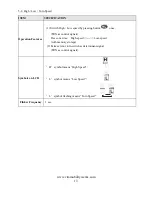
Control Mode 
(Left-direction lamp) 
 
(Right-direction lamp) 


(Parking lamp) 

Press  button

once,  the  right-indicator  and 

  turn  off, 

left-indicator and 

  flashing, warning sound act. Press

again to 

turn off left-indicator. 
 

Press  button

once,  the  right-indicator  and 

  turn  off, 

left-indicator  and 

  flashing,  warning  sound  act.  Press

again  to 

turn off left-indicator. 
 

Press  button

once,

turn  on,  right-left  indicators  and 


flashing  ,  warning  sound  act  .  Press

again  to  turn  off  the  Parking 

lamp function. 

Usage Condition 

While  (a)  KEY  OFF  (b)  Charging  Mode  (c)  Sleep  Mode,  all  functions 
closed. 

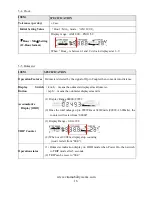
Flicker Frequency 

1 sec. 

Warning 

Sound 

Frequency 

One short “Bi” sound per second 

Determinant Condition 

Left-Right indicators have priority to Parking lamp. 

<Ex.>   
If  “Parking  lamp”  turned  on  already,  now  you  start  “Right  indicator” 
function,  the  flashing  indicator  lamps  will  change  from  both  side  (left  & 
right) to right side, and the “Parking lamp” function will be closed. 

Remarks 

(1) Load circuit for left-direction light: 24V/50W max 
(2) Load circuit for right-direction light: 24V/50W max 
(3) With “short circuit” and “overload” protection 


Содержание V7x

Страница 1: ...www vitamobilitywerks com 1 USER MANUAL VITA MOBILITY WERKS V7x...

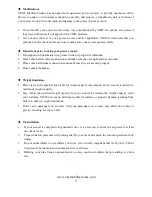
Страница 2: ...r operate the scooter while you are under the influence of alcohol Never use electronic radio transmitters such as walkie talkies or cellular phones Make sure that there are no obstacles behind you wh...

Страница 3: ...n the scooter Obey all local pedestrian traffic rules Wait until your path is clear of traffic and then proceed with extreme cautions 2 To prevent injury to yourself or others always ensure that the p...

Страница 4: ...lity to operate scooters in a safe manner 11 Be aware when the drive mode is unlocked or locked 12 Don t remove anti tipper if there is any tipper equipped with the scooter 13 Contact with tools can c...

Страница 5: ...d make sure they are secured properly 4 Please check the brakes u Weight limitation 1 Please refer to the specifications table for weight capacity information Power scooter is rated for a maximum weig...

Страница 6: ...owing statement be incorporated to the user s manual for all power scooter like the v7x Power scooters may as susceptible to electromagnetic interference EMI which is interfering electromagnetic energ...

Страница 7: ...AS POSSIBLE WHEN EXPERIENCING THE FOLLOWING Unintentional scooter movements Unintended or uncontrollable direction Unexpected brake release The FDA has written to the manufacturers of power scooters a...

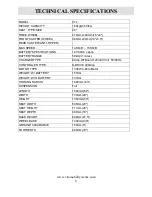
Страница 8: ...TIONS 12V 80Ah x 2pcs BATTERY RANGE 50km 31 miles CHARGER TYPE 8Amp Off Board 120 240 Volt 50 60Hz CONTROLLER TYPE S DRIVE 200Amp MOTOR TYPE 1300W 4 Pole Motor WEIGHT W BATTERY 151KG WEIGHT W O BATTER...

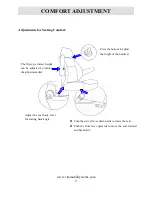
Страница 9: ...bottom to adjust the height of the headrest Adjust the seat back lever for seating back angle The flip up armrest height can be adjusted by turning the adjustment dial l Turn the swivel lever downward...

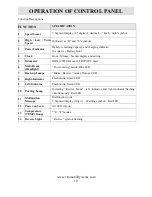
Страница 10: ...display and setting 5 Odometer ODO 99999 km max TRIP 99 9 max 6 Main Beam Headlight Power saving mode Blue LED 7 Back up Lamps Brake Reverse modes Orange LED 8 Right Indicator Flash mode Green LED 9...

Страница 11: ...eft Indicator Green Right Indicator Green Parking Red Headlight Blue Warning Red Back up lamp Amber LCD Backlight Illumination 700 mcd min Orange color LOGO Backlight Blue color Connecter CON1 20PIN 3...

Страница 12: ...max Backlight and LED light status Static 5 mA max Key OFF status mA mA 5 OPERATING INSTRUCTION 5 1 Speed Sensor and Display ITEM SPECIFICATION Operation Features Speed detection by speed sensor from...

Страница 13: ...ng button once TRN as control signals Press one time High speed Low speed with memory storage 2 Take exterior turn switch as determinant signal TRN as control signals Symbols on LCD H symbol means Hig...

Страница 14: ...25 12 55 3 24 78 40 2 24 42 30 1 23 88 and Flashing 20 Low power Warning Warning LED Flashing Flicker Frequency 2 sec Operation Characters 1 Scale status only decrease won t increase 2 When the remai...

Страница 15: ...26 92 90 6 28 5 100 7 Increase Frequency 0 5 sec Operation Character 1 Scale status only decrease won t increase 2 Take the PIN3 CH3 of charger as determinant signal enter Charging Mode when CH3 groun...

Страница 16: ...erts into distance Display Switch Button km h means the odometer displayed as kilometer mph means the odometer displayed as mile Accumulative Display ODO 1 Display Range 00000 99999 A M P M m i l e k...

Страница 17: ...ower Saving Mode When motor stop the modulation down to 30 Headlight When motor act 100 output power Headlight Usage Condition While a KEY OFF b Power Saving mode c Sleep mode all functions closed Det...

Страница 18: ...r flashing for 3 sec Determine as Reversing Mode back up lamp keep flashing Reverse warning sound can be set by panel Turn on Turn off Usage Condition While a KEY OFF b Charging Mode c Sleep Mode all...

Страница 19: ...icator Press button once turn on right left indicators and flashing warning sound act Press again to turn off the Parking lamp function Usage Condition While a KEY OFF b Charging Mode c Sleep Mode all...

Страница 20: ...ker Message code symbol LED Flicker Status 1 Flashing opposite to controller message Battery needs charge soon 2 2 On Low voltage needs charge now 3 3 On Over voltage 4 4 On Over current 5 5 On Park B...

Страница 21: ...22 F Display Switch Button When display C degree stand for Celsius thermometer When display F degree stand for Fahrenheit thermometer 5 14 Reverse Indicator ITEM SPECIFICATION Operation Feature Take e...

Страница 22: ...h type then press MODE to enter Setting Mode of C F 4 When C or F flashing Press SET to choose C or F Escape from Setting Mode Under setting mode if below situations happened will auto save the last s...

Страница 23: ...klight will be turned on voluntarily and turned off No any operation of ADJ button more than 5 sec 6 System Configuration ITEM SPECIFICATION Controller Ds162K01 Series Charger CTE 8A Battery WP12280 2...

Страница 24: ...40 C Switching Method SWITCHING MODE Charging Method Constant current two stage constant voltage Battery Application 24V Lead Acid Rechargeable Battery 26Ahr 75Ahr Output Detection 1 Short Circuit Pr...

Страница 25: ...g and cannot turn to charging indication Check if the battery connector is connected successfully Check if there is any short circuit on the output connection The battery charger may be defective if t...

Страница 26: ...n off the power after charging Important l Always charge your batteries in well ventilated areas l The charger is intended for indoor use only Please protect it from the moisture l For maximum perform...

Страница 27: ...l l If the battery cannot be charged Orange light cannot turn to Green or if the Orange light turns to Green immediately please check it with the technicians The battery may be defective l The voltage...

Страница 28: ...batteries need to be charged WEEKLY CHECKS 1 Your power scooter comes with standard pneumatic tires If your power scooter comes with optional air tires make sure to maintain the pressure of the tires...

Страница 29: ...ater Never hose off your power scooter or place it in direct contact with water l Keep wheels free from lint hair sand and carpet fibers l Visually inspect the tire tread If less than 1mm 1 32 please...

Страница 30: ...pting to troubleshoot on your own The following symptoms could indicate a serious problem with your power scooter Contact your local dealer if any of the following arises 1 Motor noise 2 Frayed harnes...

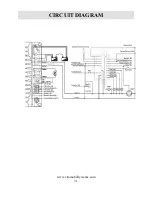
Страница 31: ...www vitamobilitywerks com 31 CIRCUIT DIAGRAM...

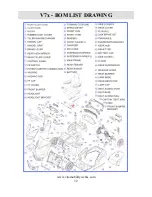
Страница 32: ...www vitamobilitywerks com 32 V7x BOM LIST DRAWING...

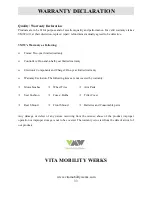
Страница 33: ...ontrollers One and a half year limited warranty Electronic Components and Charger One year limited warranty Warranty Exclusion The following items are not covered by warranty Motor brushes Wheel Tires...

Отзывы: