background image

User’s 

Manual 


14


3.1 

Front Panel Introduction 

The front panel controls enable user to control the unit and preset the 
programmable functions.   
 

3.1.1  

LED Definition 

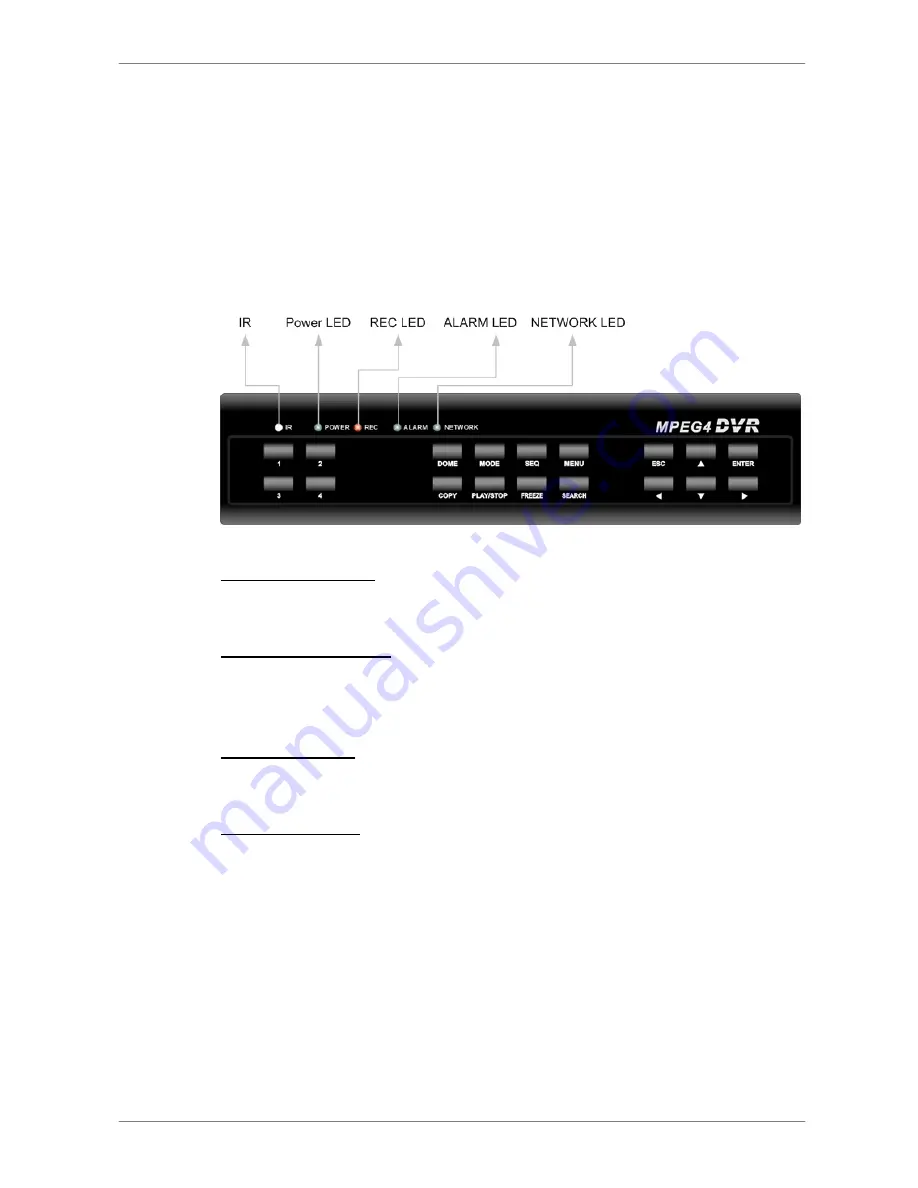
The MPEG-4 DVR LEDs on the front panel are described as follows. 


Power LED (Green) 

The LED lit during the period when the correct power is connected. 
 

Network LED (Green) 

The LED should be lit when MPEG-4 DVR is connected to a network and 
blink when the data is being transferred. 
 

Alarm LED (Red)


The LED should be lit during an alarm is triggered.   
 

REC LED (Green) 

The LED should blink while the MPEG-4 DVR is recording. 
 

Содержание MPEG-4 DVR

Страница 1: ...Version 1 2 00P379090ZSEA2 MPEG 4 DVR User s Manual 00P379090ZSEA2...

Страница 2: ...User s Manual 2...

Страница 3: ...cleaners or aerosol cleaners Use only a damp cloth for cleaning Always power down the system prior to connecting and disconnecting accessories with the exception of USB devices Lithium battery Danger...

Страница 4: ...dealer for assistance Rack Mounting Consult with the supplier or manufacturer of your equipment rack for the proper hardware and procedure of mounting this product in a safe fashion Avoid uneven load...

Страница 5: ...Setting 19 3 4 1 Set Date Time 19 3 4 2 Daylight Saving Time 20 3 5 Record Schedule Quality Setting 21 3 5 1 Record Mode 21 3 5 2 Schedule Setup 22 3 5 3 Preset Record Configuration 22 3 6 4 To Recor...

Страница 6: ...Deleting Recorded Video 30 4 6 Dome Control 31 4 6 1 Dome Connection 31 4 6 2 Dome Protocol Setup 32 4 6 3 RS485 Setup 32 4 6 4 Dome Controlling Keys 33 4 6 5 Setting Preset Points 35 4 6 6 Calling Pr...

Страница 7: ...eously while recording other video and to view wanted recorded video instantly by entering the time and date or selecting recorded video from the event list MPEG 4 DVR includes DVRRemote the remote vi...

Страница 8: ...hernet Support VGA main output optional Live display 120pps NTSC 100pps PAL 1 Channels in out for audio recording Support up to 2 internal HDDs USB2 0 port for video clip exporting support USB ThumbDr...

Страница 9: ...ability and flexibility of this digital recording system 2 System Setup The notices and introduction on system installation will be described particularly in this chapter Please follow the description...

Страница 10: ...always leave a space for air ventilation on the unit s bottom side 2 2 Selecting Video Format The MPEG 4 DVR is designed to operate under either NTSC or PAL video formats The switch is positioned on t...

Страница 11: ...tallations The following figure shows the connectors by name and followed by the detailed description of each connector LAN Connector RJ 45 The MPEG 4 DVR is capable of networking The LAN port opens t...

Страница 12: ...streams from installed cameras Alarm I O RS485 The unit provides an alarm I O and RS485 port that offers user the flexibility required to connect the unit to the other device The definitions of pins...

Страница 13: ...sable its UTP function NOTE UTP cable transfers not only Video Signal but also power for cameras 3 General System Setup The MPEG 4 DVR allows user to access some general operations through the front p...

Страница 14: ...the front panel are described as follows Power LED Green The LED lit during the period when the correct power is connected Network LED Green The LED should be lit when MPEG 4 DVR is connected to a ne...

Страница 15: ...ameras supported by the unit When in dome control mode the key named 1 is used to access the Set Go preset menu the key named 2 is used to hide or display the dome setting parameters DOME Press the ke...

Страница 16: ...EZE Press FREEZE while viewing live image the live video will be frozen The date time information shown on the monitor will continue updating Press FREEZE again to return to live mode Press FREEZE whi...

Страница 17: ...isappear when the unit has been completely powered up To Restart Shutdown the Unit Press MENU and input the administrator password to access the OSD Main menu Select Shutdown in Main Menu and press EN...

Страница 18: ...shown in the following table The same passwords are used for entering the remote viewing software DVRRemote Lite Administrator Password User Password 1 2 3 4 4 3 2 1 NOTE It is strongly suggested to...

Страница 19: ...FF Apr 1 st Sun 02 00 Apr Last Sun 02 00 60 Min 3 4 1 Set Date Time Set Date Time Select Date Time and press ENTER for adjusting the settings LEFT RIGHT keys are used to move the cursor to previous or...

Страница 20: ...ylight Saving Time Daylight Saving Time The item is for those people who live in certain regions to observe Daylight Saving Time Select ON to enable or OFF to disable the function If the function is d...

Страница 21: ...circumstance we recommend you to select 720x240 60PPS the default for this item Move the cursor to Record Mode and press ENTER then select a Record mode using UP DOWN keys NOTE After changing the Reco...

Страница 22: ...rection keys Press ENTER to confirm the settings or ESC to cancel If you want to have a weekend record choose YES to enable the Weekend Schedule in advance and then set the Weekend Start End time Pres...

Страница 23: ...ord Weekend Record Overall Recording Condition 2 Days No No No Fair NOTE The recorded event video can be accessed not only through the Event List but also through the Date Time Research using the PLAY...

Страница 24: ...operation under live mode is described as follows To Freeze Live Image Press FREEZE while viewing live image the image pauses but the date time information does not and the system clock continues runn...

Страница 25: ...yback video When the recorded video is paused press LEFT RIGHT to resume playback video single step reverse forward respectively Press FREEZE again to continue playing video PLAY STOP Press to start p...

Страница 26: ...t video by selecting channel as well In live or playback mode press SEARCH to enter the Search menu which is shown as follows Search Search By Time From End Start Time 2005 01 01 00 00 00 2005 05 01 0...

Страница 27: ...0 09 29 2005 03 11 12 18 20 2005 03 10 05 16 00 2005 03 08 17 11 37 2005 03 08 16 29 10 2005 03 08 03 22 17 Ch 2 5 3 1 1 7 6 4 2 8 2 Type Motion Alarm Alarm Motion Alarm Motion Motion Alarm Motion Mot...

Страница 28: ...has been connected to the DVR unit and the port has been set appropriately for video export According to the size of video the export may take you about 10 minutes to 1 hour 4 4 1 ezBurn Introduction...

Страница 29: ...port The playback continues Press COPY again on the point that you want to end the export Now the ezBurn window displays as below figure The information shown on the window is for read only ezBurn con...

Страница 30: ...the screen Press ENTER to start the export the whole event video to the connected device or press ESC to abort 4 5 Deleting Recorded Video User can delete the Normal and Event recorded video in Purge...

Страница 31: ...display the desired dome camera in full view To enter Dome Control mode press the DOME key and press channel key 2 to display the hint screen to exit the Dome Control mode and back to live mode press...

Страница 32: ...ated with dome camera using the Direction keys and ENTER The available protocol includes DynaColor Pelco D Pelco P AD422 Fastrax 2 and None default NOTE The settings become effective after saving the...

Страница 33: ...the changes and exiting from the menu 4 6 4 Dome Controlling Keys The function keys used in Dome Control are described as follows Set Go Preset This key is used to enter the Dome Preset menu to set up...

Страница 34: ...ode Auto Enter In OSD Menu mode the key is used to make selection In dome control mode this key is used to activate automatic focus and iris function Iris Close Use to close the Iris on the dome camer...

Страница 35: ...t Screen press 2 again to toggle the Hint Screen Hint Screen DOME ESC Exit MODE PLAY Iris Open Close SEQ FREEZE Focus Near Far MENU SEARCH Zoom In Out ENTER Auto Focus Iris Pan Tilt CH1 Set Go Preset...

Страница 36: ...Hint Screen press 2 again to toggle the Hint Screen Press 1 to access the Set Go Preset function Dome Preset Index 1 2 3 4 5 6 7 Set Preset NO NO NO NO NO NO NO Go Preset NO NO NO NO NO NO NO Use UP D...

Страница 37: ...Installation Plug Play Audio Input RCAx1 Line In Output RCAx1 Line Out Recording Compression Method MPEG 4 Advanced Simple Profile Recording Mode Schedule Alarm Motion Detection Pre alarm Yes Resoluti...

Страница 38: ...Remote Control IE Browser Windows AP Dome Control IE Browser Windows AP Front Panel Dome Control Protocol DynaColor Pelco P Pelco D AD422 Fatrax 2 Remote Operation Monitoring Playback Instant Recordi...

Страница 39: ...cond NTSC Total Images Per Second PAL NTSC 8 KB PAL 8 KB NTSC 11 KB PAL 11 KB NTSC 14 KB PAL 14 KB NTSC 17 KB PAL 17 KB NTSC 20 KB PAL 20 KB 160 GB Internal Storage 30 25 7 5 9 0 5 5 6 6 4 3 5 2 3 6 4...

Страница 40: ...50 22 0 26 5 14 0 16 8 10 3 12 3 8 1 9 7 6 7 8 1 30 25 44 1 52 9 28 1 33 7 20 6 24 7 16 2 19 5 13 4 16 1 15 12 5 88 2 105 8 56 1 67 3 41 2 49 4 32 5 39 0 26 8 32 2 7 5 6 25 176 4 211 6 112 2 134 7 82...

Страница 41: ...e 60 50 51 4 61 7 22 0 26 5 14 0 16 8 10 3 12 3 8 1 9 7 30 25 102 9 123 5 44 1 52 9 28 1 33 7 20 6 24 7 16 2 19 5 15 12 5 205 8 246 9 88 2 105 8 56 1 67 3 41 2 49 4 32 5 39 0 7 5 6 25 411 5 493 8 176...

Отзывы: