background image

BWC

September 2020

Visual Engineering

Video solutions. Integrated

visualengineering.co.uk

Page 7

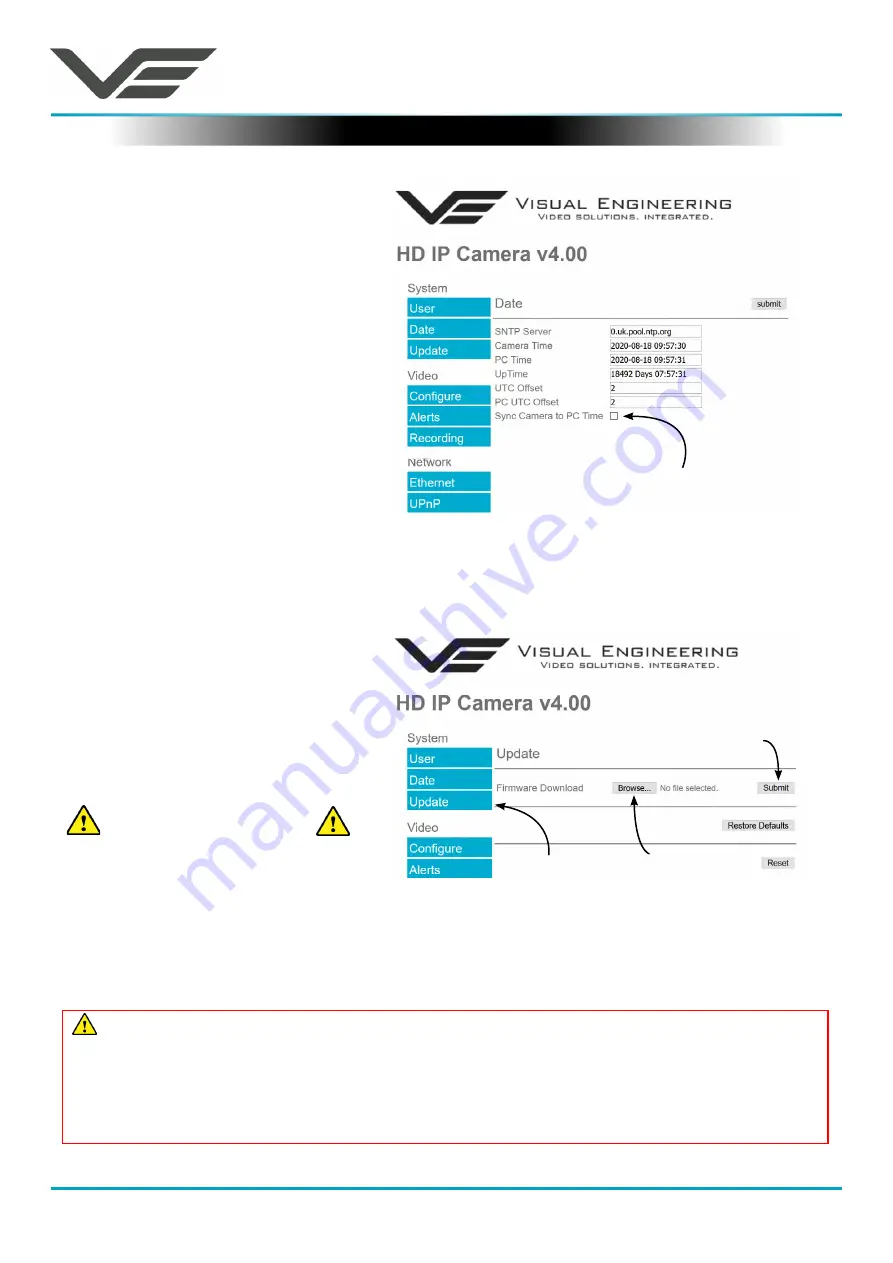
Date Menu

Update Menu

It is possible to update the 

firmware of the camera. There are 

three steps to updating the camera 

firmware, as shown on the right.

Only update the camera 

with files that have 

been approved by Visual 

Engineering. 

Use of other files will render 

the camera inoperable.

Tick this box and press 

submit

 to sync the camera 

to the PC time 

The date menu page allows the user 

to synchronise the camera time to 

a SNTP server. In this instance it is 

necessary to have the PC connected 

to a network.

If a network connection is not 

available it is possible to synchronise 

the camera to the PC time by ticking 

the “Sync Camera to PC Time” check 

box and pressing the 

submit

 button.

The “UTC Offset” can be altered to 

align the camera time with the local 

time zone. To align the camera to the 

actual PC time the “UTC Offset” should 

be made same as the value displayed 

in the “PC UTC Offset” field.

3. Submit 

the file

1. Select the 

Update tab

2. Browse to 

the file

Following a 

Submit

 the camera will update the firmware and display the following text:

Programming in Progress...Do not remove power


Wait until the web page clears this text before trying to move away from the current web page or 

powering off the camera. Updates typically take approx 3 minutes to complete.

       Important: To fully ensure the upgrade has finished it is advised to refresh the web page 

and check the banner displays

 “

HD IP Camera v4.00

” 

or the camera starts to once again stream 

video before switching off the power

.


It is advised that following a firmware update that the 

Restore Defaults

 button is pressed, this 

will revert the camera back to a default start state. The IP address of the camera will 

revert

 to its 

default IP address

 of 

192.168.1.195 

following a power cycle.

Pressing the 

Reset

 button will completely re-start the camera.

Содержание Body Worn Camera

Страница 1: ...BWC September 2020 Visual Engineering Video solutions Integrated visualengineering co uk Page 1 Body Worn Camera Body Worn IP Camera With Recording ...

Страница 2: ... Unreachable Cameras 13 UPnP Menu 14 Recording Menu 15 Recovering Recordings 16 Record Format 16 Using FileZilla 17 Using VLC to Play Streams 18 The VE Camera Viewer 20 Viewing Video 20 Video Panel Options 20 Settings 21 Play Recordings 21 Video Panel Coloured Border 23 Trigger Alarms 23 Pan Tilt Zoom Control 23 Advanced User 23 Multiple Viewing 25 TCP Vs UDP 25 Multiple Viewers 25 TCP UDP in VLC ...

Страница 3: ...and manage stored recording files is also covered This is followed up with a description of mounting options technical specifications and dimensions The VE part number for this manual is 110 3172 Warranty and Support All Visual Engineering products are supplied as standard with a 12 month Return to Base warranty In the event of a suspected product failure users should contact the Visual Engineerin...

Страница 4: ...re micro SD card storage Access to the stored movie files is via FTP transfer using the VE Camera Viewer software or an FTP transfer software tool The camera also supports control through the ONVIF protocol such that the camera can be controlled by and viewed on ONVIF compliant VMS platforms The outer casing is CNC machined aluminium this rugged build together with its IP65 environmental rating pr...

Страница 5: ...ion changes will be retained Browse to the camera s web page by typing the camera s IP address into the web browser address bar Default IP Address Body Worn Cameras are by default set with a fixed IP address of 192 168 1 195 If the camera is not responding on this address it is possible that the IP address has been changed If the new IP address is unknown the user can use the VE Camera Viewer soft...

Страница 6: ...P Server Connection OSD On Screen Display Audio Out Changes are only enabled when the submit button is pressed The primary mechanism for configuring the camera is its web browser interface The example screen below shows what is to be expected once a valid connection between the PC and camera has been established by typing the camera s IP address into the web browser address bar In this example it ...

Страница 7: ...cal time zone To align the camera to the actual PC time the UTC Offset should be made same as the value displayed in the PC UTC Offset field 3 Submit the file 1 Select the Update tab 2 Browse to the file Following a Submit the camera will update the firmware and display the following text Programming in Progress Do not remove power Wait until the web page clears this text before trying to move awa...

Страница 8: ...ith an IP address of 192 168 1 195 the URL is rtsp 192 168 1 195 jpeg It is possible to change the Encoder Type to any one of the following options HD IP Camera PAL Input NTSC Input Guardian Node SWZ HD Camera LVDS Input 25Hz LVDS Input 29 97Hz SDI Input 25Hz SDI Input 29 97Hz For normal operation it is not necessary to adjust the Encoder Type For correct camera operation it is important that the ...

Страница 9: ... 30fps users may choose to select lower frame rates thereby reducing the bandwidth required H 264 IDR Frame changes to the I frame interval balances the stream s quality against latency the lower the number the lower the latency Lower latency however can incur picture degradation due to the effect of limiting the decoder buffer Video Flip can be useful when the camera is installed upside down Vide...

Страница 10: ...m bandwidth available Changes to the resolution and frame rate will adjust the stream s bit rate The following table shows example bit rates for particular resolution and frame rate values Bit rate Available Resolution Frame Rate 5 10MB s 1920x1080 30 4 5Mb s 1920x1080 15 3 4Mb s 1280x720 30 2 3Mb s 800x450 30 1 2Mb s 800x450 15 512kb s 1Mb s 640x360 15 256 512kb s 320x180 15 ...

Страница 11: ...l triggers can be used to trigger an OSD On Screen Display event For this to occur users should ensure that the OSD Print option in the User Menu is enabled The level of motion required to invoke a trigger can be set with the Trigger Sensitivity between Off Low Mid or High The duration of the alarm event will be the duration of the motion event plus the time set in the Trigger Duration field value...

Страница 12: ...erver button HTTP Ports The default HTTP port and ONVIF HTTP port to control and configure the camera is 80 Selecting one of the five options as shown in the drop down box on the right will set both the HTTP port and ONVIF HTTP port number Moving the camera s HTTP port number should only be carried out by users confident of keeping a track on what settings have been applied to the camera Setting a...

Страница 13: ...ort 8080 This extended URL format should be used to address cameras reconfigured to a HTTP port number which is not the default number of 80 If a camera has been set to an unknown IP address it can be found by using the VE Camera Viewer this will find any camera s IP address regardless of the IP subnet If unsure which port the camera has been configured to run a VMS software tool such as the ONVIF...

Страница 14: ...al Engineering Video solutions Integrated visualengineering co uk Page 14 UPnP Menu The Universal plug and play menu allows the user to set the Device ID and Camera Name Users should press the submit button to enable changes ...

Страница 15: ... duration SD Card Management In the event of the SD card becoming full there are two options for Overwrite Control One option is to have the recordings stop when the SD card is full or the other option is to have the oldest material to be overwritten when the SD card becomes full Following any changes made in the menu the user must press the submit button Wait until the camera finishes re configur...

Страница 16: ...s containing motion will have an m appended on the end This is so any video clips with movement in the video can be easily identified When searching motion files it is advisable to also check for activity in the video in the file preceding any motion tagged file For the file described above with motion in the video it will have the complete file name of 170801134611m avi Recordings are stored in d...

Страница 17: ... shown here Username Camera Username the default is root Password Camera Password the default is 1234 Then press Quickconnect Files can be dragged across to the location selected on the local computer Recordings on the camera will be stored in the directory structure SD YYMMDDHH as shown above Individual files can then be selected and downloaded or dragged across to the storage location selected o...

Страница 18: ...need a video player application The camera is compatible with many players a simple freeware player is VLC Media Player Users should download VLC Media Player and run the application VLC is a free media player and can be downloaded from http www videolan org vlc index en_GB html Enable the VLC Media Player application From the Media menu select the Open Network Stream as shown below ...

Страница 19: ...ed visualengineering co uk Page 19 Enter the camera URL and stream type eg rtsp 192 168 1 195 h264 The URL depends upon the IP address of the camera and the stream type eg h264 or jpeg This is shown below Press play and the video stream will appear as shown below ...

Страница 20: ...yer The video can be viewed by clicking the Eye Icon next to the camera s name The video panel selector can be used to select how the video panels are arranged this is useful when several video feeds are in the system Video Panel Options The top of the video panel displays information on the playback mode of the displayed video In the above instance the video playback is a Live stream it can also ...

Страница 21: ...vanced User text The player will find all available files that are stored on the SD card in the camera The update screen as shown on the right will be displayed until all files are discovered Settings The video can be orientated as required using the Flip Video and Mirror Video options The Motion Sensitivity can also be set to Off Low Mid or High The Trigger Duration sets the alarm time in secs fo...

Страница 22: ... months that don t hold recordings are greyed out Select the required date days that don t hold recordings are greyed out Select the required hour of day hours that don t hold recordings are greyed out Select the required start and end time from the time dial Press the play icon The files will then be downloaded after which time the video recording can be viewed in the video panel ...

Страница 23: ...be shown in the bottom left corner The trigger icon is either a motion trigger or a low to high light level change as described in the table below Trigger Icon Trigger Source A low light level to high light level transition has been detected Motion has been detected in the video Pan Tilt Zoom Control PTZ is not supported in the Body Worn Camera Select a camera from the Camera List this will cause ...

Страница 24: ...values below 350mS are not recommended The camera is capable of transmitting H 264 and MJPEG video streams select the preferred stream to be viewed The video stream packets can be sent over TCP or UDP select the preferred transport method More information on these methods is described in the TCP Vs UDP section Select Multicast to On sends a request to the camera to send a multicast video stream Cu...

Страница 25: ... Multiple Viewing The camera is capable of transmitting a video stream over either UDP or TCP transmission protocols The benefits of each protocol is particular to the specific deployment of the camera In general terms UDP is a more efficient method which carries less overhead than TCP but lacks some reliability as not all video frames are required to be received in full For example if the camera ...

Страница 26: ...download available here https sourceforge net projects onvifdm The software will locate cameras on the network Click the Network settings tab to display the port that the camera is currently configured to In the example shown below camera s port is set to 8080 therefore the camera s URL is 192 168 1 195 8080 Video Management Systems ONVIF If the controlling PC and camera are on separate IP subnets...

Страница 27: ...pable of providing this gateway the settings and control interface will differ dependant on manufacturer and model The example below shows a router s NAT PAT Network Address Translation Port Address Translation configured to forward port 8080 the HTTP port and port 554 the RTSP port of the camera which has an IP address of 192 168 1 194 Both of these ports can be configured in the camera through t...

Страница 28: ...warded Remote Configuration Remote Video Streaming To stream the camera s video across the internet a URL similar to the ones described below should be used rtsp 90 81 72 63 554 h264 rtsp 90 81 72 63 554 jpeg In the above URL examples the internet router s gateway IP address 90 81 72 63 and the camera s RTSP port 554 should be substituted where relevant Ensure that the video bit rate of the camera...

Страница 29: ... September 2020 Visual Engineering Video solutions Integrated visualengineering co uk Page 29 Mounting The BWC includes a clip on the reverse this can be used to attach it to a tactical vest as shown below ...

Страница 30: ...D Card Camera Sensitivity 0 1 Lux Power Consumption 2W 2 5W Illuminated Camera Resolution Max 1920 x 1080p30 Min 320 x 240 IP Streaming RTSP over TCP or UDP Video Encoding H 264 and MJPEG Dual Streaming VMS Compliance ONVIF Max Bit Rate 10Mb s Environmental IP65 Field of View Horizontal 90º or 60º Dimensions 47 x 31 x 29 5mm LED Illumination Auto Switching or Disabled Weight 60g ...

Страница 31: ...way Colchester Essex Tel 44 0 1206 211842 CO3 8NB Web www visualengineering co uk UK Email sales visualengineering co uk BWC September 2020 Visual Engineering Video solutions Integrated visualengineering co uk Page 31 Dimensions All dimensions are in mm ...

Отзывы: