Vista Viper H5-49R Скачать руководство пользователя страница 16

12 

VIPER-H5-49R User manual V1.0 

3.


Live Screen Configuration 

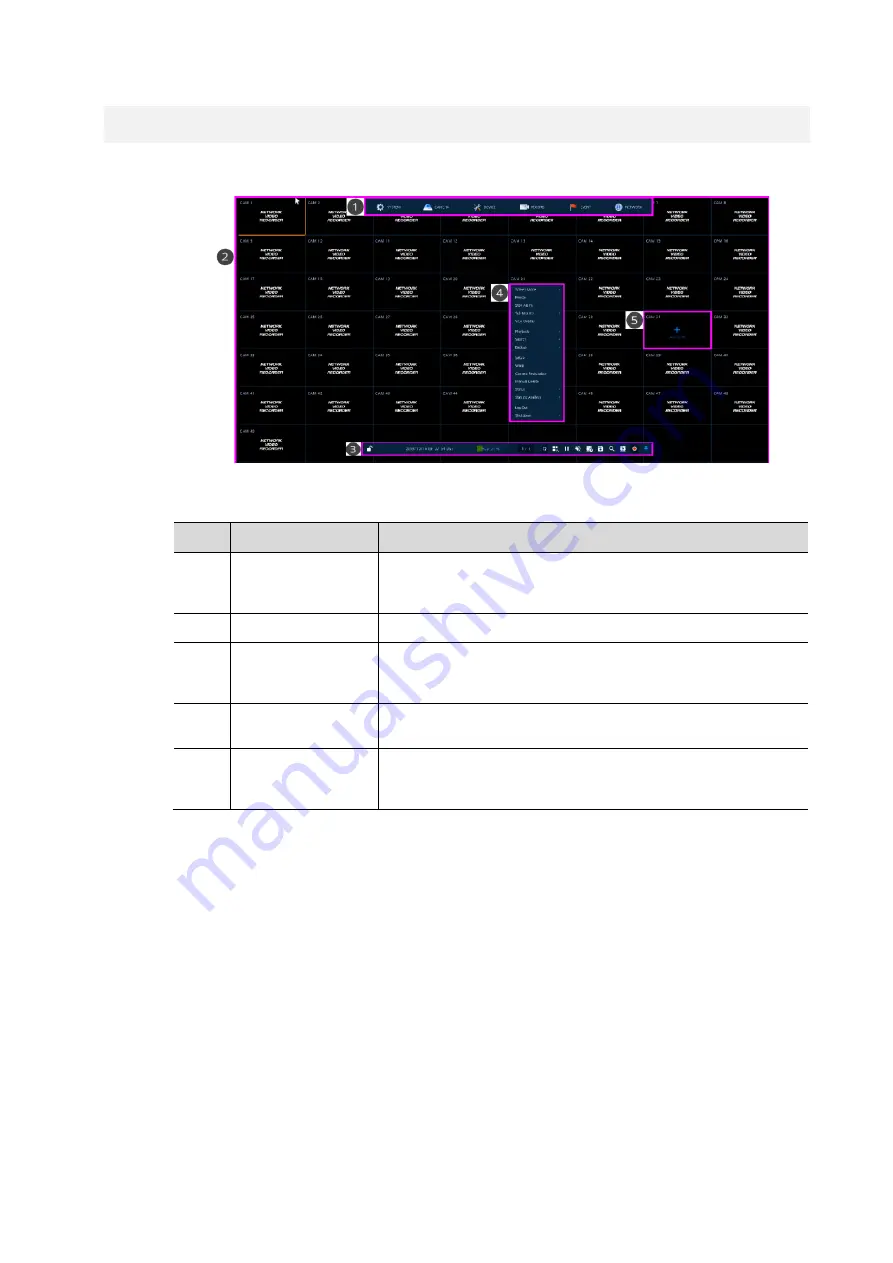
The following section describes the Live screen icons and User Interface (UI) 


Figure 3-1 UI Screen Configuration 

Table 3-1 Items and Description of UI Screen Configuration 

No. 

Item 

Description 

Setup menu 

Setting menu is located in the corner of upper screen. See 

4 Setup 

menu

” to display detailed information about the setting menu.

 Only 

available to admin logon. 

Live screen 

Shows live video of connected cameras, upto 49 (7x7) way split. 

Launcher menu 

Launcher menu is located at the bottom of the 

screen. See 

3.2 Live 

Launcher menu

” to display detailed information about the 

Launcher 

menu. 

Quick menu 

Clicking the right button of a mouse displays Quick menu. See 

3.3 

Quick menu

” to display detailed information about the quick menu.


Add to CH 

Move mouse cursor on the center of window to register IP camera 

manually. See

3.3.2 Camera Registration

” to display detailed 

information about the camera registration. 

Содержание Viper H5-49R

Страница 1: ...1 H5 49R 49 Chn H265 NVR User Manual Please read this manual thoroughly before use and keep it handy for future reference...

Страница 2: ...2...

Страница 3: ...nt damage Caution Improper use of this equipment can cause equipment damage Note Notes contain important information about a product or procedure This apparatus is manufactured to comply with the radi...

Страница 4: ...from the apparatus 11 Only use attachments accessories specified by the manufacturer 12 Unplug this apparatus during lightning storms or when unused for long periods of time 13 Refer all servicing to...

Страница 5: ...2 3 5 Easy Installation Wizard 11 3 Live Screen Configuration 12 3 1 Icons in Live screen 13 3 2 Live Launcher menu 15 3 2 1 Backup 16 3 3 Quick menu 18 3 3 1 PTZ Control 19 3 3 2 Camera Registration...

Страница 6: ...rial Device Serial Device 65 4 4 5 TEXT 66 4 5 RECORD 69 4 5 1 Schedule Schedule 69 4 5 2 Stream 72 4 6 EVENT 76 4 6 1 System Disk 76 4 6 2 Alarm In 78 4 6 3 Motion 81 4 6 4 Video Loss Setup 83 4 6 5...

Страница 7: ...or a smartphone video might be monitored by transmitting video and audio using a network The device features include the following Logical User Interface Records and displays up to 49 IP cameras Uses...

Страница 8: ...se 4 HDD fixing screw 5 Program CD 6 Quick guide 1 2 NVR Description Figure 1 1 Name and Connection of each front section Table 1 2 Name and Function of each front section No Name Function 1 USB port...

Страница 9: ...Connect power cord 2 POWER 1 2 Power on off switch 3 LAN IP camera input port 4 WAN Network connector 5 AUDIO IN OUT Audio input output port 6 HDMI Sub Connect main monitor 7 HDMI Main Connect sub mon...

Страница 10: ...of injury or electrical shock or device malfunction Make sure to check the compatibility of HDD with the device Always switch off and unplug the unit While pressing the red button on the front of the...

Страница 11: ...d so boot up will take a longer time When the buzzer sounds the start screen will be presented In Log in screen enter the ID Password and press OK Note Default ID Password is admin admin Click to see...

Страница 12: ...ate Easy Installation Wizard 2 3 1 Account Click the keyboard icon to set ID and Password required With keyboard UI set the ID and Password and then press OK Note Default ID Password is admin admin Th...

Страница 13: ...e NVRS on the system set each with a different Keyboard ID HDMI VGA Set resolution of a monitor connected to the device Note Video is not displayed through VGA port if set 3840x2160 resolution If reso...

Страница 14: ...the next setting phase 2 3 4 Time Date Set each item in Time Date setting screen Network Time Sync Select network for synchronizing with time server Recommended System Time Use this to manually set t...

Страница 15: ...on Wizard Select to run Easy Installation every time when the system start It is recommended to un tick this box after initial set up to ensure the Wizard does not operate after a power outage Press S...

Страница 16: ...ng menu Only available to admin logon 2 Live screen Shows live video of connected cameras upto 49 7x7 way split 3 Launcher menu Launcher menu is located at the bottom of the screen See 3 2 Live Launch...

Страница 17: ...umbers and camera titles 2 A camera with PTZ function 3 PTZ control function currently active 4 Recording in alarm event mode 5 Recording in motion event mode 6 Recording in panic recording mode 7 Rec...

Страница 18: ...14 VIPER H5 49R User manual V1 0 Figure 3 3 Chosen live screen channel...

Страница 19: ...ext camera or split scree partition 5 Displaying live screen in order set toggle 6 Selecting partition mode to show in live screen single screen 4 9 and 16 partition 7 Freezes the live screen display...

Страница 20: ...lct the device onto which to back up the video 7 Reload Search for attached USB devices 8 Folder Name Entering a folder name to save back up files 9 File format Selecting a file format to back up H4V...

Страница 21: ...e 3 5 Backup Mask Item and Description No Item Description 1 Select CH Select the channel to set the privacy zone 2 Privacy Mask Enable Select whether to use the Privacy Mask 3 Mask Zone Apply all or...

Страница 22: ...selected live screen images toggle on off 5 Speaker Output Mute Turn the speaker volume on off 6 PTZ Control Controls the PTZ function of moveable cameras This menu is shown when PTZ camera connected...

Страница 23: ...area 19 Log in Log out Log in Log out 20 Shutdown Shuts down or restarts the device shutdown restart Select Fisheye view mode to de warp fisheye camera There are 3 dewarping modes as Panorama Ceiling...

Страница 24: ...of the mouse displays Quick menu Figure 3 9 PTZ Control Quick menu Table 3 8 PTZ Control Item and Description in Quick menu No Item Description 1 Preset Go Move the camera to the selected preset posit...

Страница 25: ...tered 2 Auto Assign Automatically assign cameras to channels 3 Port Show the detected camera port LAN WAN 4 Assign Select the channel number that the camera is to be assinged to 5 Model Shows the dete...

Страница 26: ...Mode Select connection mode between Onvif or RTSP 2 ID PWD Enter ID and password of IP camera 3 Onvif URL Enter camera IP address Note only replace the URL section http url with the IP address of the...

Страница 27: ...o Item Description 1 Start Set the start time of the system log search 2 End Set the end time of the system log search 3 Log Type Select the log type to be displayed Network Record Setup Disk Backup a...

Страница 28: ...of the unit is displayed Figure 3 13 Status Event in Quick menu Table 3 12 Status Event Item and Description in Quick menu No Item Description 1 Freeze or release an event list toggle 2 Refresh Delete...

Страница 29: ...cted camera Figure 3 14 Status Record in Quick menu Table 3 13 Status Record Item and Description in Quick menu No Item Description 1 Record time Shows the oldest and newest recording on the NVR 2 Rec...

Страница 30: ...Status Disk in Quick menu Table 3 14 Status Disk Item and Description in Quick menu No Item Description 1 Disk Info Display disk temperature and S M A R T information 2 Rec Info Display recording peri...

Страница 31: ...te The Setup menus can also be accessed via the quick menu right click on the screen Table 4 1 Setup menu Item and Description No Item Description 1 SYSTEM Setting the system environment 2 CAMERA Sett...

Страница 32: ...Configuration Export Import Factory Default CAMERA Basic Basic Audio In Out Advanced Advanced Video Stream VA Stream Registration Registration Satellite Registration Setup DEVICE Display Display Spot...

Страница 33: ...3rd Level Disk Alarm In Setup Schedule Motion Setup Schedule Video Loss Setup POS Setup Notification Periodic Schedule NETWORK Basic WAN Port LAN Port IP Filter DVRNS DDNS DVRNS Dashboard DDNS E Mail...

Страница 34: ...2 General buttons in Setup menu Table 4 3 Item and Description of General buttons in Setup menu No Item Description 1 Default Reverse any changes made in that screen to factory settings 2 Save Save th...

Страница 35: ...Language Set the system language 2 Device Name Enter the device name 3 Video Type Select image standard types NTSC PAL 4 Keyboard ID Select keyboard ID 1 255 5 Remote Control ID Assign ID into remote...

Страница 36: ...tion 1 Current Version Displaying the present firmware version 2 Device Connect USB memory that has files to upgrade to the USB port select files to upgrade Note The file must be un zipped and on the...

Страница 37: ...created and user can select the list from search and backup menu Time overlap list can be created up to 20 lists a day 2 DST Start Set the start date of summer time 3 DST End Set the end date of summe...

Страница 38: ...olidays of the system Figure 4 6 SYSTEM Time Date Holiday Table 4 7 SYSTEM Time Date Holiday Item and Description No Name Function 1 Year Select years to set holidays 2 Delete selected holidays 3 Add...

Страница 39: ...ay Add Holiday Table 4 8 SYSTEM Time Date Holiday Add Holiday Item and Description No Name Function 1 Name Enter the holiday name 2 Date Display chosen date 3 Type Select the holiday types e g Selecti...

Страница 40: ...access Do not display live video if logged out 6 ADUP Archive Dual User Permission Two users should access to search playback and back up The users should both have administrator permission 7 Auto Lo...

Страница 41: ...name 2 PERMISSION Select items to permit access 3 Select channels to permit access Press Add User button then Add User screen displays Figure 4 10 SYSTEM Account User Add User Table 4 11 SYSTEM Accou...

Страница 42: ...tion No Name Function 1 Device Select an exterior connector with USB USB Displays the USB device connected Refresh button Re recognize the device 2 Import Apply information saved in USB to the device...

Страница 43: ...efault settings Figure 4 12 SYSTEM Config Factory Default Table 4 13 SYSTEM Config Factory Default Item and Description No Name Function 1 Select All Unselect All Select deselect all items to be defau...

Страница 44: ...Basic Basic Table 4 14 CAMERA Basic Basic Item and Description No Name Function 1 CH Display the channel name 2 Title Sync Change CH name to camera title 3 Title Enter the camera name of relevant cha...

Страница 45: ...p screen displays Figure 4 14 CAMERA Basic Basic Copy Covert Setup Table 4 15 CAMERA Basic Basic Copy Covert Setup Item and Description No Name Function 1 From Select a channel converted setting 2 To...

Страница 46: ...able 4 16 CAMERA Basic Audio In Out Item and Description No Name Function 1 No Display channels of audio 2 Use Select deselect whether to use audio 3 Assign Select channels to be assigned audio 4 Reco...

Страница 47: ...Item and Description No Name Function 1 CH Display channels 2 Video Setup camera image such as Color White Balance WDR AE and etc 3 Stream Setup camera stream such as Resolution Framerate Bitrate and...

Страница 48: ...amera manual 4 Backlight Compensation Enable or disable BLC function 5 White Balance Control contrast ratio when suddenly it became bright inside 6 Wide Dynamic Range Enable or disable WDR function 7...

Страница 49: ...values that can be set depend on the connected camera For details refer to the connected camera manual 3 Second Stream Sets Codec type Profile Resolution Framerate Bitrate GOP of Sub stream The value...

Страница 50: ...Name Function 1 CH Display channel 2 Mode Select whether to use this function in the NVR 3 Enable Video Contents Analysis Select to activate the VCA menu on the camera Note The Video Analytics VA men...

Страница 51: ...tion 1 CH Display channel 2 Enable Select to activate Privacy Mask function 3 New Mask Click to to create new mask on the screen Drage the mouse to change the size and position of the mask 4 ID Name U...

Страница 52: ...to activate Hi Stream function Video mode will be fixed to CVBR 3 ROI Select Static ROI or Dynamic ROI Static ROI is controlled based on the selected area Dynamic ROI is controlled based on the entire...

Страница 53: ...4 22 CAMERA Advanced Stream Table 4 23 CAMERA Advanced Stream No Name Function 1 CH Select channel 2 Copy Stream Setup Copy main recording image set value to other channels 3 Main Stream Set the image...

Страница 54: ...the camera registration 2 Registration list Displays the status of the currently registered IP camera 3 Import Register IP camera using text file format Click the Import button to open the Import win...

Страница 55: ...list are written in the following order Channel number IP address ID Password Device service address Web port Camera title Ex 1 192 168 0 8 admin admin http 192 168 0 8 onvif device_service 80 CAM1 A...

Страница 56: ...control of Decoder monitors Figure 4 25 CAMERA Satellite Registration Table 4 26 CAMERA Satellite Registration No Name Function 1 Delete the selected device 2 Add Satellite Add items to be connected o...

Страница 57: ...tup Figure 4 27 CAMERA Satellite Setup Table 4 28 CAMERA Satellite Setup No Name Function 1 Satellite Select device is connected to satellite 2 Monitor Select monitor to control with satellite MAIN1 S...

Страница 58: ...ellite as shown below Figure 4 28 Quick Menu Satellite Control Table 4 29 Quick Menu Satellite Control No Name Function 1 Display the satellite screen Control the setting of connected device directly...

Страница 59: ...ion of the display device 1920x1080 3840x2160 2 Event Popup Set duration of event popup screen Screen go back to original layout after duration time 3 Monitor Relay Switch Select whether to use monito...

Страница 60: ...ble 4 31 DEVICE Display Spot Item and Description No Name Function 1 Spot Output Resolution Set the resolution of the spot output Mouse Whether to use the mouse or not 2 Duration Sequence Channel chan...

Страница 61: ...EVICE Display OSD Table 4 32 DEVICE Display OSD Item and Description No Name Function 1 Camera Name Select what to display on live screen Off CH Title CH Title 2 Live Bar Select how to display the liv...

Страница 62: ...rtition mode to be marked in the below table All Full and Quad 3 Sequence List Display the sequence list based on division selected value 4 Add Sequence Add items to be included in the play sequence 5...

Страница 63: ...33 DEVICE Display Sequence Add Sequence Table 4 34 DEVICE Display Sequence Add Sequence Item and Description No Name Function 1 Dwell Time Select time to play 3 sec 5 sec 10 sec 15 sec and 30 sec 2 D...

Страница 64: ...Display Layout Table 4 35 DEVICE Display Layout Item and Description No Name Function 1 Division Select the division to set the layout 2 CH List Display the CH List based on layout selected setting C...

Страница 65: ...ecording Time starting time for saving information in the disk End Recording Time ending time to stop saving information in the disk Status disk status 4 S M A R T Display S M A R T information in dis...

Страница 66: ...PER H5 49R User manual V1 0 Disk RAID Select the RAID level NONE RAID 0 RAID 1 RAID 5 RAID 1 0 Figure 4 36 DEVICE Disk Setup Disk iSCSI Configure additional storage via iSCSI Figure 4 37 DEVICE Disk i...

Страница 67: ...y selected iSCSI IP address and port number Note Recorder support Max 6 volumes Target Node Each volume supports Max 16TB Clicking Register displays iSCSI Register screen Figure 4 38 DEVICE Disk iSCSI...

Страница 68: ...te iSCSI device IP address must be set as static IP not DHCP 4 4 3 PTZ PTZ To use PTZ Function of the device users need to match ID protocol and speed with each camera Figure 4 39 DEVICE PTZ PTZ Table...

Страница 69: ...Device Serial Device Table 4 40 DEVICE Serial Device Serial Device Item and Description No Name Function 1 USB to Serial Set communication transmission value of USB device 2 RS 485 Set communication...

Страница 70: ...p PORT1 PORT2 LAN 2 Use Select POS Setup use or not None Generic 3 Select Channel Click button to select the channel 4 Pos Name Set the POS name 5 Start Character Enter the start character NONE STRING...

Страница 71: ...tion No Name Function 1 Use Select deselect whether to use text function 2 CH Select camera channels to connect with the text input device 3 Protocol Select protocol to correspond with the text input...

Страница 72: ...Figure 4 43 DEVICE TEXT TEXT Copy to TEXT Setup Table 4 43 DEVICE TEXT TEXT Copy to TEXT Setup Item and Description No Name Function 1 From Select channels set 2 To Select the device to be copied 3 S...

Страница 73: ...edule Table 4 44 RECORD Schedule Schedule Item and Description No Name Function 1 CH Select the channel number to be configured 2 Schedule Type Selection Select the types of schedules for that channel...

Страница 74: ...on event recording mode when Alalrm events occur then switch to continuous mode when no motion M A Record on event recording mode when only alarm and motion sensitive event occur C M A Record on event...

Страница 75: ...VIPER H5 49R User manual V1 0 Copy Schedule Setup screen displays Select channels to be copied Select channels to apply copied content Copy the schedule by pressing Apply Press Save to save the schedu...

Страница 76: ...channels 2 Resolution Framerate Bitrate Shows the camera s main stream resolution framerate and bit rate 3 Continuous Select recording stream to be used for Continuous mode 4 Event Select recording st...

Страница 77: ...in Stream Copy Stream Setup Table 4 46 RECORD Stream Main Stream Copy Stream Setup Item and Description No Name Function 1 From Select the channel to be copied 2 To Select the channels to copy these s...

Страница 78: ...Stream Sub Stream Table 4 47 RECORD Stream Sub Stream Item and Description No Name Function 1 CH Display channels 2 Resolution Framerate Bitrate Shows the camera s sub stream resolution framerate and...

Страница 79: ...RECORD Stream Panic Item and Description No Name Function 1 Panic Record Select deselect to use immediate recording function 2 CH Display channels 3 Resolution Frame rate Quality Panic recording strea...

Страница 80: ...stem Disk System Table 4 49 Event System Disk System Item and Description No Name Function 1 System Restart Select deselect whether to use system restart event 2 Notification Select deselect whether t...

Страница 81: ...sk Unplugged Select deselect whether to use disk unplugged event 2 Beep Select deselect whether to use buzzer sound in case of event 3 Alarm out Select to end alarm time Keep 5 sec 10 sec 20 sec 30 se...

Страница 82: ...C NET N O Normally Open N C Normally Close NET Select when using the camera s alarm input function over the network 4 Beep Select use time of buzzer sound null 5 sec 10 sec 20 sec 30 sec 1 min 10 min...

Страница 83: ...ckbox Dwell Time Selecting alarm duration Keep 5 sec 10 sec 20 sec 30 sec 1 min 10 min 30 min and 1 hour 2 Group Recording Select deselect whether to use Group Recording 3 Simultaneous recording camer...

Страница 84: ...set the schedule 2 Schedule Type Selection Select the types of schedules 3 Schedule Table Display the schedule users set 4 Drag Field Display the area dragged with a mouse 5 Copy to Alarm Schedule Cop...

Страница 85: ...mera with Onvif 3 Area It is actived when Motion is selected in Use menu Sets the motion area and sensitivity 4 Sens It displays the sensitivity set in the Motion Area Level 1 10 5 Beep Select use tim...

Страница 86: ...ing is to be used Figure 4 55 Event Motion Schedule Table 4 55 Event Motion Schedule Item and Description No Name Function 1 CH Select channels to set schedules 2 Schedule Type Selection Select the ty...

Страница 87: ...ec 30 sec 1 min 10 min 30 min and 1 hour 4 Alarm Set alarm output 5 Group Rec Select the camera to record simultaneously 6 Noti Set email notices 7 Preset Set preset of PTZ camera 8 Copy to Video Loss...

Страница 88: ...annels 2 Use Tick to use the POS for this channel 3 Beep Select use time of buzzer sound null 5 sec 10 sec 20 sec 30 sec 1 min 10 min 30 min and 1 hour 4 Alarm Set alarm output 5 Group Rec Select the...

Страница 89: ...5 sec 10 sec 20 sec 30 sec 1 min 10 min 30 min and 1 hour 2 Group Recording Select deselect whether to use Group Recording 3 Simultaneous recording camera channel screen opens 4 Monitor Popup Select...

Страница 90: ...Periodic Item and Description No Name Function 1 Periodic Notification Select deselect whether to use periodical alarms 2 Summary Send the save or event information Record sending the save information...

Страница 91: ...em and Description No Name Function 1 Notification Type Selection Select the types of notification None E mail Push Mobile E mail Push 2 Schedule Table Display the schedule users set 3 Drag Field Disp...

Страница 92: ...dress Display the MAC Address 4 IP Address Subnet Mask Gateway Manually set these values 5 DNS Select manual and enter DNS otherwise choose automatic function 6 Port TCP RTSP Web Enter TCP RTSP and We...

Страница 93: ...NETWORK Basic LAN Ports Table 4 62 NETWORK Basic LAN Ports Item and Description No Name Function 1 DHCP Server Select whether to enable DHCP server 2 MAC Address Display the MAC Address 3 IP Address...

Страница 94: ...lter Table 4 63 NETWORK Basic IP Filter Item and Description No Name Function 1 Mode Select None to disable Select Access to access IP address range Select Deny to restrict IP address range 2 Range St...

Страница 95: ...DVRNS Dashboard Table 4 64 NETWORK DVRNS DDNS DVRNS Dashboard Item and Description No Name Function 1 DVRNS Register DVRNS account ID Enter DVRNS ID default MAC address of the unit Password Enter DVRN...

Страница 96: ...used when there is no external fixed IP address Figure 4 49 NETWORK DVRNS DDNS DDNS Table 4 49 NETWORK DVRNS DDNS DDNS Item and Description No Name Function 1 DDNS Site Select DDNS site 2 Host Name En...

Страница 97: ...ype Select SMTP server gmail com hotmail com aol com naver com daum net 2 Address Port Enter server address and port number 3 Image Attach Select deselect whether to attach AVI image 4 Authentication...

Страница 98: ...LAN Figure 4 66 NETWORK Warp Registration Table 4 66 NETWORK Warp Registration No Name Function 1 Use Warp Select whether to use Warp Registered devices can be selected in the Warp of a Quick menu 2...

Страница 99: ...vice list Click button to search for a new device 3 Name Enter the device name It is entered automatically when selected in the device list 4 Address Enter the device address It is entered automatical...

Страница 100: ...orwarding of routers Note connection time is generally slower than using a fixed IP address Figure 4 68 NETWORK P2P P2P Table 4 68 NETWORK P2P P2P No Name Function 1 P2P Registration Click button to c...

Страница 101: ...function searches recorded data using various methods including Time Event Thumbnail Smart Search Text and VCA Search Time Recording data is searched by date and time Figure 5 2 Search Time Table 5 2...

Страница 102: ...l Select deselect all channels 3 Start Setting starting time to search 4 End Setting ending time to search 5 Event Type Selecting the types of event Panic Motion Alarm In Video Loss Pin Interest and T...

Страница 103: ...from a scene Example car in car pak Figure 5 4 Search Thumbnail Table 5 4 Search Thumbnail Item and Description No Item Description 1 Calendar Selecting dates to search 2 CH Selecting channels to sea...

Страница 104: ...rch Item and Description No Item Description 1 CH Selecting channels to search 2 Area Setup Select area to search motion event 3 Start Setting starting time to search 4 End Setting ending time to sear...

Страница 105: ...ct deselect all channels 3 Start Setting starting time to search 4 End Setting ending time to search 5 Keyword Entering keyword to search 6 Case Sensitive Searching items in case sensitive 7 Whole Wor...

Страница 106: ...VCA Item and Description No Item Description 1 Select CH Selecting channels to search 2 Start End Set start time and end time 3 Event Type Selecting VCA event type 4 Search Search VCA event 5 Event Li...

Страница 107: ...ard and pause the videos 7 Play forward step 8 Play fast forward 2 64x 9 Go to last section of the video 10 Moving to previous next partition screens 11 Selecting the partition mode to mark in the scr...

Страница 108: ...time line by 1hour or 24hours toggle Click mouse right button to open quick menu in the playback mode Figure 5 10 Playback Quick menu Table 5 10 Playback Quick menu No Item Description 1 Screen Mode S...

Страница 109: ...P Max Recording Throughput 192Mbps Recording Mode Continuous Motion Alarm C M C A M A C M A Panic Pre Alarm 1sec 3sec Post Alarm 5sec 1hour PLAYBACK Simultaneous Playback 1 4 8 9 10 16 25 30 36 49 Spl...

Страница 110: ...nal block Alarm Out 2 Output Terminal block Serial Port 2 RS485 Terminal block USB 2 USB2 0 1 USB3 0 ETC Operating Humidity 0 90 RH Non condensing Operating Temperature 0 40 Power Supply AC 100 240V D...

Отзывы: