


D-301436
7
Your pendant transmitter can be activated by simply
pushing its red button. Once pushed, a signal is
sent from the pendant transmitter to the Base Unit
and the red LED on the pendant transmitter
illuminates. The Base Unit then calls the Monitoring
Center and opens a two-way voice communication
between the user and the Monitoring Center. The
Base Unit's display (AMBER CLASSIC only) shows
CALLING FOR HELP together with the name and
number of the activated pendant.
If your phone is ringing, pressing the pendant's
red button once will answer the incoming call. You
can then talk over the unit's speakerphone. To
end the speakerphone call and hang up, simply
press the pendant button again.
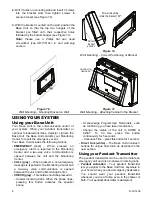
•
Neckband
- You can wear the pendant
transmitter using the neckband. Slip the tab on
the neckband into the slot on the pendant
transmitter and fasten the tab.
•
Optional
Wristband
- Your pendant transmitter
can also be used with an optional wristband. To
make the pendant transmitter wristband smaller,
slide the pendant transmitter towards the buckle.
To make the wristband larger, slide the pendant
transmitter away from the buckle.
Calling for Emergency Assistance
If you need emergency assistance, press the button
on your pendant transmitter or press the large, red
EMERGENCY button on your Base Unit.
If you press the EMERGENCY button on the Base
Unit, the display (AMBER CLASSIC only) shows
EMERGENCY BUTTON WAS PRESSED.
The Base Unit calls your Monitoring Center and
sends an emergency alarm. When your Monitoring
Center representative answers, you can hear him or
her talking to you through the Base Unit.
If you have a phone connected to the Base Unit
and want to use the phone to talk with the
representative, let the representative know and the
Monitoring Center will return your call.
Trouble
Trouble conditions are indicated by the red flashing
LED and by the sounding of beeps, and are
immediately reported to the Monitoring Center.
LED
Definition
Green (power)
On
AC power and battery power OK
Flashes
AC or battery problem detected
Yellow
Off
Away mode
On
Home mode
Flashes
Active reminder
Trouble messages are shown on the Base Station
display (AMBER CLASSIC only) until they are
resolved. Pressing the CHECK button confirms the
trouble condition and cancels the beeps.
The Base Unit continues to transmit trouble
messages every eight hours until the problem is
resolved.
Changing System Status
When the user wants to leave the premises, the unit
status must be changed to AWAY mode. The CHECK
button should be held down for 5 seconds. The unit
announces and displays (AMBER CLASSIC only)
AWAY – REMINDERS OFF.
In this state no medication reminders and no pendant
checks will be announced. The unit's speaker is
disabled and the yellow LED flashes.
If the pendant transmitter button is pressed while in
the AWAY mode, the unit will sound
"EMERGENCY" and reports to the Monitoring
Center. This initiates two-way communication
through the speaker. In addition, any device that is
alarmed while in AWAY mode immediately initiates
a call to the Monitoring Center (as in HOME mode)
and also initiates two-way communication.
To return the status to HOME mode, hold down
the CHECK button for 5 seconds. The unit's
speaker will announce and display (AMBER
CLASSIC only) "HOME – REMINDERS ON". The
yellow LED will turn off.
Clock Adjustment /
Announcement
To Set the Clock (AMBER CLASSIC)
1.
To enter the clock adjustment mode, press the
CHECK button three consecutive times. After each
press, be sure to wait for the time announcement
to complete before pressing again. The top line,
assigned to the Month, will begin to flash.
2.
Use Direct Link buttons 1 (scrolls up) and 2
(scrolls down) to set the current field value.
3.
Press Direct Link button 3 to scroll to select other
fields: month, day, year, hours, minutes, and
seconds.
4.
Press the Check button to set a new date or time
value.
Clock Announcement (AMBER
CLASSIC X)
Press the CHECK button to receive clock and status
announcement.
Note:
Clock adjustment is performed by the HHCPC
software.
Note:
Press the Call (Escape) button at any
time to return to normal operation mode. This
does not affect current time/date settings.
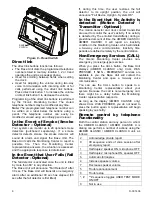
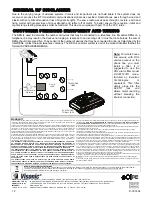
System Reset
To reset the system, simply insert a sharp object into
the reset switch hole, as shown in Figure 8.
01/15/2004
08:25:53 PM


