background image

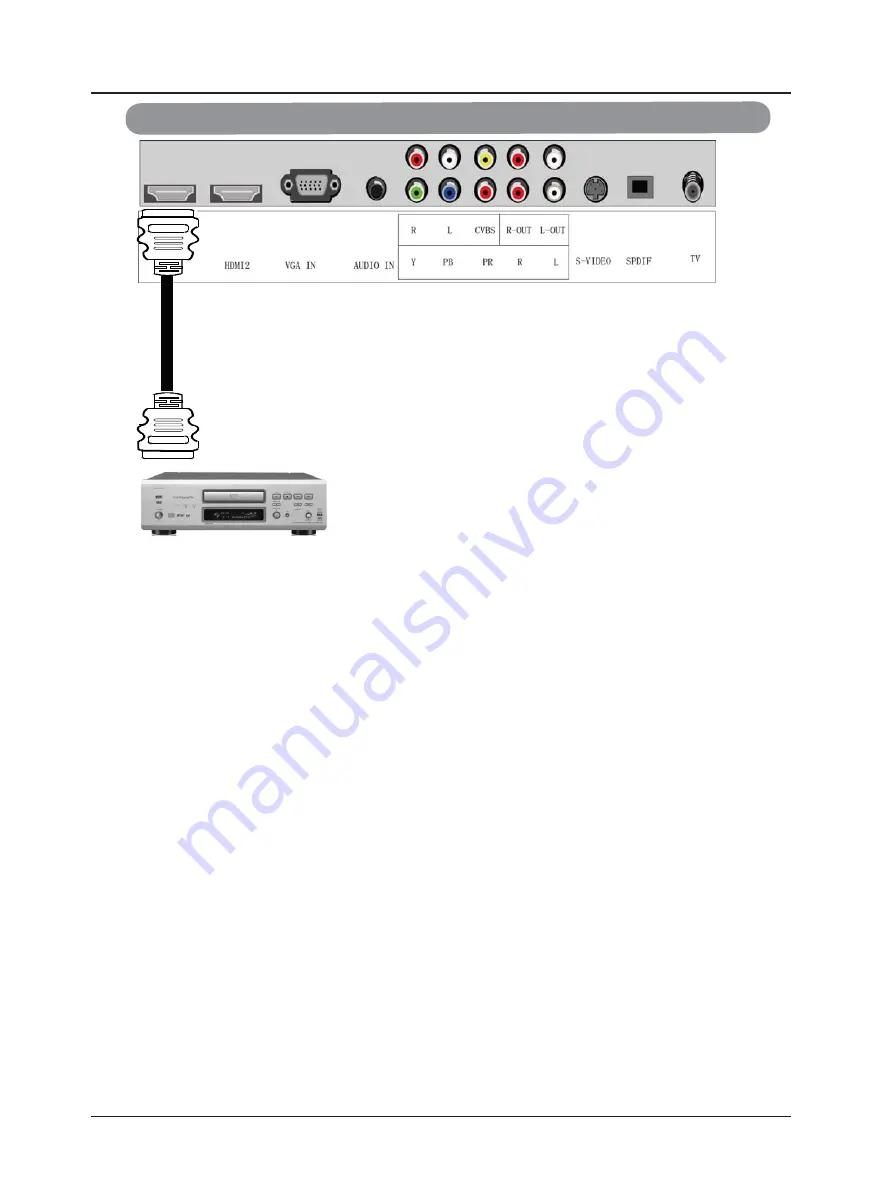
For DVD Players with DVI: 


1. Turn off the power to the LCD TV and DVD player. 
2. Using a HDMI-DVI cable, connect the DVI end to your DVD Player and the HDMI end to 
the  HDMI  input  (located  in the white area) in the rear of your LCD TV. 
3. Using an audio cable (white and red connectors), connect cable to the audio output 
connecters associated with the DVI out put on the rear of your DVD Player, and 
connect the other end to the audio c onnectors (white area) associated with the 
HDMI input in the rear of your LCD TV. 
4. Turn on the power to the LCD TV and your DVD Player. 
5. Select digital HD using the input button on the front of the LCD TV or directly by 
pressing the 

SOURCE

 button on the remote control. 


13


Содержание Rembrandt LVQ-42HLR-FHD

Страница 1: ...es not accommodate the three wire plug have an electrician install the correct outlet or use an adapter to ground the appliance safely Do not defeat the safety purpose of the grounded plug Do not over...

Страница 2: ...the mast and supporting structure grounding of the lead in wire to an antenna discharge unit size of the grounding conductors location of antenna discharge unit connection to grounding electrodes and...

Страница 3: ...s packaged in a carton Any standard accessories are packed separately in another carton The weight of the LCD display is approximately 35 00Kg Since the glass can be easily scratched or broken please...

Страница 4: ...s Please ensure the product is installed with the screen in landscape orientation Any 90 clockwise orcounterclockwise installation may induce poor ventilation and excessive component damage Preparing...

Страница 5: ...7 1 3 Illustration of the Interface Panel 9 4 Specifications 18 2 Connection and Preparation 10 2 1 Connect Antenna or Video Facility 10 2 2 Battery Installation of Remote Control Unit 10 2 3 Auto Se...

Страница 6: ...6 2 2 2 Menu Menu display 2 2 5 CH Press to scan throught channels 2 2 6 CH Press to scan through channels 2 2 3 VOL Press to turn up the volume 2 2 4 VOL Press to turn down the volume 2 2 1 INPUT Pr...

Страница 7: ...2 Remote Control Unit 7 TV PC Recall Lock List MTS EPG CC HDMI...

Страница 8: ...ource PMODE Press this button to select the desired picture mode SMODE Press this button to select the desired sound mode SLEEP Press this button to set the sleep timer When the preset length of time...

Страница 9: ...e Interface Panel Back panel control 1 HDMI1 10 2 HDMI2 3 PC VGA 4 PC AUDIO 5 S VIDEO YPBPR AUDIO R L 6 CVBS AUDIO R L 7 8 9 9 SPDIF AUDIO R L OUT TV NOTE R Right audio Red L Left audio White S video...

Страница 10: ...down Scratch the grip of the battery compartment 2 Install two new 1 5V AAA batteries make sure the anode and cathode of the batteries matches the marks inside the battery compartment Or not it would...

Страница 11: ...ning the black and white information and the other two containing the color information This enhancement over S Video takes advantage of the superior picture provided by progressive scan DVD players a...

Страница 12: ...uld be connected to the HDMI input of the HDTV for optimal results Connecting DVD Player Best 1 Turn off the power to the LCD TV and DVD player 2 Connect a HDMI cable to the HDMI output of your DVD pl...

Страница 13: ...ble white and red connectors connect cable to the audio output connecters associated with the DVI out put on the rear of your DVD Player and connect the other end to the audio connectors white area as...

Страница 14: ...oup green color band in the rear of your LCD TV 5 Connect the R red color and L white color audio connectors on the rear of your DVD player to the R red color and L white color audio input connectors...

Страница 15: ...connectors on the rear of your DVD player to the R red color and L white color audio input connectors in the side of your LCD TV 4 Turn on the power to the LCD TV and DVD player 5 Select AV using the...

Страница 16: ...3 Turn on the power to your LCD TV 4 Select TV using the INPUT button on the front of your LCD TV or directly by pressing the TV button on the Remote Control 3 2 5 Using the Antennaor Cable through Y...

Страница 17: ...ect RGB using the INPUT button on the front of your LCD TV or directly by pressing the SOURCE button on the Remote Control Note a For the best picture quality when connecting a computer through RGB se...

Страница 18: ...ccessories Remote Control Power cord Attention card regidtration card User Guide Power requirement AC 100 240V 50 60Hz Normal Power Dissipation 250W The whole machine parameters Standby Power Dissipat...

Страница 19: ...to enter the submenu Press MENU to return to the main menu from the submenu Press to select picture mode Vivid Standard Mild Custom Press ENTER to confirm and return to Press to adjust the contrast Pr...

Страница 20: ...Surround Press to select Surround on or off Press ENTER to confirm and return to preview menu AVL Press to select AVL on or off Press ENTER to confirm and return to preview menu SPDIF Type Press to se...

Страница 21: ...s 90ms 120ms or off Time Zone Press to select Time Zone mountain central alaska eastern hawaii palific Daylight Saving Time Press to select Daylight Saving Time on or Off Press ENTER to confirm and re...

Страница 22: ...pacity Press to select the Menu Opacity Zoom Mode Press to select the Zoom Mode normal wide zoom DNR Press to select the DNR off minimum maximum medium Closed Caption Press to enter the Closed Caption...

Страница 23: ...banklight Restore Default Press to restore the factory mode Lock menu Enter Password press digital button enter password and Press to check password the password of factory mode is 0000 Change Passwor...

Страница 24: ...d enter the US menu TV Press to adjust TV MPAA Press to select the MPAA Canada Press to select and enter the Canada menu Canada english Press to select the Canada english Canada French Press to select...

Страница 25: ...ter the Humor level menu intellgence level Press to select and enter the intellgence level menu Reset Press to select and enter the reset menu Press to select No Yes and press ENTER to confirm this fu...

Страница 26: ...tenna AUTO Scan Press to select and enter the auto scan menu Cable system Press to select cable system AUTO HRC IRC STD Start to Scan Press to select and enter the Start to scan menu 26 Press to selec...

Страница 27: ...enter the Favorite menu Show Hide Press to select and enter the Show Hide menu Channel NO Press to select Channel NO Channel Lable Press to select and enter the Channel Lable menu Press to select the...

Страница 28: ...C Press to select the PC and press to enter the PC menu H Pos Press to adjust the H Pos V Pos Press to adjust the V Pos Clock Press to adjust the Clock Phase Press to adjust the Phase AUTO Press to se...

Страница 29: ...00 VESA Guidelines 56 48 70 75 00 VESA Standard 1024 x768 60 02 75 78 75 VESA Standard 63 981 60 80 45 VESA Guidelines 1280 x768 79 976 75 85 41 VESA Standard 1360X768 47 7 60 85 5 VESA Guidelines 140...

Страница 30: ...ck if the INPUT button is set to AV position Picture lacks color or picture too dark Check color brightness and contrast controls are correctly adjusted All channels lose color Intermittently Check if...

Отзывы: