background image

C

ONFIGURING


THE

 S

CANNER

22

A

DJUSTING

 S

CAN

 S

ETTINGS


AND

 P

AGE

 S

ETTINGS

When scanning using a configuration that you created yourself, you can 
adjust that configuration’s scan settings and page settings. For example, 
if the scanned image is too dark, you can adjust the brightness of the 
scan setting.

To adjust the scan settings and page settings:
1. Display the Configuration dialog box.

Click the tab of the button whose options you want to change.

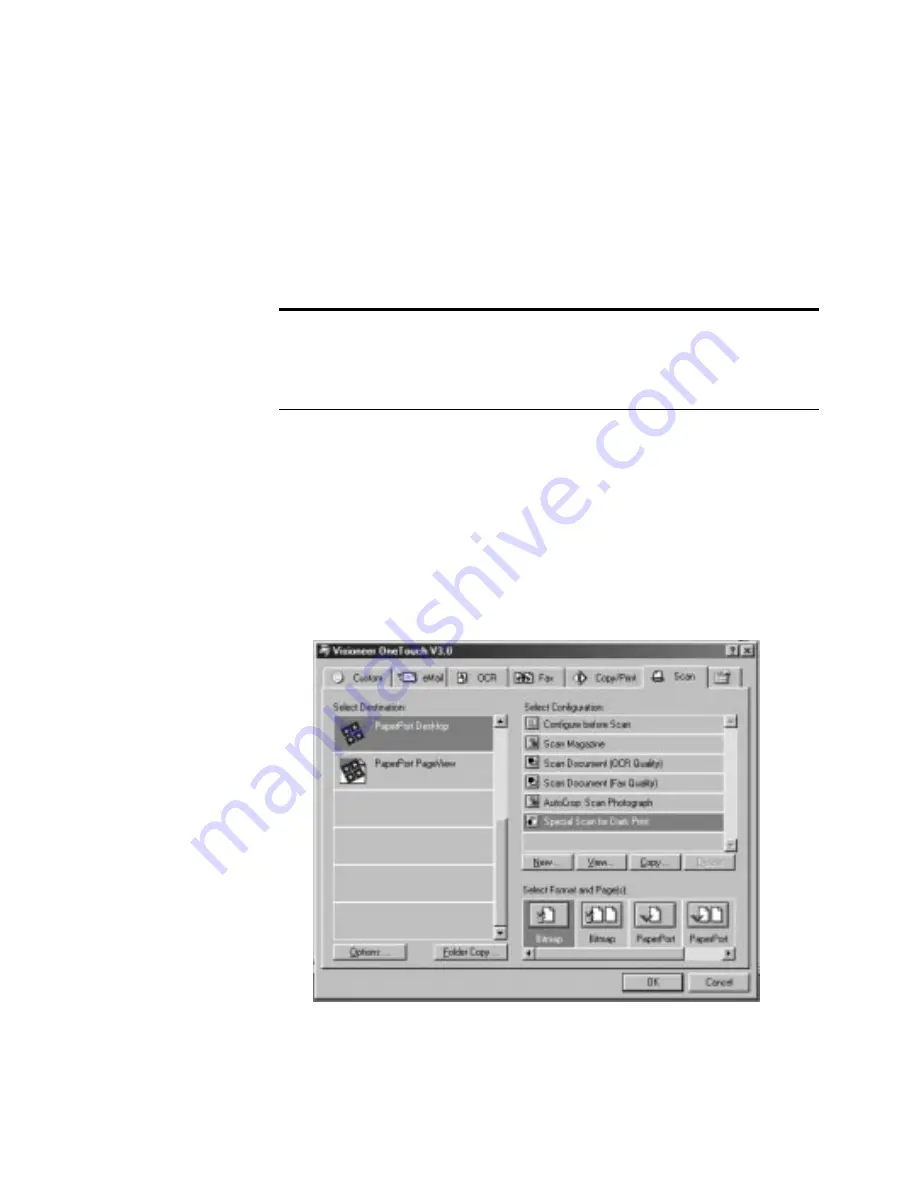
2. In the Select Configuration list, click the configuration that you 

want to adjust.

For example, the following figure shows a configuration named 
Special Scan for Dark Print (which you would have created earlier).

Note:  You cannot change the scan settings or page settings for any of 
the predefined scan configurations. You can only adjust settings for 
scan configurations that you create yourself. See the section above, 
“Creating New Configurations”.

Содержание OneTouch 8900

Страница 1: ...Visioneer OneTouch 8900 Scanner FOR USB CONNECTION Installation Guide...

Страница 2: ...YOUR EXCLUSIVE REMEDY CONCERNING THE PRODUCT ALL OTHER REPRESENTATIONS WARRANTIES OR CONDITIONS EXPRESS OR IMPLIED WRITTEN OR ORAL INCLUDING ANY WARRANTY OF MERCHANTABILITY FITNESS FOR A PARTICULAR P...

Страница 3: ...o Scan 13 Scanning by Pressing the OneTouch Buttons 14 Scanning from the Button Panel on the Screen 15 About the OneTouch Buttons 16 Configuring the Scanner 17 About the Configuration Dialog Box 18 Ge...

Страница 4: ...ion and Color Hue 41 Adjusting Output Size 43 Saving a Custom Size 47 The Scan Info Box 48 Zooming In and Out 48 Setting Preferences 48 Getting Help with the Scan Manager 50 Cleaning the Scanner Glass...

Страница 5: ...documents and color photos to place their electronic images on your computer WHAT S IN THE BOX Before starting the installation check the contents of the box to make sure that all parts are included...

Страница 6: ...HE VISIONEER ONETOUCH 8900 SCANNER 2 THE VISIONEER ONETOUCH 8900 SCANNER Glass Document pad Reference frame Document cover On Off switch Power jack OneTouch button panel TPA port USB port On Off light...

Страница 7: ...Touch buttons panel Press a OneTouch button to scan copy print email fax OCR convert items to text or scan with custom settings On Off light Shows that the scanner is receiving power On Off switch Tur...

Страница 8: ...hard disk space A VGA or SVGA monitor Recommended settings for your monitor are as many colors as possible High Color 16 bit True Color 24 bit or 32 bit Set the resolution to at least 800 by 600 pixe...

Страница 9: ...no other applications are running 2 Insert the PaperPort CD into your computer s CD ROM drive The CD automatically starts Note You must install the PaperPort software before connecting the scanner to...

Страница 10: ...ish in the dialog box above 5 When a message asks if you want to restart your computer before using your scanner select restart your computer and click OK Restarting your computer sets up the files th...

Страница 11: ...end of the USB cable into an available USB port Some newer computers also have keyboards with USB ports You can plug the scanner into the keyboard instead of the USB port on the computer 2 Turn the s...

Страница 12: ...t attach easily make sure that you are plugging it in correctly Do not force the plug into the connection 4 Plug the power adapter cable into the power jack on the back of the scanner 5 Plug the power...

Страница 13: ...r screen becomes active 7 Click the Finish button The scanner s on off light turns from amber to green when the scanner and computer are communicating properly That completes the steps to connect your...

Страница 14: ...e the one in this figure If the icon has a red X through it the scanner is not properly connected See the next section If the Scanner Is Not Properly Connected for the steps to fix the problem To chec...

Страница 15: ...o another electrical outlet Is the scanner s locking tab in the locked position Slide the locking tab to the unlocked position If you tried to scan with the scanner locked you must restart your comput...

Страница 16: ...the connection The scanner icon will no longer have a red X through it and you re ready to begin scanning If you try all the troubleshooting procedures described above and in the Readme file and the...

Страница 17: ...n the scanner s front panel Scan from the Screen Click the scanner icon on the Windows taskbar A panel representing the scanner buttons appears Click a button on the panel on the screen Scan from the...

Страница 18: ...s face down and press one of the scanner buttons The scanner starts scanning the item A message just above the Windows taskbar shows the status of the scanning When scanning is complete the status mes...

Страница 19: ...The scanner starts scanning the item the messages about the scanning appear above the Windows taskbar the progress window shows the image as it is scanned When the scan is complete the scanned image...

Страница 20: ...ur printer copier at the printer copier s default resolution Fax Displays the scanned item in your fax software as a black and white image at the default resolution of your fax software or modem OCR C...

Страница 21: ...o display the Configuration dialog box from the shortcut menu 1 Right click the scanner icon The shortcut menu appears 2 Choose Configure on the shortcut menu The Configuration dialog box appears Clic...

Страница 22: ...ed Photograph for Editing and then after the scanning is finished to open Microsoft Paint to display the scanned image The Format and Page s setting is to scan as a bitmap for a single page item See S...

Страница 23: ...nd whether to scan a single page or multiple pages The formats are bitmap and PaperPort Use PaperPort for scanning any item Bitmap format is usually for photos or artwork The page icons represent sing...

Страница 24: ...ion and image format for a scanner button to optimize it for the type of scanning you want to do You use the Configuration dialog box to select new options To select new options for a scanner button 1...

Страница 25: ...using the new configuration settings and displays the scanned image in the new destination application CREATING NEW CONFIGURATIONS You cannot change settings such as brightness or contrast of the pres...

Страница 26: ...1 Display the Configuration dialog box Click the tab of the button whose options you want to change 2 In the Select Configuration list click the configuration that you want to adjust For example the f...

Страница 27: ...aphs The scanning produces an image in varying shades of gray Select Color to scan color photographs and other color items Resolution Drag the slider to the right or left to adjust the dots per inch d...

Страница 28: ...to in the middle of the glass the scanner will automatically determine the size of the photo When AutoCrop is selected the scanner makes two passes the first pass senses the item s size and the second...

Страница 29: ...rs Make sure the configuration you just defined is selected 7 Click OK on the Configuration dialog box The new configuration and its adjusted settings now apply to the button whose tab is selected at...

Страница 30: ...r example the destination applications for the email button are usually email applications By selecting the Show All Destinations option as the preference for the email button all the other types of a...

Страница 31: ...Select this option to see the small icon representing the OneTouch scanner in the Windows taskbar Scanner Lamp turns off These options control when the scanner lamp powers goes off After idling for x...

Страница 32: ...ption automatically puts the computer into standby mode Folder for Temporary Images Click the Folder button and then select a folder for the scanner s temporary images During scanning a temporary file...

Страница 33: ...sktop appears 2 From the PaperPort File menu choose Select Source The Select Source dialog box appears and shows your Visioneer Scan Manager Pro software as well as all other Twain devices installed o...

Страница 34: ...rPort Desktop appears 3 Click the Twain icon on the Command Bar or choose Acquire from the File menu The Visioneer Scan Manager Pro appears Note Your Visioneer OneTouch scanner is initially set to sca...

Страница 35: ...Click a setting in the list if you want to change it The setting s options appear on the right side of the Scan Manager where you can select new options if necessary Click AutoScan to scan with your...

Страница 36: ...scans the item and displays a preview using the options you selected 3 Review the image to make sure it s what you want 4 To adjust one of the settings for the scan click it in the list of settings A...

Страница 37: ...an settings In addition your OneTouch 8900 scanner has built in image analysis capabilities that find the optimum combination of settings for the item you re scanning When you click AutoScan the scann...

Страница 38: ...s Guide on the CD for more information about using the PaperPort software GETTING HELP WITH THE PAPERPORT SOFTWARE The PaperPort software includes a complete set of help topics that answer questions...

Страница 39: ...ng button on the right side of the Scan Manager The following figure shows an example of the Scan Manager if you click the Resolution setting in the list or click the Resolution and Sharpen button Res...

Страница 40: ...elect a configuration on the Scan Manager such as Color Custom 2 Adjust the settings that you want for later use Click to close the settings panel Note The information in the scan settings list and th...

Страница 41: ...lution determines the amount of detail you can see in the scanned image The resolution setting for the scan is in dots per inch dpi The higher the resolution the finer the details however higher dpi s...

Страница 42: ...l scanned items click one of the options in the list For example to set the resolution for scanning a business card select Business Card OCR That setting is sufficient for your optical character recog...

Страница 43: ...amount of moire patterns click Reduce Moire Moire patterns are wavy rippled lines that sometimes appear on the scanned images of photographs or illustrations particularly newspaper and magazine illus...

Страница 44: ...u at the top of the Histogram 3 Click the Auto button to have the scanner analyze the image and set the appropriate brightness and contrast You can also adjust the brightness and contrast by sampling...

Страница 45: ...ration to scan you can adjust a group of color settings Gamma controls the brightness of the midtones of the color saturation is the strength or purity of a color and hue is the color your eyes see as...

Страница 46: ...curve 3 Drag the Gamma Saturation and Color Hue sliders to the left to decrease the settings or to the right to increase the settings You can also type a number directly into the setting boxes or clic...

Страница 47: ...he Auto Trim option to automatically eliminate the unwanted sections of the image You can also adjust the output size to scan only specific sections of an image For example if you re scanning a photog...

Страница 48: ...where you want it put the pointer on the line and drag the mouse For example if you want the scan to include a border around the image you can drag the dotted line to be slightly larger than the autot...

Страница 49: ...t for the new area click the drop down arrow and choose new units if you want Resolution the dots per inch dpi setting for the new area Scale the amount of enlargement or reduction of the image to fil...

Страница 50: ...ck Rotate 90 Degrees 6 To maintain the selected area s length to width relationship known as the aspect ratio click Maintain Aspect Note that as you rotate the area or maintain its aspect ratio the wi...

Страница 51: ...you can create a custom size and reuse it whenever scanning those items To save a custom size setting 1 Click Add under the list of sizes The Add Size dialog box appears 2 Type a name and dimensions...

Страница 52: ...return the image to its full size click the Pointer button directly above the Zoom button put the pointer on the image and click the right mouse button Select Show Full Image from the pop up menu tha...

Страница 53: ...nly a 24 bit depth range of colors Select this option to automatically allow the Scan Manager s color settings to support more than a 24 bit depth if the other devices also support the greater range o...

Страница 54: ...ored in a folder before being sent to the PaperPort Desktop or some other application Instead of using the default folder specified by the Scan Manager you can select another folder on your computer U...

Страница 55: ...help topics click the drop down menu at the top of information 4 Click the Help button again or click Exit on the window to exit the help system CLEANING THE SCANNER GLASS Scanning items that have exc...

Страница 56: ...llation procedure was not successful You need to reinstall the PaperPort software I got the error message PaperPort cannot allocate enough memory to perform internal critical operations What do I do Y...

Страница 57: ...imensions Height 4 0 inches 10 2 cm Width 11 7 inches 29 7 cm Length 16 7 inches 42 4 cm Weight 6 2 pounds 2 7 kg Operating temperature 50 104 F 5 35 C without condensation Relative humidity 20 80 35...

Страница 58: ...VISIONEER ONETOUCH 8900 SCANNER SPECIFICATIONS 54...

Отзывы: