background image


                                                                    SPIRIT II G 6-10KVA PF0.9 LCD    -    UPS                                          www.visionups.com 

- 9 -


1.5.2 LCD Operation instruction 

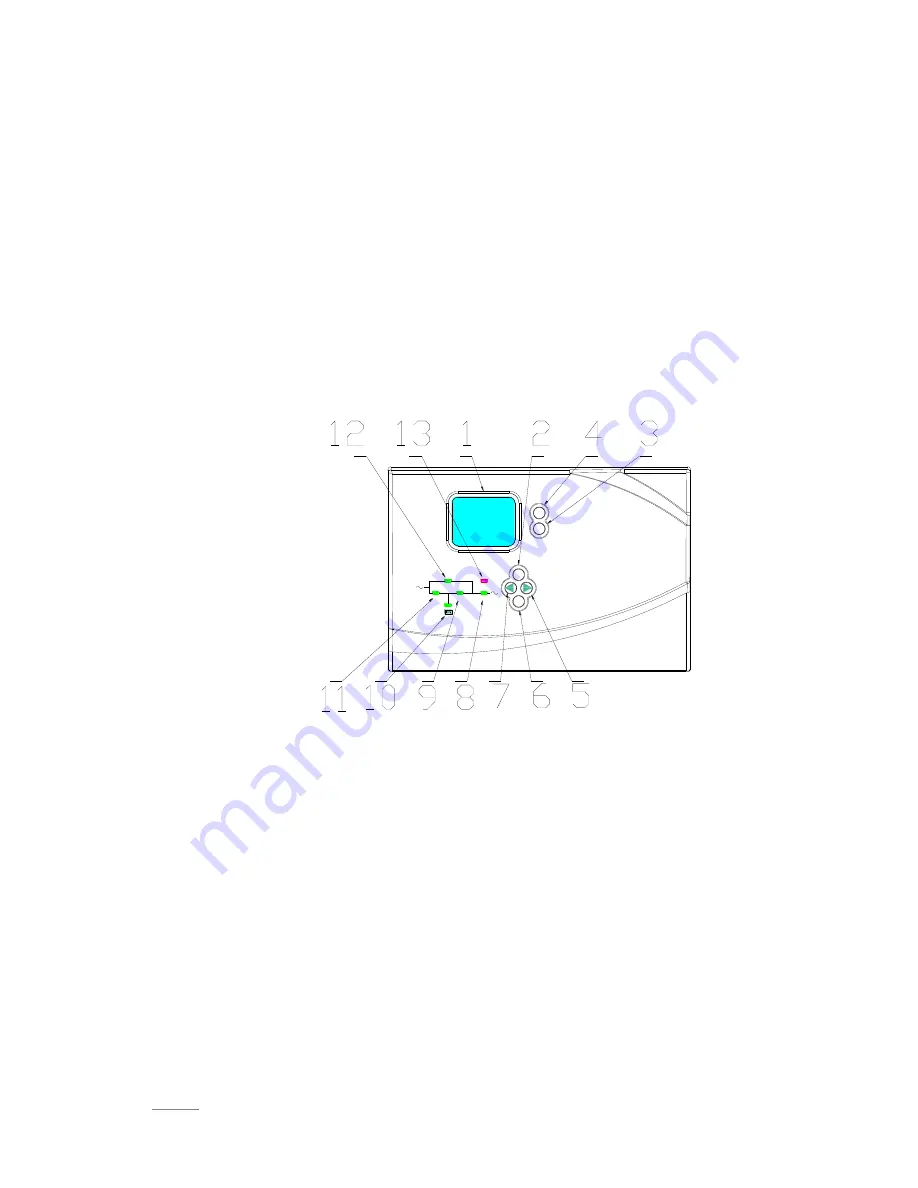
The LCD control panel which consists of LCD display board, LED and buttons, (see 

Fig1-3) displays and controls these information including operating information, alarm 

information, function setting information.   


LCD control panel 

1)  Five green LED and one red LED 

2)  LCD control panel which can display four line of English 

3)  Button: On, Off, ESC, Enter, and Left, Right 


ON

O

FF

ESC

ENT

BYPASS

RECT

INV

OUTPUT

FAULT


Fig.1-3 LCD control panel introduction 


1.  LCD Display Board 

2.  ESC 

3.  Off button 

4.  On button 

5.  right or down 

6.  Enter/Save   

7.  left or up 

8. 

Output Indicator 

9. 

Inverter Indicator 

10.  Battery Indicator 

11.  Mains (AC) Indicator 

12.  Bypass Indicator 

13.  Fault Indicator


Содержание SPIRIT II G

Страница 1: ...User Manual Vision Spirit II G 6 10KVA PF0 9 1 1 phase True online double conversion UPS ...

Страница 2: ...ase out high frequency online UPS designed by our R D team who is with years of designing experiences on UPS With excellent electrical performance perfect intelligent monitoring and network functions smart appearance complying with EMC and safety standards The UPS has become standard product meets the world s advanced level Read this manual carefully before installation This manual provides techni...

Страница 3: ...Do disconnect the UPS input and make sure the UPS is complete off before moving the UPS or reconfigured the connection otherwise there will be potential electric shock 3 For the sake of human being safety please well earth the UPS before starting it 4 Working environment and storage way will affect the lifetime and reliability of the UPS Avoid letting the UPS work under following environment for l...

Страница 4: ... dry area or environment if it will not be free of operation for long time Storage temperature of UPS with internal battery is 20 55 extended backup model without internal battery is 40 70 10 Taking out the UPS or batteries from storage it is recommended to connect them with the utility for at least 12 hours per 3 months to avoid battery over draining 11 Don t open the battery electrolyte inside w...

Страница 5: ...ion 16 2 3 Connection of parallel system 18 3 Operation 19 3 1 Working modes 19 3 1 1 AC mode 19 3 1 2 Bypass mode 19 3 1 3 Battery mode 19 3 1 4 ECO mode 20 3 2 Operation 20 3 2 1 Power on 20 3 2 2 System parameter setting 20 3 2 3 Start 20 3 2 4 Inverter shutdown 21 3 2 5 Power off 21 3 3 Working Mode and transferring 21 3 3 1 Transfer to bypass if overload 22 3 3 2 Normal mode to battery mode 2...

Страница 6: ...e 24 4 2 Battery maintenance 24 4 3 Visual checking 24 4 4 UPS status checking 25 4 5 Function checking 25 5 Trouble shooting 25 Appendix 1 USB communication 27 Appendix 2 RS232 communication port definition 28 Appendix 3 Specification 29 Appendix 4 Option 31 Appendix 5 UPS message table 31 ...

Страница 7: ...or computer center network management center auto control system telecom systems etc 1 2 Product range Capacity 6kVA 10kVA Model 6kVA S 6 kVA H 10kVA S 10kVA H Remarks with internal battery External battery with internal battery External battery 1 3 System principle diagram The system can work in single unit and parallel so as to enhance the reliability Fig 1 1 Single unit ...

Страница 8: ... reliability self diagnostics and protections are featured Intelligent battery management which extends battery life LCD panel and LED indicators clearly indicate the system status and parameters such as input output voltage frequency load temperature inside UPS etc Perfect network power management can be achieved by using UPS monitoring software Maintenance bypass switch is provided so the power ...

Страница 9: ...n setting information LCD control panel 1 Five green LED and one red LED 2 LCD control panel which can display four line of English 3 Button On Off ESC Enter and Left Right ON OFF ESC ENT BYPASS RECT INV OUTPUT FAULT Fig 1 3 LCD control panel introduction 1 LCD Display Board 2 ESC 3 Off button 4 On button 5 right or down 6 Enter Save 7 left or up 8 Output Indicator 9 Inverter Indicator 10 Battery ...

Страница 10: ...isplay content 1 Running parameters Input voltage frequency output voltage frequency current loading output power inverter voltage battery voltage battery remaining capacity Bus voltage bus running time temperature inside UPS 2 Alarm information priority from high to low It provides shutting down auxiliary power fault output short circuit inverter fault rectifier fault over temperature overload ch...

Страница 11: ...s menu Turn to another menu or parameter Turn to another menu or parameter UPS Messages reference table Explanation Content Message Initialization CurState Init No export No Out At bypass Bypass Rectifier working Mains Battery mode Battery Battery testing Testing Starting Starting ECO mode CurState ECO EPO mode CurState EPO UPS maintaining CurState M Byp UPS fault CurState Fault Battery float char...

Страница 12: ... arrow icon will come out on the LCD when pressing the ENT then the data info status info setting info can be selected by pressing the right or left arrow button and checking the details by pressing 5 Select and confirm the data info to be viewed in detail It contains the details of the AC input output inverter battery BUS parallel temperature See Fig 4 to 12 below Fig 4 MAIN INPUT INFO Fig 5 OUTP...

Страница 13: ...information will be displayed on the screen which includes user set system set parallel set battery sett revise set See Fig 15 to 19 Fig 15 setting menu Fig 16 setting menu Fig 17 setting menu Fig 18 setting menu FIGURE Invert 220 0V 50 0HZ FIGURE P Battery 0V 0 0A 0min 0 FIGURE N Battery 0V 0 0A 0min 0 FIGURE BUS 370V 370V CAP 0Hour FIGURE Parallel ID 1 P Amount 0 STATUS Code 11 Fault 0 0 0 0 Mod...

Страница 14: ...ting 1 5 4 Rear panel instruction 1 5 4 1 6k H S rear panel Fig 1 4 Rear Instruction 1 Parallel slot 2 Maintenance bypass switch covered 3 Intelligent slot 4 EPO 5 COM 6 USB 7 Input switch 8 Input output battery terminal covered SETTING Parallel set ID 1 P amount 2 P Redund 0 ...

Страница 15: ...6 10KVA PF0 9 LCD UPS www visionups com 14 1 5 4 2 10k H S rear panel 1 Parallel slot 2 Maintenance bypass switch covered 3 Intelligent slot 4 EPO 5 COM 6 USB 7 Input switch 8 Input output battery terminal covered ...

Страница 16: ...n the front panel and the bottom part so as to keep the ventilation in good conditions avoid temperature of components inside getting high Keep the UPS away from high temperature water flammable gas corrosive gas dust direct sunlight and explosive things Don t lay the UPS outdoor 63A circuit breaker is required at the input L N for 6KVA UPS while 100A for the 10KVA UPS PDU is required to connect t...

Страница 17: ...3 Make sure battery quantity complies with the specs Measure the voltage of battery bank after finishing connection and the battery voltage should be around 192 216 240Vdc measure positive and negative battery voltage should be around 96 108 120Vdc Don t mix batteries with different capacity manufacturers and don t mix brand new and old batteries either CAUTION It is recommended to connect or repl...

Страница 18: ...e terminals WARNING Please connect the output Earth well before go for other operation Connection of the UPS communication cables 1 USB cable provided in accessories can be used to connect the UPS with PC 2 Follow steps below to install SNMP if purchased A Remove the cover of SNMP slot at UPS rear panel and keep it for further use B Insert the SNMP card and tighten the screws C Connect the UPS wit...

Страница 19: ...onnected in parallel the copper wires required to connect with each UPS is minimum 10AWG for the 6KVA and 8AWG for 10KVA but the main wire for linking all the UPS in parallel should be N 10AWG or 8AWG N refers to the number of the UPS in parallel Make sure the cables are as shorter as possible to reduce any possible noise interference to data transfer CAUTION Connect the L N and E well Configurate...

Страница 20: ...ange the rectifier and charger will stop working the loads will be powered by battery bank of which energy goes through inverter circuit The Inverter s and battery s indicators on LCD control panel will be on green and the alarm will beep every 3 seconds In battery mode if the battery voltage becomes low and reaches the setting value the system will give low battery voltage alarm beep once every s...

Страница 21: ... green and it goes to inverter mode 3 2 2 System parameter setting Check the information displayed on the LCD by right or left arrow button press ESC to quit from the main menu When the function setting interface as P 11 Fig3 press the ENT to enter to function setting such as floating charging boosting charging temperature compensation function battery capacity for extended backup model only 3 2 3...

Страница 22: ...ystem is overload otherwise it will shut down in some time 3 2 4 Inverter shutdown 1 If the AC is normal press the off button and hold for 1 second until hearing one beep inverter indicator will be off bypass indicator will be on UPS will work in Bypass mode 2 If the AC is absent press the off button and hold for 1 second until hearing one beep UPS will shut down the output and the LCD will displa...

Страница 23: ...nverter automatically 3 3 3 Go to bypass mode due to over temperature The temperature inside UPS may be high if ambient temperature is high or the ventilation is poor then the UPS will go to Bypass mode fault indicator will be on red the LCD will display that the inner temperature is high long beeps will come If so please cut off the input power of UPS move objects that affecting the ventilation f...

Страница 24: ...ings interface press ESC to return to main menu 3 Parameter which has been selected and to be changed will be highlighted Press arrow button to change the value and press ENT to confirm the value Once confirmed it will not be highlighted 4 Press the arrow button can view the detailed alarm info after entering the alarm info interface press ESC to return to main menu 3 5 3 Priority of info displaye...

Страница 25: ...p battery in good conditions 1 The most proper working temperature is 15 to 25 Celsius degree 2 Avoid small discharging current Don t let UPS work in battery mode continuously for 24 hours 3 Charge battery for at least 12 hours every 3 months if it is free of operation If the environment temperature is high charge it once every 2 months 4 For extended backup models check and clean the battery conn...

Страница 26: ...ontact the distributor if problems can not be solved by following trouble shooting below No Problem description Probable causes Solution 1 No display on LCD no self diagnose A Input power absent B Low input Use Multi meter to measure the input to see if it is normal or not 2 AC normal but AC indicator off UPS is in battery mode A Input circuit breaker off B Input power connection problem A Switch ...

Страница 27: ...ackup time again B Contact distributor to replace battery 10 Long beeps fault indicator on the LCD shows over temperature Over temperature inside UPS A Check to see if there is wind blowing out from fans B Move objects away from the UPS C Wait till the UPS becomes cool and restart UPS 11 Long beep fault indicator on and the LCD shows output short circuit Output short circuit Eliminate the short ci...

Страница 28: ...s com 27 Appendix 1 USB communication port definition Definition of Male port 1 2 4 3 Pin 1 VCC Pin 2 D Pin 3 D Pin 4 GND Available function of USB Monitor UPS power status Monitor UPS alarm info Monitor UPS running parameters Timing off on setting ...

Страница 29: ... and UPS RS232 port PC RS232 port UPS RS232 port Pin 2 Pin 2 UPS send PC receive Pin 3 Pin 3 PC send UPS receive Pin 5 Pin 5 ground Available function of RS232 Monitor UPS power status Monitor UPS alarm info Monitor UPS running parameters Timing off on setting RS 232 communication data format Baud rate 2400bps Byte length 8bit End bit 1bit Parity check none ...

Страница 30: ...t 45 Bypass frequency range 1 2 4 5 10 THDI 3 100 linear load input THDV 1 5 100 non liner load input THDV 1 Battery Battery number 16 18 20pcs can be set Battery type VRLA Charge mode Boost charge or float charge auto switch Charge time Boost charge up to 20Hr Max Charge current A 6KVA 1A S 10A H 10KVA 1A S 10A H Output Output type Single phase Ground Output precision 1 0 Voltage distortion THD 2...

Страница 31: ...r EMI Conduction IEC 62040 2 Radiation IEC 62040 2 Harmonics IEC 62040 2 EMS IEC 62040 2 MTBF 250 000Hr 1 1 400 000Hr MTTR 30min Isolation resistance 2MΩ 500Vdc Isolation intension 2820Vdc 3 5mA 1min Surge Meeting IEC60664 1 1 2 50uS 8 20uS 6kV 3kA Protection IP20 Parallel circumfluence 1 1 8 N 1 3 Parallel equal current 1 1 8 N 1 10 Dimension weight DIMENSION Capacity KVA 6KVA 5 4KW 10KVA 9KW Hei...

Страница 32: ...oubleshoot problems 4 1 Operational Status and Mode s Note X shows that it will determined by other conditions 4 2 Alarm Information Item UPS Alarm Waning Buzz LED 1 Rectifier Fault Beep continuously Fault LED lit 2 Inverter fault Including Inverter bridge is shorted Beep continuously Fault LED lit 3 Inverter Thyristor short Beep continuously Fault LED lit 4 Inverter Thyristor broken Beep continuo...

Страница 33: ...it 23 Cable connection error Twice per second Fault LED lit 24 CAN comm Fault Twice per second Fault LED lit 25 Parallel load sharing fault Twice per second Fault LED lit 26 Battery over voltage Once per second Fault LED blinking 27 Mains Site Wiring Fault Once per second Fault LED blinking 28 Bypass Site Wiring Fault Once per second Fault LED blinking 29 Output Short circuit Once per second Fault...

Отзывы: