background image

14

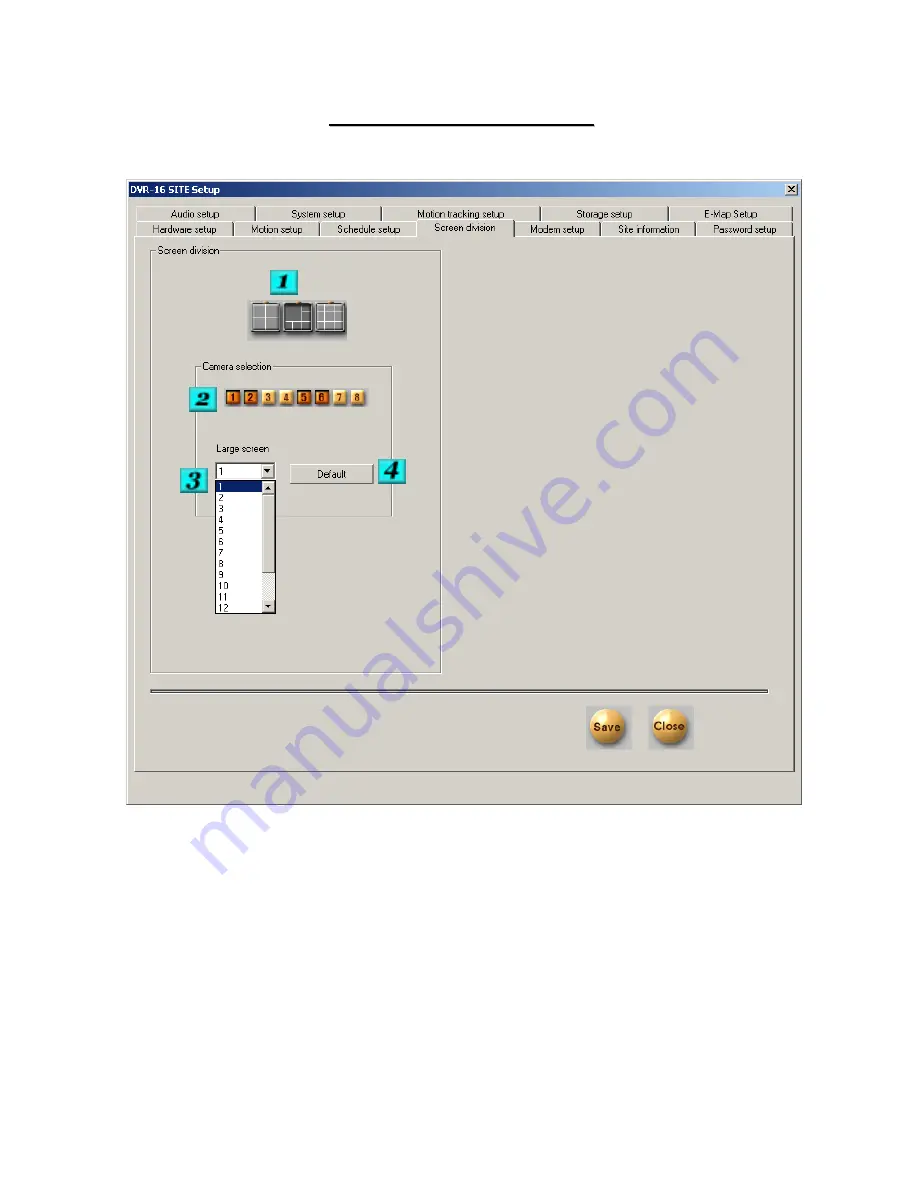
SCREEN DIVISION

SCREEN DIVISION

# 1 – Division Selection – Click on the division that you would like to modify.

# 2 –Camera Selection – Select the cameras that you would like to be displayed in the selected division.

# 3 – Large Screen – If the division you are modifying has larger screen sections, you can enter the camera 
numbers that you would like in the large screen boxes.

# 4 – Default – Restores the factory defaults for this section.

Содержание MAX Pro

Страница 1: ...1 VISION PRO DIGITAL VIDEO RECORDERS VISION PRO DIGITAL VIDEO RECORDERS SITE SOFTWARE USERS MANUAL SITE SOFTWARE USERS MANUAL...

Страница 2: ...E SETUP Page 25 E MAP Page 26 DVR OPERATION Page 28 PAN TILT CONTROL Page 29 SEARCH MODE Page 31 SEARCH BUTTONS FEATURES Page 33 INDEX SEARCH Page 34 DATA BACKUP Page 35 BACKUP TO FLOPPY Page 36 WATER...

Страница 3: ...S YOUR UNIT MAY NOT HAVE ALL OF THE FEATURES DESCRIBED IF YOU HAVE ANY QUESTIONS ABOUT FEATURES OR OPTIONS PLEASE CONTACT YOUR DEALER INSTALLATION CONSIDERATIONS z Avoid any place that has high moistu...

Страница 4: ...ages should contain the following items Digital Video Recorder Unit Keyboard Mouse Software Windows Disk DVR Software ect Power Cable Optional Items that may be included Communications Cable Serial Po...

Страница 5: ...TE CONTROL JACK RS 422 OUTPUT PLUG FROM COM 1 PORT SIGNAL SIGNAL NOT USED CAUTION Be careful of the polarity of the RS 422 lines Reversing the polarity can damage some equipment If you have Questions...

Страница 6: ...d rays heat perception magnetic etc should be connected to COM connector and the other line is connected to any available sensor 1 8 connector 1 2 3 4 5 6 7 8 COM CONTROL Alarm Siren relay etc Power D...

Страница 7: ...sors such as infrared rays heat perception magnetic etc should be connected to COM connector and the other line is connected to any available sensor 1 16 connector The power of the adapter should be n...

Страница 8: ...assigned and then enter their 4 digit password The system default level 1 password is blank The person who is to be the system administrator will have complete system access and the ability to assign...

Страница 9: ...sor Enter the sensor numbers that should begin the selected camera recording If you would like more than one sensor to activate recording separate the sensor numbers by a comma ex 1 4 4 Camera Link En...

Страница 10: ...you wish to activate 12 Name You can give each control relay output a unique name The name can be up to 14 characters long 13 Auto ON OFF You can assign the time that you would like the relay to turn...

Страница 11: ...ries DVR s 2 Camera Select the camera that you would like to modify settings for 3 Sensitivity The motion detection sensitivity can be adjusted individually for each camera by moving the adjuster as n...

Страница 12: ...of some of the images 9 Default Clicking here will result in resetting of the individual camera adjustment to factory default 10 Area Clear Clicking here will clear the motion detection grids from al...

Страница 13: ...fy the schedule of 3 Schedule Range Select the ranges that you would like to modify 4 Record Mode Select the recording method for the range that you have selected You can choose from Continuous Motion...

Страница 14: ...Camera Selection Select the cameras that you would like to be displayed in the selected division 3 Large Screen If the division you are modifying has larger screen sections you can enter the camera n...

Страница 15: ...ameras that will cause a connection to occur to the emergency monitoring software The connection will occur to the Emergency site below 4 Sensors For Emergency Select the sensors that you want to caus...

Страница 16: ...oose if the backup images you would save to a floppy disk will be in jpg or bmp format 3 Clock Display Format You can choose how you would like your clock to be displayed 4 Sensor Type Select whether...

Страница 17: ...2 Password Change This section allows you to change the passwords for the 3 levels The passwords should be kept in a safe location We recommend that only one person be allowed to modify passwords All...

Страница 18: ...UDIO SETUP 1 Audio Settings Place a check in the boxes to activate the features 2 Camera Select the camera that the audio will be saved with NOTE Voice recording function will discontinue while connec...

Страница 19: ...ice recording Prior to recording voice you need to first control audio volume for microphone Go to Start Program Application Entertainment Volume Control Go to Options Properties then below window wil...

Страница 20: ...nced Controls for Microphone by clicking Advanced on Mic taps in Volume Controls Adjust the options to make your system sound correctly T i p s Click on Mute which is circled on the left picture if yo...

Страница 21: ...ily to maintain optimal performance The default time is 3 00 A M if you would like to change the time that this occurs enter the new time in the boxes This feature will automatically reboot the system...

Страница 22: ...rm Backup Settings 1 Schedule This section shows all of the scheduled backups that have been assigned for the system to perform 2 Calendar The calendar is used to select the dates that you wish to add...

Страница 23: ...were the backup should occur We do not recommend the use of any of the systems main drives for the backup In addition the system can establish a connection to a remote backup location by IP address T...

Страница 24: ...re of your DVR Once you click close and restart the DVR the storage setup screen will appear We recommend that your dealer be contacted for assistance in modifying storage structure Changing allocatio...

Страница 25: ...box Click on Go to copy the image into that position The bitmap you wish to use should be in a resolution of 540x360 pixels for best results 4 To add icons to the map select the item number you wish t...

Страница 26: ...ws the current recording status of the channel REC Continuous M REC Motion M S REC Motion and Sensor S REC Sensor No Mark Recording is turned off 2 Displays if the available audio recording is being r...

Страница 27: ...ve 8 Indicates the amount of free hard drive space that is available When this bar displays 0 free the system is continuing to record video by deleting the oldest video 9 Exits the software You will h...

Страница 28: ...wn To return to the display mode click on the Quit button in the lower right corner The controls will vary depending on what camera you are controlling The controls shown are for a GC 755 Zoom Camera...

Страница 29: ...s selected you will see the status of the recorded video throughout the day You can either move the slide bar to the period of time you wish to review or enter the time in the Hour Minute section The...

Страница 30: ...ecording The colors on the graph depict the status of the recording Purple Continuous Blue Motion Green Pre Alarm If there is not a colored bar present there was no recording during that period You ca...

Страница 31: ...llows you to play back the selected camera in multiple grid modes frame by frame Zoom resizes the entire image Digital Zoom Zoom In Zoom Out Move Intelli Search Refresh Brightness Adjust Noise Reducti...

Страница 32: ...rching Performance Is Improved If Turned Off Select all cameras Index Search Index Search Panel Skip adjusting this allows the System to skip frames during playback Delay adjusting this slows down or...

Страница 33: ...on The cameras that have recording for the day will be shown along with the choices for the type of recording that was done All pre alarm sensor and motion You can select or deselect the types of reco...

Страница 34: ...34 DATA BACKUP DATA BACKUP 1 Clicking on this button will bring up the Data Backup section below You can then select the type of backup that you wish to perform...

Страница 35: ...e system will display the below message if you have chosen to use the Watermark feature otherwise the image will be saved without the watermark program If you click Yes the watermark utility along wit...

Страница 36: ...FICATION OF IMAGE ON DISK Run the watermark check program by running the file WMChecker exe on the floppy disk The following image will appear 1 File Open Clicking here will bring up the box below Sel...

Страница 37: ...pened the name of the file will appear in the window Select Watermark check to verify the image Once verification has been completed windows similar to those below will appear Corrupted image Uncorrup...

Страница 38: ...ia type you would like to use for the backup You can select from any available drive such as mapped network drive zip hard drive etc You can also select a remote IP address that the system will backup...

Страница 39: ...ny standard media players The maximum time for each AVI backup is 5 minutes 2 You will need to select the times for the backup and the cameras that you would like to be included in the AVI file The ba...

Страница 40: ...rmat CD R CR RW button from the backup section the below screen should appear If it does not you may have to press ALT and Tab to cycle to the Direct CD Utility Once the below screen shot appears inse...

Страница 41: ...format You then need to exit the Direct CD program The CD can now be used as a writeable media from the select media option Follow the same procedures for a backup to hard drive ect Once your backup...

Страница 42: ...if you wish to be able to insert the CD and write more data to the CD If you are done and want to finish the CD select the Close to Read on Any Computer option You can also choose if you would like t...

Страница 43: ...ayback Audio can be played back only when one camera is selected You must select only the camera that contains the audio Audio can be played in normal forward play mode only You cannot playback audio...

Страница 44: ...PRINTING IMAGES 1 Printing the selected image After adjusting size and brightness you can print the image to any available system printer When the system is not setup properly for Printing the below...

Страница 45: ...nters 2 In Printers window select and click Add Printer 3 In Add Printer window click Next 4 Click the manufacturer and model of your printer 5 Click available port 6 If your printer is not listed on...

Страница 46: ...to the image click on the ADD button The date and time of the file will be placed in the list Enter a description to allow for easy identification To delete a reference select it from the list and cli...

Страница 47: ...Installed 2 Guest user setup and password setup Double click on Users and Passwords in Control Panel Appendix A Configuring the DVR for Connection over PSTN SDN Select Advanced in tab menu in Users an...

Страница 48: ...48 Select Guest in User menu and select Guest Properties by right clicking on Guest Uncheck on Account is disabled in General tab menu...

Страница 49: ...49 Select Guest in User menu and select Set Password by right clicking on Guest Type New password and Confirm password as 1234 and click OK Password must be 1234 Password confirmation Press OK...

Страница 50: ...must run KPPPSETUP EXE to allow for a remote connection using a modem in Windows 2000 Explore the C Drive and locate the DVR 16 Center folder Locate the KPPPS Setup exe File and execute it The proces...

Страница 51: ...51 4 Network and Dial Up Connections Setup Double click on Network and Dial Up Connections in Control panel Right click on K Network and Click on Properties...

Страница 52: ...lick on Settings Set the below options and click OK Data Encryption Optional encryption connect even if no encryption Logon Security Select Allow these protocols Microsoft CHAP MS CHAP Allow older CHA...

Страница 53: ...53 In Network on tab menu select PPP Windows 95 98 NT4 2000 Internet Then click on ok...

Страница 54: ...54 5 Incoming Connection Setting In Network and Dial Up Connections right click on Incoming Connections and select Properties Check the modem that is being to be used in General tab menu...

Страница 55: ...55 In User on tab menu select Guest in Users allowed to connect In Networking on tab menu select Internet Protocol TCP IP and click on Properties...

Страница 56: ...ignment Specify TCP IP addresses From 192 168 55 1 To 255 255 255 0 Click on OK to complete the setup process Your DVR should now allow both incoming and outgoing connections to be made over your mode...

Страница 57: ...static IP address Right click on My Network Places on the desktop and select properties Locate the Local Area Move down Connection Icon and right click on it to select properties Select Internet Prot...

Страница 58: ...RXB 1 4 DENARD TYPE 2050 ERNA ERNA LG GAC PT1 RG PT 101 VIDEOTEC DTRX PROFLY 320 PROFLY SD DYANCOLOR SD SOTEK SD LILIN SD SAMSUNG SCC 641 SD DIGITEL MH 209 RX UNIMO KRX 2101 RX DAIWA DMP 22 SD HONEYWE...

Страница 59: ...59 NK 97 CHE NIKO KIO 1616 RS 422 RS 422 TXD 6 FGND 7 RXD 4 POWER 2 RXD 3 TXD POWER 5 1...

Страница 60: ...60 RAS715 6 LS Sensormatic KIO 1616 RS 422 RS 422 TXD BROWN 9 TXD YELLOW 8 RXD RXD 24V AC GND 24V AC NOT USE NOT USE ORANGE 6 GREEN 7 RED 4 2 BLACK 3 WHITE 5 1...

Страница 61: ...61 PIH 717X LILIN KIO 1616 RS 422 RS 422 RXD 15 TXD 13 TXD 12 RXD 14...

Страница 62: ...62 Dynacolor KIO 1616 RS 422 RS 422 6 DA 4 POWER 2 GND 3 DB 5 1...

Страница 63: ...63 WV CS854 Panasonic KIO 1616 RS 422 RS 422 GND BROWN TXD ORANGE RXD GREEN RXD YELLOW TXD RED...

Страница 64: ...64 TOA CBC KIO 1616 RS 422 RS 422 B 4 B 2 A 3 GND A 5 1...

Страница 65: ...65 KTD 313 1 KALATEL B 6 B 4 POWER 2 A 3 A POWER 5 1 KIO 1616 RS 422 RS 422 Connect to Digiplex...

Страница 66: ...66 SPD 1600 SAMSUNG KIO 1616 RS 422 RS 422 VIDEO 2 POWER 12V 3 POWER GND 4 GND 9 DATA 7 POWER 12V 5 LINE LOCK SYNC 6 DATA VIDEO 8 1...

Страница 67: ...67 SCC641 SAMSUNG KIO 1616 RS 422 RS 422 TX 11 TX 10...

Страница 68: ...68 V1311R VPS VICON 11 GND 9 10 KIO 1616 RS 422 RS 422...

Страница 69: ...69 C1487M E PELCO KIO 1616 RS 422 RS 422 RX TX RX TX...

Отзывы: