PAGE 05
INSTALLATION INSTRUCTIONS & MONITOR & REMOTE
OPERATION
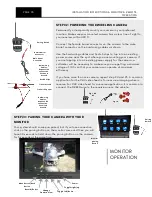
Fig 10.
Your system should come pre-paired, but if you lose connection
click on the pairing button on the monitor menu and then you will
have 20 seconds to hold down the pairing button on the camera
for 5 seconds at the same time.
STEP #3: PAIRING YOUR CAMERA WITH YOUR
MONITOR
Permanently or temporarily mount your camera in your preferred
location. Make sure your mounted camera has a clear line of sight to
your receiver within 400 ft.
Connect the female barrel connector on the camera to the male
barrel connector on the hardwiring cables as shown.
Use the hardwiring cables and Scotch clips to tap into an existing
power source near the spot where you are mounting your camera. If
you are tapping into an existing power supply for the camera, a
voltmeter will be necessary to make sure you are getting a minimum
voltage of 10.5v so that your camera can operate at maximum
efficiency.
If you have more than one camera, repeat step #2 and #3. A common
application for the CH2 video feed is for rear view imaging when in
reverse. For CH2 video feed for a reverse application, it is common to
connect the GREEN wire to the reverse wire on the vehicle.
STEP #2: POWERING YOUR WIRELESS CAMERA
Hardwiring
Cables.
Requires 12V
connection.
Positive &
Ground.
MONITOR
OPERATION
Scotch Clips
Trailer 12V power
Trailer Ground
Hardwiring
Cables.
Requires 12V
connection.
Positive &
Ground.
Fig 1. & 2.
& 3
Pairing Switch
Female Barrel
Connector
Male Barrel
Connector
Pairing
Switch
Monitor
pairing
button
Record/Select
Power
Toggle left/down
Menu button/back
button
Toggle right/up
Change
Camera View


