Vip2 VK2-1080(720)BIR3V9F Скачать руководство пользователя страница 14


VK2-1080(720)BIR3V9F installation guide V2.1 

14 

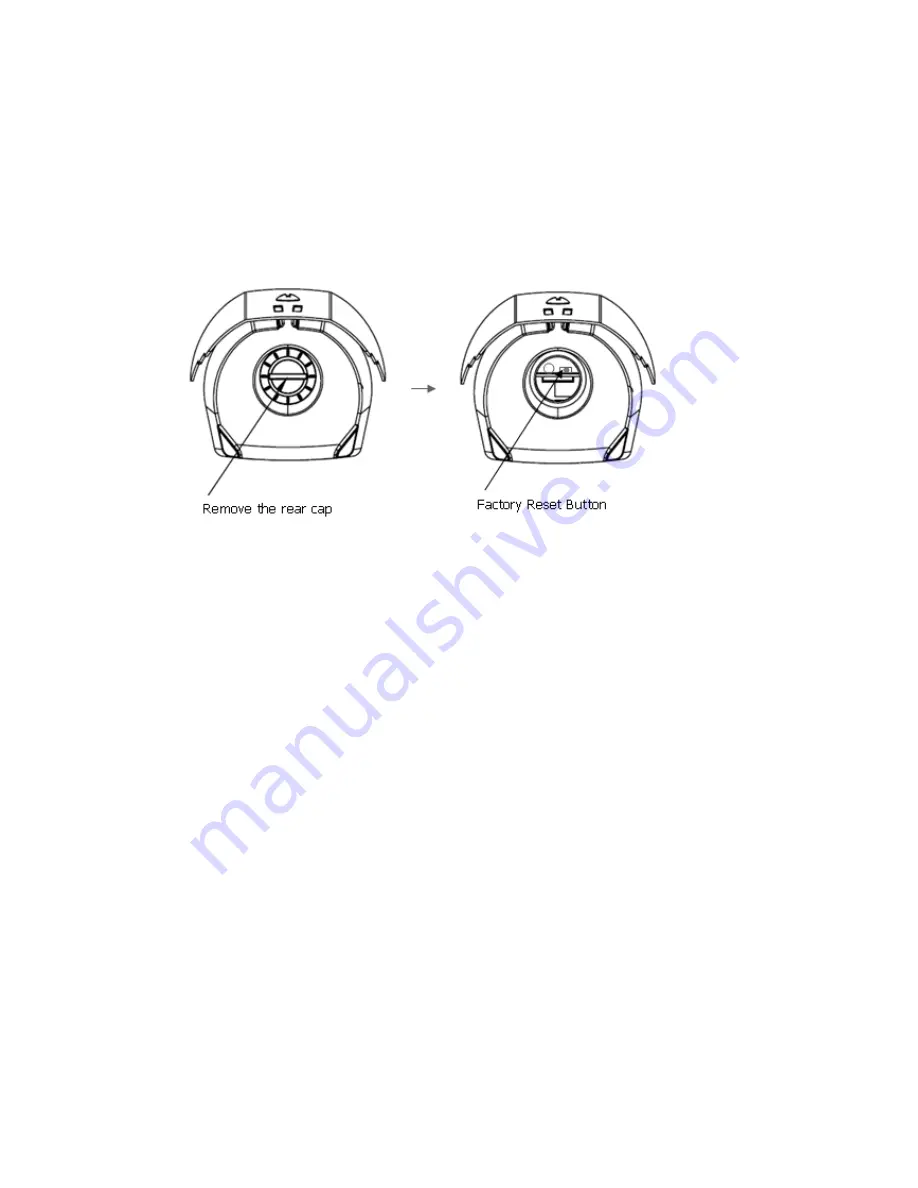
3.6 Resetting to the factory default settings 


To  reset  the  VK2-1080(720)BIR3V9F  to  the  original  factory  settings,  go  to  the  Setup>System 
>Maintenance


web page (described in “3.5.6 System>Maintenance” of the User’s Manual) or use the 

Reset button on the network camera, as described below:   


Follow  the  instructions  below  to  reset  the  VK2-1080BIR3V9Fto  the  factory  default  settings  using  the 
Reset button. 


1.    Switch off the VK2-1080(720)BIR3V9F by disconnecting the power adapter. 


2.    Remove the rear cap of the camera. 


3.    Press and hold the Reset button with a straightened paperclip while reconnecting the power. 


3.    Keep the Reset button pressed for about 5 seconds. 


4.    Release the Reset button. 


5.    The VK2-1080(720)BIR3V9F resets to factory defaults and restarts after completing the 

factory 
       

reset. 


6. 

Replace the rear cap of the camera. 


CAUTION:

 When performing a Factory Reset, you will lose any settings you have saved. 


3.7 More Information 

 
For more information, please see the VK2-1080(720)BIR3V9F 

User’s Manual, which is available on 

the CD included in this package. 


Содержание VK2-1080(720)BIR3V9F

Страница 1: ...VK2 1080 720 BIR3V9F Installation Guide...

Страница 2: ...VK2 1080 720 BIR3V9F installation guide V2 1 2...

Страница 3: ...ral triangle is intended to alert the user to the presence of important operating and maintenance servicing instructions in the literature accompanying the appliance PRECAUTIONS Safety Installation Sh...

Страница 4: ...PPROVED BY THE PARTY RESPONSIBLE FOR COMPLIANCE COULD VOID THE USER S AUTHORITY TO OPERATE THE EQUIPMENT CE COMPLIANCE STATEMENT WARNING This is a Class A product In a domestic environment this produc...

Страница 5: ...the password See page 8 Package Component The system comes with the following components Contents in the installation CD 1 The VK2 1080 720 BIR3V9F User s Manual 2 The SmartManager User s Manual 3 Th...

Страница 6: ...guide V2 1 6 Parts and Description Carefully remove the contents from the box and verify that nothing was damaged in shipment Camera Dimension See the diagrams below for the exact dimension of the VK...

Страница 7: ...Installation1 Cable through the wall with the mount base A Drill the mounting location using the template sheet or the bottom of the mount base as a template B Insert the plastic anchors into the dril...

Страница 8: ...camera 2 2 Connection Connecting to the RJ 45 Connect a standard RJ 45 cable to the network port of the network camera Generally a cross over cable is used for directly connection to PC while a direct...

Страница 9: ...onnect the VK2 1080BIR3V9F device to the network and power up 2 Start SmartManager utility found on th supplied CD Start All programs SmartManager the main window will be displayed after a short while...

Страница 10: ...ation Address field of your browser 3 The following page will be displayed Click Live View or Setup to enter web page 4 Live View 3 2 Access from the internet Access from the internet once connected t...

Страница 11: ...ease adjust the mode in accordance with your PC specifications and monitoring purposes 1 General controls Live View Page Search Playback Page Setup Page Help Page The video drop down list allows you t...

Страница 12: ...several images and video stream formats Your requirements and the properties of your network will determine the type you use The Live View page in the VK2 1080BIR3V9Fprovides access to H 264 MPEG 4 a...

Страница 13: ...live screen to activate the Zoom Focus control panel Adjusting Zoom Click button to zoom out and click button to zoom in The focus is moved slightly after adjusting zoom adjust the focus again as nec...

Страница 14: ...witch off the VK2 1080 720 BIR3V9F by disconnecting the power adapter 2 Remove the rear cap of the camera 3 Press and hold the Reset button with a straightened paperclip while reconnecting the power 3...

Страница 15: ...DHCP ARP Zeroconf Bonjour Security Multi user authority HTTPS IP Filtering Privacy Zone Max Connection 10 API Programming Interface API Supported Open Platform Compatible ONVIF Alarm Triggers Motion...

Страница 16: ...VK2 1080 720 BIR3V9F installation guide V2 1 16...

Отзывы: