Viotek NB32CB Скачать руководство пользователя страница 7

7

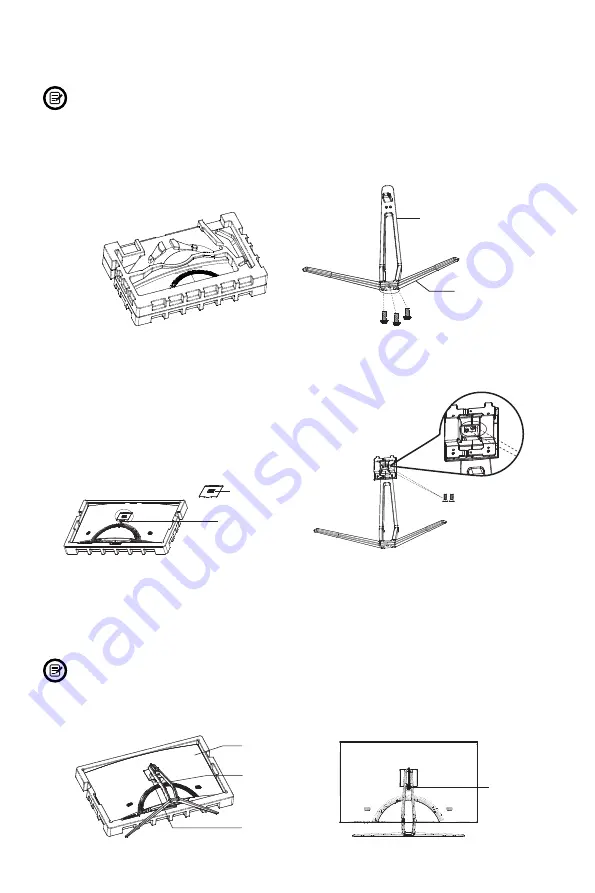
Section 4:  Stand Installation

  Keep the foam underneath the monitor before attaching the stand.

1.  Open the package and take out the monitor with foam still attached. Gently 

place it on a desktop or table. Next, use the included screwdriver and three NO.1 

P-Head screws to fasten the base to the stem.


NO.1 P-Head Screws 

12mm x 3

Stand Stem

Base

2. Remove the foam covering the back of the monitor. Press the release button to 

remove the stand plate. Next, use two NO.1 K-Head screws to fasten the stand 

plate to the stem.

 Release Button

Stand Plate


NO.1 K-Head 

Screws 12mm x 2


3.  Insert the stand plate into the opening on the back of the monitor. It should click 

into place. Make sure the stand is securely attached to the back of the monitor 

before removing the remaining foam. Be sure to place the monitor on a level, 

even table or desk.

  If needed, the stand can easily be detached from the monitor by pressing the 

release button near the stand plate. Make sure the monitor is laid on a flat 

surface before removing the stand.

Monitor

Stem

Stand Plate


Release 

button


Содержание NB32CB

Страница 1: ...ustomers and providing the best products our product information including our user manuals may receive updates from time to time Please check our website for the latest user manuals and product mater...

Страница 2: ......

Страница 3: ...onnectivity Options 9 6 1 Removing the Port Cover 9 6 2 Connecting Your Earphones 9 6 3 Connecting the Power Cable 10 6 4 VGA Connectivity 10 6 5 HDMI Connectivity 10 Section 7 Basic Operation 11 Sect...

Страница 4: ...nitor 5 Do not spray cleaner and or any kind of liquid directly onto the monitor s screen or any part of the monitor 6 Do not insert anything into any part of the monitor especially the ventilation op...

Страница 5: ...60Hz NO 2 Screws x 4 for Mounting NO 1 Screws x 7 for Stand Installation HDMI Cable x 1 Screwdriver x 1 User Manual x 1 The NO 1 screws come in two types P Head and K Head Extra screws of each type m...

Страница 6: ...nsert one end of the HDMI cable into the computer s HDMI output and connect the other end to the monitor s HDMI port 8 10 9 1 3 4 5 6 7 2 1 Power Connector Insert the power cable to supply power to th...

Страница 7: ...the stand plate Next use two NO 1 K Head screws to fasten the stand plate to the stem Release Button Stand Plate NO 1 K Head Screws 12mm x 2 3 Insert the stand plate into the opening on the back of t...

Страница 8: ...emove the stand plate If the monitor is already attached to the stand remove the stand Release Button Stand Plate 2 Remove the original screws x 4 1 from the opening in the back of the monitor 3 Follo...

Страница 9: ...pluging in the earphones you can use the clip on the back of the stand stem to conveniently manage cables or store your headphones Gently pull the clip back to open it Note The clip only opens at 77...

Страница 10: ...A Connectivity In order for the monitor to receive VGA signals from the computer use a VGA cable to connect the monitor to the computer VGA VGA OUTPUT VGA Cable Not included 6 5 HDMI Connectivity In o...

Страница 11: ...turned off by default To enjoy the benefits of FreeSync you must have hardware with FreeSync capability an HDMI cable and the latest graphic drivers To use this feature connect your computer and moni...

Страница 12: ...s configuration and parts etc 1 Press any one of the buttons M E to activate the navigation window eco 2 Press M to enter the OSD menu BRIGHTNESS BRIGHTNESS CONTRAST ECO DCR STANDARD OFF 3 Press or to...

Страница 13: ...ze RGB components Green 0 50 Blue 0 50 OSD SETTING Language English Espa ol Fran ais Portugu s Deutsch T rk e Polski Italiano Nederlands Set OSD language OSD H POS 0 100 Adjust the OSD horizontal posi...

Страница 14: ...of your game choose the corresponding game icon These game icons are primarily designed to optimize your aim during shooting games though they can be used for other scenarios 3 Press to switch ECO mod...

Страница 15: ...roperly inserted A loose connection can cause a bad signal Try connecting to another video source for comparison The screen appears to be scrolling rolling or moving unusually Check that your source f...

Страница 16: ...2CW NB32CB Screen Size 31 5 Curvature 1800R Viewing Angle 178 H 178 V Aspect Ratio 16 9 Resolution 1920x1080p Backlight E LED LED Indicator Power on Blue LED Power saving Blue Flicker LED Typical Brig...

Страница 17: ...ot cover items out of production if the product is no longer made or stocked This Warranty is not assignable or transferable The original purchaser may call WP s toll free number at 1 855 229 9472 for...

Страница 18: ...rotection against harmful interference in a residential installation This equipment generates uses and can radiate radio frequency energy and if not installed and used in accordance with the instructi...

Страница 19: ......

Страница 20: ...COPYRIGHT 2019 VIOTEK ALL RIGHTS RESERVED...

Отзывы: