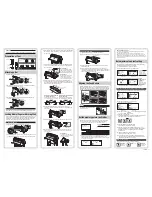
Load the media according to the instructions given for each type. Use
the grit roller on the right side of the media (looking from the front) as
a guide when setting it in the media sensor. Afterwards, adjust the
push roller so that it's lined up with the side of the media.
Loading Media (Paper or Marking Film)
Position the left and right push rollers to correspond with the width of
the media. Adjust the push rollers so that they are positioned above
both the media and the grit rollers. Position the push rollers within the
grit roller position guides ensures that they are above the grit rollers.
After setting the Tool/Speed/Force/Acceleration, make test cutting,
and repeat until optimal condition is achieved.
(1) Load the media for test cutting in the plotter.
(2) Press the [COND/TEST] key in the default screen.
The Qe6000 can take media width
of 55 mm or more.
Aligning the Push Rollers
When removing the tool, turn it counterclockwise to remove the tool.
(2) Set the roll media on top of the stock shaft, and then insert the roll
media into the stopper. Once it's set, tighten the stopper's screws.
(3) Push the tip of the roll media forward from the back of the Qe6000.
Make sure to pull it so that there is no slackening across the roll
media's route.
Simple mode/Normal mode
You can use the [SIMPLE] key on the default screen to switch between
Simple mode and Normal mode.
Qe6000 will be reset once when you switch. In Simple mode you can
change easy settings from the menu screen. In Normal mode, you will be
able to change more detailed settings. Simple mode and Normal mode are
independent from one another. The settings of the mode you're currently in
will take precedence.
(4) Press the media lock to engage it, and then pull the leading edge
out of the front of the plotter, making sure that it completely covers
the media sensor.
(5) Position the media and the push rollers to correspond with the
width of the media. The push rollers push down on either side of
the media. Use the grit roller position guide to make sure the push
rollers are set on top of the grit rollers.
(6) Pull the media taut to make sure that there is no slack in the
conveyance path, and then raise the media set lever to lower the
push rollers.
(7) Release the media stopper lock (Pull the sides and slide it forward.)
(8) When the set lever is up (and the media is held down by the push
rollers) and the media stopper is unlocked, pull out the roll media
and give it slack.
Caution
To avoid bodily injury, always handle the cutter blade with caution.
Preparation of Tool
(1) Loosen the tool holder screw.
(2) While pushing up the tool holder, push until its flange completely
touches the upper part of the holder.
(3) Make sure that the tool bracket is engaged on the tool's flange,
and then tighten the screw.
Attaching a Tool
Removing the tool
(1) Lower the media set lever to raise the push rollers.
Loading Roll Media
(1) Lower the media set lever to raise the push rollers.
(2) Make sure that the sheet media completely covers the media sensor.
(3) Set the Tool conditions (Tool, Speed, Force, Acceleration).
(4) Make test cutting for three pieces while Tool conditions are being
set.
(6) Press the POSITION ( ) key the tool carriage to the location
you wish to perform the test cutting.
(7) Press the [1] key (FORCE).
3 cutting test patterns are cut, with current FORCE in the center,
and 1 each of FORCE increased and decreased for 1.
(3) Position the media and the push rollers to correspond with the
width of the media.
(4) Pull the media taut to make sure that there is no slack in the
conveyance path, and then raise the media set lever to lower the
push rollers. Set the sheet media so that the paper's edges line up
with the guideline on the front side.
Loading Sheet Media
To make 3 cuts with set value and ±1 of set value
Check if the offset value is set correctly by following.
Media stopper
This stops the stock shaft
from spinning when setting in
media. It is also utilized when
pulling roll media straight out.
Supplement
When actually cutting, please
release the lock from the
media stopper (while pulling to
the exterior, slide it forward).
When Feeding Long-axis Media
(at exceeds 2 meters)
Position the push rollers at least 15
mm inside the edges of the media.
Supplement
Dirt from the floor may stick to
the media when giving it slack,
so please be careful.
Setting the Tool
conditions
For more
information about
the various cutting
conditions, see
"Qe6000 User's
Manual".
To move the push rollers, the media set lever must be in the lowered position.
Caution
Set the media type into the Plotter depending on the preset media.
(1) If you have already loaded the media, the MEDIA TYPE menu
appears. Select the media type to suit the loaded media.
Set the media type into the Plotter
(2) After the media is detected, the plotter is ready to receive data for
cutting or plotting. This status is called "READY status" of the
default screen. When setting is finished, the tool carriage's location
will become the initial point.
Release the media stopper.
Caution
Caution
Tool adjustment and test cutting
Do not touch the
Tool edge when
power is turned on
or during operation.
(8) Press the [ENTER] key after completion.
It will return to CUT TEST menu screen.
(9) Press the [2] key (CUTTER OFFSET). (Normal mode only)
3 cutting test patterns are cut, with current CUTTER OFFSET in
the center, and 1 each of CUTTER OFFSET increased and
decreased for 1.
(10) Press the [ENTER] key after completion.
It will return to CUT TEST menu screen.
(11) Check if the cut test is appropriate. Confirm the cutting test
results, and adjust to optimal setting. Repeat cutting test and
adjustment until optimal cut is achieved.
How to check offset
Cutter plunger
Cutter blade
(CB09UA)
Insert the
cutter blade
Right
Extend the blade Extract the blade
Too short
Guide of the cutter blade length
Adjusting
the blade-tip
length
Media with backing sheet
Too long
When Feeding Long-axis Media
(at least 2 meters)
Position the push rollers at least 5
mm inside the edges of the media.
Release the
media lock
Media stopper
Give it slack
Give it slack
Media sensors
Media set lever
Line up
Menu screen (Normal mode)
Menu screen (Simple mode)
Roll media
Sheet media
CONTINUE
Plot starting with the edge of media
Plot starting with the preset position
Set a sheet media
When similar media is reset
[1] ROLL-1 FRONT EDGE
[2] ROLL-2 CURRENT
[3] SHEET
[4] CONTINUE
CONDITION screen
(Normal mode)
CONDITION screen
(Simple mode)
CONDITION screen
(Normal mode)
CONDITION screen
(Simple mode)
Ex.) TOOLS CONDITION
Settings screen (Normal mode)
Ex.) TOOLS CONDITION
Settings screen (Simple mode)
CUT TEST screen
(Normal mode)
CUT TEST screen
(Simple mode)
Not enough
adjustment.
Increase the
offset value.
Optimal offset
value.
Too much
adjustment.
Decrease the
offset value.
Cut Order
–1
Setting values
+1
Flange
Bracket to hold tool
Tool holder
Top
Bracket to
hold tool
Tool holder
Bracket to hold tool
Tool holder
Bracket to
hold tool
Flange
Media sensor
Push roller Media set
lever
Media set
lever
Media stopper
Slide the
media lock
Media sensors
Push roller
Media sensor
Media
Grit roller
Grit roller position guide
Push roller
Push roller
15 mm
Media
15 mm
5 mm
5 mm
Media
Push roller
Push roller
Grit roller
position guide
Grit roller
(It isn't on the grit roller)
(It isn't on the grit roller)
Push roller
Grit roller
Media
Media sensor
(5) Press the POSITION ( ) key (CUT TEST).
CUT TEST screen is displayed.
621640310


