background image

8


8


W W W . V I N O T E M P . C O M  


Setting the temperature: 

You can manually adjust the temperature. Simply 

press the DOWN arrow button on the control panel to decrease the temperature 

and the UP arrow button to increase the temperature by 1 degree inside the 

wine cellar. The temperature range for this unit is from 45°F (7°C) to 65°F 
(18°C). 

 
When the cabinet temperature is too low, the LED will display “LL”. When the 

temperature is too high, it will display “HH”. The “ER” display shows when there 

has been a power disruption. 


DOOR HANDLE INSTALLATION 


1.


Gently pull away the door gasket in the area where the handle is to be 
installed. The gasket is easily displaced by hand; no tools are necessary. 

2.


Use a Phillips head screwdriver to remove/install screws securing door handle. 
(Do not over tighten screws as this will cause damage to the handle.) 

3.


If needed, use a flat head screwdriver to remove the 2 decorative plugs from 

the front of the door or the plugs at the top of the door where the hinge is 
located, if they are located on the side you wish the handle to be installed on. 

Save the plugs for future use. 

4.


Replace the door gasket to its original position. Insert plugs into open door 

holes if desired. 


CLEANING AND CARE 


Always unplug the wine cellar before cleaning.  


Do not use benzene, scrubbing brushes or chemical cleaners as these will 

damage the unit.  


Use only a mild, nonabrasive cleanser to clean the exterior of the cabinet.  


Clean the stainless steel door and handle by wiping with a warm water and 

baking soda solution. The solution should be about 2 tablespoons of baking 
soda to a quart of water.  


Wash the racks with a mild detergent solution. 


Always dry all parts with a clean, dry cloth before plugging the wine cellar 
back into the receptacle. 


MOVING YOUR WINE CELLAR 


Always unplug the wine cellar before moving. 


Remove all bottles before moving the wine cellar. 


Securely tape down all loose items and shelves inside your appliance. 


Turn the leveling legs up to the base to avoid damage. 


Tape the door shut. 


Be sure the wine cellar stays in the upright position during transportation 


Protect the outside of appliance with a blanket or similar item when moving 

as needed. 

Meijer.com

Содержание T-WC58GNV-S10

Страница 1: ...E O F E X P E R I E N C E Q U A L I T Y O W N E R S M A N U A L W i n e C e l l a r V T W C 5 8 G N V S B 1 0 5 8 b o t t l e V T W C 5 8 G N V S 1 0 5 8 b o t t l e V T W C 5 8 G N V B 1 0 5 8 b o t...

Страница 2: ...possible wine should be stored at approximately 55 Fahrenheit However the chart below suggests the optimal drinking temperature for the different styles of wine C F Wine Style 19 66 Armagnac Brandy C...

Страница 3: ...any packaging materials You may want to keep the box and packing materials for use at a later date Upon receipt and inspection of unit the supply cord must be replaced if it is damaged Contact our cu...

Страница 4: ...RTANT SAFETY INSTRUCTIONS 6 CORD INSTRUCTIONS 6 WINE CELLAR INSTALLATION 7 OPERATING INSTRUCTIONS 7 TEMPERATURE CONTROL 7 DOOR HANDLE INSTALLATION 8 CLEANING AND CARE 8 MOVING YOUR WINE CELLAR 8 TROUB...

Страница 5: ...4 Shelf 5 Cabinet 6 Control Panel 7 Light ON OFF Button 8 LED Temperature Indicator 9 Temperature Adjustment Button Item Number VT WC58GNV10 Type 1 Temp Bottle Capacity Approx 58 Dimension WxDxH with...

Страница 6: ...nded and may be hazardous Do not operate if the housing is removed or damaged A loose fit plug may cause overheating and a distortion of the plug Contact a qualified electrician to replace loose or wo...

Страница 7: ...approximately 24 hours This will reduce the possibility of a malfunction in the cooling system from handling during transportation Clean the interior surface with a soft cloth and lukewarm water befo...

Страница 8: ...ocated if they are located on the side you wish the handle to be installed on Save the plugs for future use 4 Replace the door gasket to its original position Insert plugs into open door holes if desi...

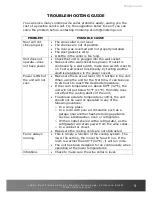
Страница 9: ...ut the unit will not cool Make sure there are at least 3 to 5 bottles in the unit When using the unit for the first time it can take up to 24 hours to reach the desired temperature If the room tempera...

Страница 10: ...1 0 10 W W W V I N O T E M P C O M Meijer com...

Страница 11: ...at Seller s option to repair or replace defective part s with either new or factory reconditioned part s Purchaser is responsible for shipping the unit pre paid to designated facility and Seller will...

Страница 12: ...without notice WARNING Please do not place the unit within reach of children For adult use only Contact info vinotemp com with any questions or visit www vinotemp com 17621 S Susana Road Rancho Doming...

Отзывы: