


46NVR.64
Viale Vicenza, 14
36063 Marostica VI - Italy
www.vimar.com
49401504A0 02 2103
C
a
b
Decodifica dei dati:
1-Fare clic su "Modifica crittografia"
2-Inserire il nome utente e la password utilizzati per accedere all'NVR. L'utente
deve avere l'autorizzazione alla gestione del disco.
3 - Selezionare il disco da decrittografare e quindi togliere la password.
4 - Cliccare su Chiudi.
Sblocco disco: quando un disco crittografato viene trasferito da un altro NVR a
questo NVR, sarà nello stato bloccato. Per sbloccarlo, selezionare questo disco
e fare clic su Sblocca. Dopo aver inserito la password di crittografia dei dati, il
suo stato sarà di sola lettura. Sarà ora possibile leggere i dati ma non scriverli.
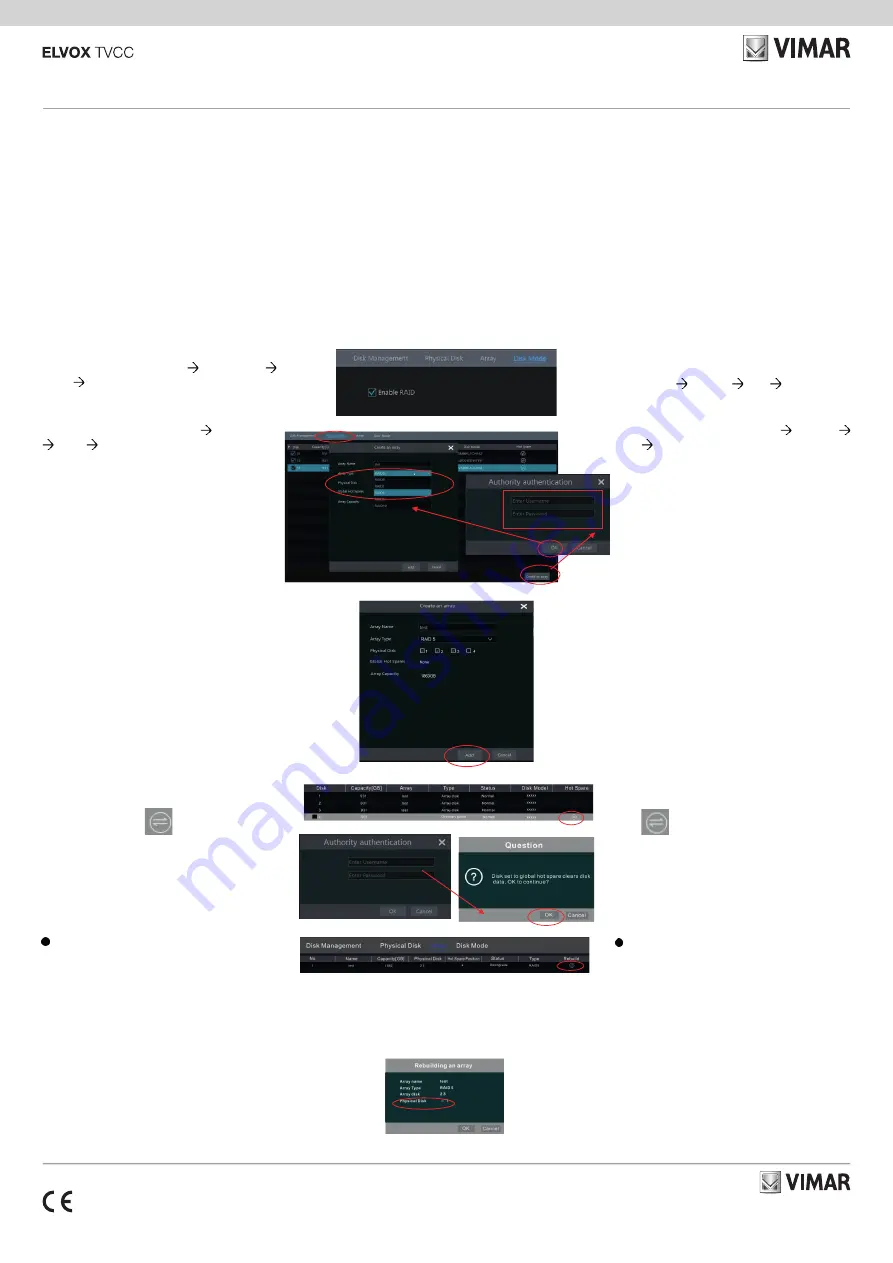
1.3 - Raid
1 - Abilitare RAID (Vai a Start Impostazioni
Disco Modo Disco)
d. Seleziona il disco fisico.
Se sono presenti 8 dischi, selezionare 7 dischi.
Il restante dovrebbe essere impostato su un hot
spare.
Se serve una maggiore sicurezza dei dati, è pos-
sibile ridurre i dischi fisici e aumentare i dischi hot
spare.
Si prega di impostarli come necessario.
Data Decryption:
1 - Click "Data Encrypt"
2 - Enter the username and password used to log in the NVR. This user shall
have the permission of disk management.
3 - Check the disk you want to decrypt and then empty thepassword.
4 - Click Close Encrypt.
Unlock the disk: when one encrypted disk is transferred from another NVR to this
NVR, it will be in locked status. Then you can select this locked disk and click Un-
lock . After you enter the password of its data encryption, its status will be Read
Only . Now you can read the data of this disk but it cannot be writtenanything.
1.3 - Raid
1 - Enable RAID
(Go to Start Settings Disk Disk Mode)
d. Select physical disk.
If you have 8 disks, please check 7 disks. The
remaining one should be set to a hot spare.
If higher data security is needed, you can de-
crease physic disks and increase hot spare
disks. Please set them as needed.
2 - Creare un array. (Vai a Start Impostazioni
Disco
Disco fisico)
a. Fare clic su "Disco fisico" e fare clic su "Crea
un array"
b. Immettere un nome utente e password con
l'autorizzazione di Gestione disco.
Si può utilizzare il nome utente e la password
con cui si accede al sistema (utente predefini
-
to: admin; password predefinita: 123456).
c. Immettere il nome dell'array e selezionare il
tipo di array (esempio RAID5).
2 - Create an array. (Go to Start Settings
Disk Physical Disk)
a. Click "Physical Disk" tab and then click "Create
an array".
b. Enter the user name and password which has
the authority of DiskManagement. If you don't
have one, you use the user name and pass-
word that you login system (the default user-
name: admin; the default password: 123456).
c. Enter array name and select array type (li-
keRAID5).
e. Selezionare un hot spare. Nell'interfaccia del
disco fisico, selezionare il disco che non si trova
nell'array e fare clic
come mostrato nelle
immagini seguenti.
Ricostruzione RAID
Se uno dei dischi è rotto, l'indicatore del disco sul
pannello anteriore diventerà rosso.
Naturalmente, verrà visualizzato un avviso se
è impostato il relativo allarme di eccezione del-
l'HDD.
Sarà necessario ricostruire il RAID dopo aver so-
stituito il disco rotto con uno nuovo.
Fai clic sull'icona cerchiata e selezionare il disco
fisico da ricostruire.
e. Select a hot spare. In the physical disk inter-
face, select the disk that is not in the array and
click
as shown in the following pictures.
RAID Rebuilding
If one of your disks is broken, the disk indicator on
the front panel will turn red. Of course, a warning
tip will pop up if the relevant HDD exception alarm
is set. You need to rebuild the RAID after you re-
place the broken disk with a new one.
Click the above circled icon and then select the
physical disk to rebuild.


