


7
46238.036 - 46239.036
C/
R E S E T
Online
1
1. Download the "Vimar Wi-Fi cam”
application in your smartphone from Google Play (for
Android version) or App Store (iOS version).
Alternatively, it is possible to download the Application at the following address:
Android version: https://play.google.com/store/apps/details?id=com.vimar.elvox.wifi_cam&hl=it
iOS version: https://itunes.apple.com/it/app/elvox-wi-fi-cam/id1052793959?mt=8
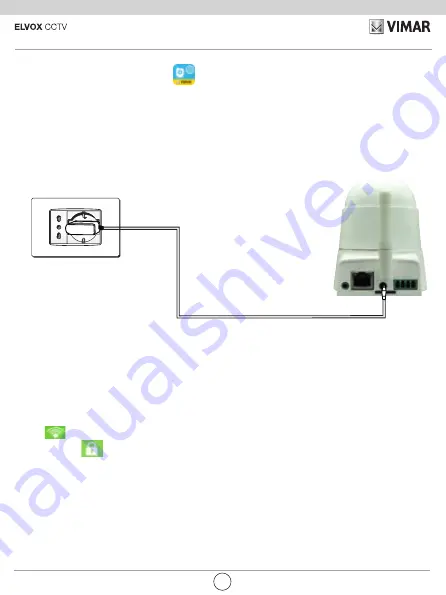
2. Connect the power supply.
Make the connections of the IP video camera with the power supply, see example below:
After connecting the power supply, an acoustic signal is emitted.
3. Quick setup and network connection.
Make sure that your smartphone is connected to the home router supplied and launch the application.
To operate correctly, the "DHCP" (dynamic IP configuration protocol) setting of your router must be
active (check referring to the manual of the router supplied).
3.1 click on
"click here to add video camera"
(for Android) or "
Add"
(for iOS)
3.2 click on
"Quick Setup".
3.3
The identification name of your network appears automatically (service set identifier, or
SSID).
Enter the password for your Wi-Fi network.
3.4 Wait for the end of the connection of the video camera indicated by the end of the acoustic
signalling, this phase lasts about 40 seconds.
N.B.
if within the time indicated the video camera will not stop sounding repeat again from step
3.2.
3.5 If the connection with "quick WiFi setup" (for Android) "quick setup" (for iOS) fails carry out the
connection through the cable: connect the video camera to your router through the network cable
supplied, see figures 1 and 3 (network port). To use the video camera through the Wi-Fi network,
the device must be added before disconnecting the cable (see par. 4.1 below preferring option
A) enter the data of your Wi-Fi network, access the menu dedicated to the video camera and
EN
Installation


