background image

Viale Vicenza, 14

36063 Marostica VI - Italy

www.vimar.com

49400702B0  02  1902

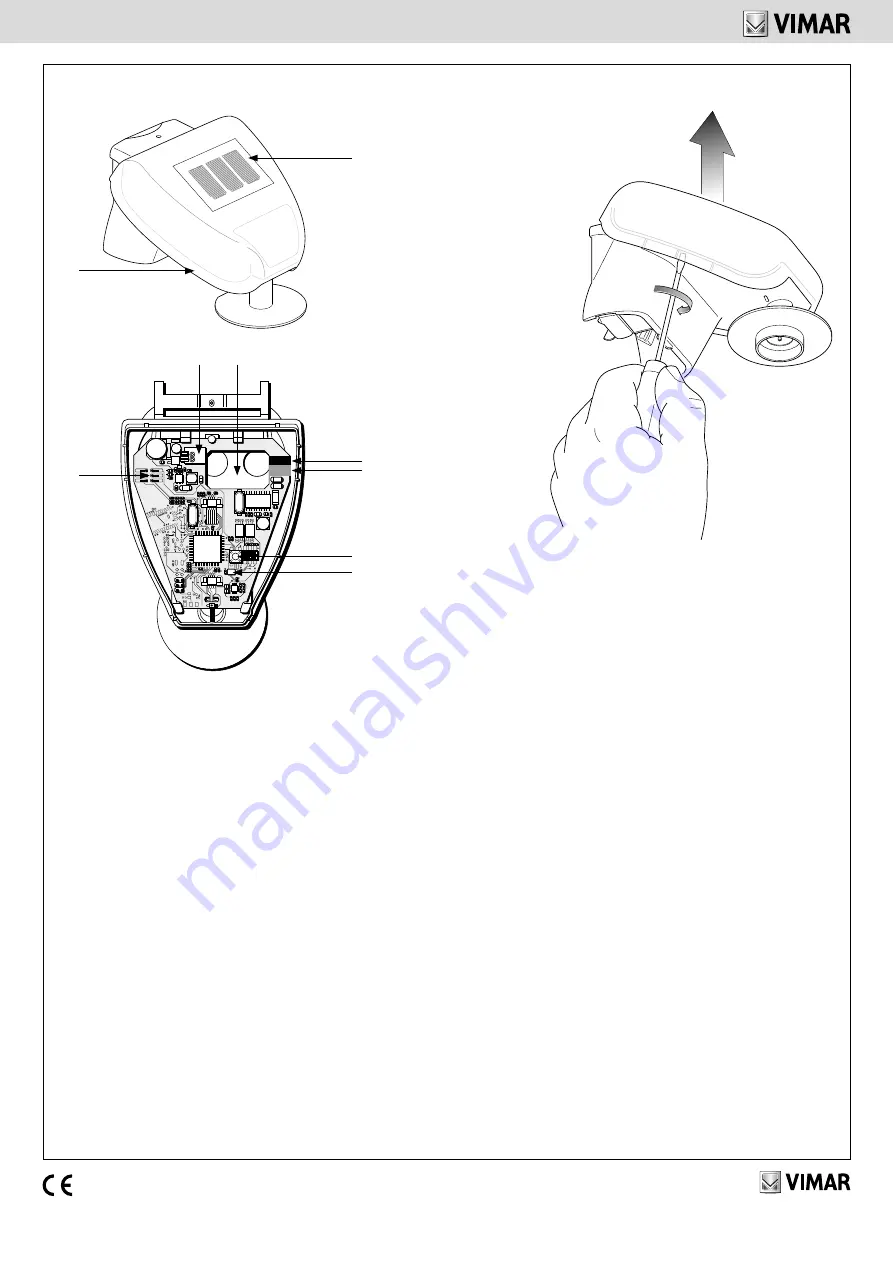
VISTA FRONTALE - FRONT VIEW - VUE DE FACE

1.

  Sensore per rilevazioni di precipitazioni

2.  

Punti di sgancio/aggancio del coperchio

3.

   Morsetto a molla rapido per alimentazione ausiliaria AUX; l’assegnazione dei 

morsetti è indipendente dalla polarità (+/- oppure -/+).

Utilizzare cavo rigido fino a 1,5 mm

2

 di sezione o cavo cordato a trefoli

.

4.

  Connettore per la connessione del cavo del sensore precipitazioni posto  

sotto al coperchio frontale della stazione meteo.

5.

  Vano per il passaggio del cavo di alimentazione e del cavo bus.

6.

  Connettore bus TP KNX (-, +). 

Si consiglia di utilizzare il cavo KNX art. 01890 usando un tubo corrugato 
per la parte esterna o di proteggere il cavo dalle radiazioni UV.

7.

  Pulsante di configurazione.

8. 

Led di configurazione.

1

2

1.

  Sensor for measuring precipitation

2.  

Points for releasing/fastening the cover

3.

  Fast spring terminal for auxiliary power supply AUX; terminal assignment is 

independent of polarity (+/- or -/+).

Use a solid cable of cross-section up to 1.5 mm

2

 or a stranded cable

.

4.

  Connector for connecting the cable of the precipitation sensor under the front 

cover of the weather station.

5.

  Space for feeding through the power supply cable and the bus cable.

6.

  KNX TP bus connector (-, +). 

We recommend using the KNX cable art. 01890 using a corrugated pipe for 
the outside or to protect the cable from UV radiation.

7.

  Configuration button.

8. 

Configuration LED.

1.

  Capteur de détection des précipitations

2.  

Points de fixation/dégagement du couvercle

3.

  Borne sans vis rapide pour alimentation auxiliaire AUX ; l’attribution des 

bornes ne dépend pas de la polarité (+/- ou -/+).

Utiliser un câble rigide d'une section maxi de 1,5 mm

2

 ou un câble torsadé 

triple

.

4.

  Connecteur pour le raccordement du câble du capteur des précipitations 

sous le couvercle avant de la station météo.

5.

  Logement pour le passage du câble d'alimentation et du câble bus.

6.

  Connecteur bus TP KNX (-, +). 

Il est conseillé d'utiliser le câble KNX art. 01890 avec un tuyau annelé pour 
la partie extérieure ou de protéger le câble contre les rayons UV.

7.

  Bouton de configuration.

8. 

Led de configuration.

Sbloccare il coperchio e toglierlo tirando verso l’alto
Unlock the cover and remove it by pulling upwards
Débloquer le couvercle et l’enlever en tirant vers le haut

3

4

6

5

7
8

1

2

3

+

-

Содержание By-me 01546

Страница 1: ...azione si veda il manuale installatore di EasyTool Professional REGOLE DI INSTALLAZIONE L installazione deve essere effettuata da personale qualificato con l osservanza delle disposizioni regolanti l installazione del materiale elettrico in vigore nel paese dove i prodotti sono installati L installazione le verifiche e la messa in funzione della stazione meteo possono essere effettuate solo da per...

Страница 2: ... on the same area line as the weather station the By me router does not permit transferring KNX messages that are indispensable for the configuration For all the details about the configuration procedures see the EasyTool Professional installer manual INSTALLATION RULES Installation should be carried out by qualified personnel in compliance with the current regulations regarding the installation o...

Страница 3: ...e aire ligne que la station météo le routeur By me ne permet pas le passage de messages KNX indispensables pour la configuration Pour tous les détails relatifs aux procédures de configuration consulter le manuel de l installateur d EasyTool Professional CONSIGNES D INSTALLATION L installation doit être confiée à des personnel qualifiés et exécutée conformément aux dispositions qui régissent l inst...

Страница 4: ...anded cable 4 Connector for connecting the cable of the precipitation sensor under the front cover of the weather station 5 Space for feeding through the power supply cable and the bus cable 6 KNX TP bus connector We recommend using the KNX cable art 01890 using a corrugated pipe for the outside or to protect the cable from UV radiation 7 Configuration button 8 Configuration LED 1 Capteur de détec...

Страница 5: ... support perpendiculaire à la paroi ou au mât 3 1 Montaggio a parete installare la parte piana verso la parete e la staffa a mezzaluna verso l alto Wall mounting install the flat part towards the wall and the half moon bracket upwards Montage mural installer la partie droite vers le mur et l étrier en demi lune vers le haut Staffa Bracket Étrier 3 2 Montaggio su sostegno installare la parte arcuat...

Страница 6: ...one devono innestarsi nelle guide del la scatola Per togliere il sensore dal supporto tirarlo verso l alto ed estrarlo opponendosi all arresto a scatto Move the box to the top of the installed mounting frame the coupling teeth should engage in the box guides To remove the sensor from the mounting frame pull it upwards and take it out against the resistance of the fastener Déplacer la boîte dans la...

Отзывы: