background image

GB

35

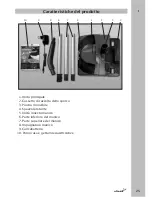
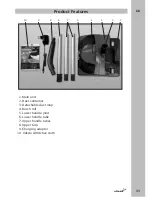
Product Features

1. Main unit

2. Dust container 

3. Detachable dust mop

4. Brush roll 

5. Lower handle joint

6. Lower handle tube

7. Upper handle tubes

8. Upper Grip

9. Charging adaptor

10. Vileda AttrActive cloth

1

3

5

6

8

9

10

7

2

4

Содержание ELECTRIC BROOM + DUSTMOP

Страница 1: ...Akku Besen Staubwischer Balai lectrique syst me attrape poussi re Scopa Elettrica Electric Broom Dustmop Bedienungsanleitung Manuel d utilisation Manuale di Istruzioni ed avvertenze Instruction manual...

Страница 2: ...2...

Страница 3: ...d technische Eigenschaften Seite 3 Generelle Warnhinweise Seite 4 Produkteigenschaften Seite 5 Zusammenbau Seite 6 Anwendung Seite 7 Aufladen des Akkus Seite 9 Pflege und Wartung Seite 10 Entsorgung U...

Страница 4: ...en Oberfl chen fern halten 12 Dieses Ger t enth lt einen wiederaufladbaren Akku Akku nicht ins Feuer werfen oder hohen Temperaturen aussetzen da Explosionsgefahr besteht 13 Benutzen Sie das Ladeger t...

Страница 5: ...1 Haupteinheit 2 Schmutzsammelbeh lter 3 Abnehmbarer Staubwischer 4 B rstenwalze 5 Unterer Griff 6 Unteres Stielrohr 7 Obere Stielrohre 8 Oberer Griff 9 Ladeger t 10 Vileda AttrActive Staub Fang T ch...

Страница 6: ...alle Teile aus der Verpackung Entfernen Sie die Pappe vom Ein Aus Schalter 2 Stecken Sie das untere Stielrohr in die Haupteinheit Stellen Sie sicher dass das richtige Stielrohr unten ist 3 Verbinden...

Страница 7: ...dlichen B den a Fliesen und Parkett Das Ger t kann mit oder ohne Staubwischer verwendet werden Verwenden Sie das Ger t mit dem Staubwischer um Partikel und feinen Staub effektiv aufzukehren Legen Sie...

Страница 8: ...l sen b Teppich Verwenden Sie das Ger t ohne Staubwischer Bringen Sie den Staubwischer nicht an der Haupt einheit an 3 F r eine bequeme Anwendung drehen Sie den Besen in alle Richtungen 4 Nach der Ben...

Страница 9: ...ISE 1 Entladen Sie niemals den Akku und stellen dann das Produkt ohne es auszuschalten zur Seite eine vollst ndige Tiefenentladung kann den Akku besch digen Schalten Sie das Ger t vor dem Aufladen auc...

Страница 10: ...leeren Sie den Staub aus dem Schmutz sammelbeh lter in den Abfalleimer Bei Bedarf k nnen Sie den entfernten Schmutzsammelbe h lter mit einem feuchten Tuch reinigen Trocknen Sie den Beh lter gr ndlich...

Страница 11: ...ku Besen mit Staubwischer erf llt die EU Richtlinie 2002 96 CE welche die Verwer tung von Elektro und Elektronik Altger ten beinhaltet Bitte entsorgen Sie dieses Ger t am Ende seiner Nutzungsdauer nic...

Страница 12: ...nn Teile eigenm chtig ver ndert oder unzul ssige Umbauten vorgenommen wurden oder das Ger t in einer nicht von Vileda empfohlenen Weise eingesetzt wird 3 Wenn es mit Teilen Zubeh r benutzt wird welche...

Страница 13: ...nnalit s et caract ristiques FONCTIONNALIT S DU PRODUIT Le nouveau balai lectrique syst me attrape poussi re de Vileda peut tre utilis sur l ensem ble de vos sols parquets carrelages tapis et moquette...

Страница 14: ...eur ou l appareil avec les mains mouill es 14 Avant la premi re utilisation la batterie doit tre charg e au moins 6 heures 15 Ne recharger la batterie que lorsqu elle est compl tement d charg e La bat...

Страница 15: ...de l appareil 2 R servoir particules 3 Support de lingette amovible 4 Brosse rotative 5 Embout de fixation du manche 6 Partie inf rieure du manche 7 Parties sup rieures du manche 8 Poign e 9 Chargeur...

Страница 16: ...composants de l emballage Retirer le carton du bouton ON OFF 2 Assembler la partie inf rieure du manche la partie principale de l appareil V rifier l ordre d assemblage des diff rentes parties du man...

Страница 17: ...reil 2 Nettoyage sur diff rentes surfaces a Sur les carrelages ou parquets L utilisation de l appareil avec la lingette assurera une r cup ration efficace des particules et de la poussi re fine Placer...

Страница 18: ...le de la partie principale de l appareil b Sur les tapis et moquettes Utiliser l appareil sans attacher le support amovible pour lingette 3 Tourner le balai dans toutes les directions pour un usage pr...

Страница 19: ...TISSEMENT 1 Ne jamais laisser le balai en position ON avec la batterie d charg e Ceci pourrait l endomma ger M me si la brosse rotative est l arr t teindre l appareil avant de le recharger 2 Ne pas ut...

Страница 20: ...irer le r servoir particules vider les particules captur es dans la poubelle Si vous le d sirez vous pouvez nettoyer le r servoir enlev l aide d un chiffon mouill Attention bien s cher avant de remett...

Страница 21: ...riques et lectroniques et leur gestion d enl vement Le mat riel d emballage est totalement recyclable et comporte le symbole de recyclage Suivre les instructions locales pour la mise au rebut Garder l...

Страница 22: ...ra tre invoqu e si le balai n a pas t utilis comme indiqu dans le manuel comme par exemple 1 Si l appareil a t endommag lors d une mauvaise manipulation durant l utilisation ou l entretien 2 Si certai...

Страница 23: ...nto Pagina 27 Carica e ricarica batteria Pagina 29 Manutenzione e pulizia Pagina 30 Smaltimento della Scopa Elettrica Pagina 31 Garanzia convenzionale Pagina 32 Funzioni del prodotto e caratteristiche...

Страница 24: ...re ad alte temperature le batterie 13 Non utilizzare il prodotto o il carica batteria con le mani bagnate 14 Precedentemente al primo utilizzo caricare la batteria per almeno 6 ore 15 Caricare la batt...

Страница 25: ...Cassetto di raccolta dello sporco 3 Piastra rimovibile 4 Spazzola rotante 5 Unit innesto manico 6 Parte inferiore del manico 7 Parte superiore del manico 8 Impugnatura manico 9 Caricabatteria 10 Pann...

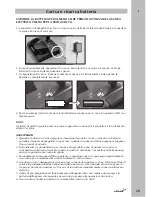
Страница 26: ...rarre tutte le componenti dalla scatola Rimuovere il cartone protettivo posto sul pulsante di accensione 2 Inserire la parte inferiore del manico nell unit principale assicurandosi che la parte di man...

Страница 27: ...pavimenti a Pulizia su mattonelle e parquet L unit pu essere utilizzata con il panno catturapolvere o senza L utilizzo del catturapolvere assicura una migliore raccolta della polvere pi sottile Applic...

Страница 28: ...unit principale b Pulizia sui tappeti Utilizzare l unit senza piastra rimuovendola dall unit principale 3 Indirizzare la scopa nelle varie direzioni a seconda della necessit d uso 4 Al termine della...

Страница 29: ...trario la batteria potrebbe rimanere danneggiata In ogni caso quando la spazzola si ferma spegnere l apparec chio prima di ricaricarlo 2 Non utilizzare il caricabatteria per caricare altri prodotti e...

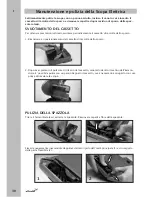
Страница 30: ...raccolta dello sporco 1 Rimozione e riposizionamento del cassetto di raccolta dello sporco 2 Dopo aver premuto il pulsante di rilascio del cassetto svuotarlo dentro il cestino dell immon dizia E poss...

Страница 31: ...sata al Vostro distributore il quale provveder al ritiro gratuito ed al trasporto della scopa stessa presso i centri di raccolta differenziata Si raccomanda uno scrupoloso rispetto delle norme sullo s...

Страница 32: ...el prodotto e o da una manutenzione difforme rispetto alle prescrizioni contenute nel manuale di istruzioni ed avvertenze che accompagna il prodotto medesimo 3 Utilizzo della Scopa Elettrica con parti...

Страница 33: ...Characteristics FUNCTIONS OF THE PRODUCT The new Vileda Electric Broom Dustmop will make your daily cleaning faster and easier Suitable for use on all floor types it combines a rotating brush on the f...

Страница 34: ...cludes rechargeable batteries do not incinerate batteries or expose to high temperatures as they may explode 13 Do not handle the charger or unit with wet hands 14 Before first use charge the battery...

Страница 35: ...Features 1 Main unit 2 Dust container 3 Detachable dust mop 4 Brush roll 5 Lower handle joint 6 Lower handle tube 7 Upper handle tubes 8 Upper Grip 9 Charging adaptor 10 Vileda AttrActive cloth 1 3 5...

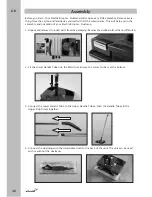
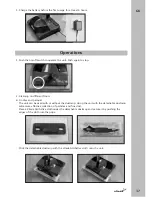
Страница 36: ...tric Broom Dustmop 1 Unpack and remove all product parts from the packaging Remove the cardboard from the on off Switch 2 Fit the Lower Handle Tube into the Main Unit Ensure the correct tube is at the...

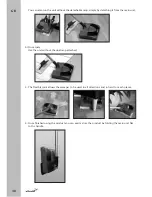
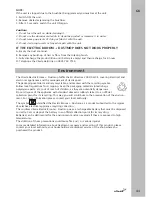
Страница 37: ...a On tiles and parquet The unit can be used with or without the dustmop Using the unit with the detachable dustmop will assure effective collection of particles and fine dust Place a Vileda AttrActiv...

Страница 38: ...from the main unit b On carpets Use the unit without the dustmop attached 3 The flexible joint allows the sweeper to be used in all directions and in hard to reach places 4 Once finished using the pro...

Страница 39: ...ry empty and then put the product away without switching it off deep discharge can damage the battery Even when the brushbar has completely stopped turning switch off the unit before recharging 2 Do n...

Страница 40: ...tainer 2 Press the release button empty dust from the dust container into the rubbish bin If desired you may clean the dust container with a wet cloth If you do this ensure you dry thoroughly before r...

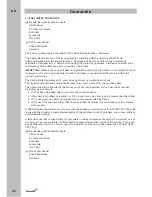
Страница 41: ...ed with the recycling symbol Follow local regulations for scrapping Keep the packaging materials plastic bags polystyrene parts etc out of reach of children as they are potentially dangerous Do not di...

Страница 42: ...e purchase date The guarantee will be annulled if the broom is not used as indicated in the instructions manual including as an example 1 If it has been damaged due to incorrect use or maintenance 2 I...

Страница 43: ...GB 43...

Страница 44: ...02845 20 26 204...

Отзывы: