Viking VK960 Скачать руководство пользователя страница 11

BULLETIN

The Viking Corporation, 210 N Industrial Park Drive, Hastings MI 49058

Telephone: 269-945-9501  Technical Services: 877-384-5464  Fax: 269-818-1680  Email: [email protected]

CARE AND HANDLING 

OF SPRINKLERS

Page 1 of 4

Form No. F_091699     18.10.11    Rev 16.1.P65

SPRINKLERS ARE FRAGILE - HANDLE WITH CARE!

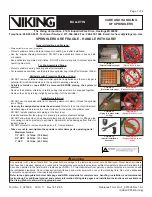
General Handling and Storage:

• 

Store sprinklers in a cool, dry place.

• 

Protect sprinklers during storage, transport, handling, and after installation.

• 

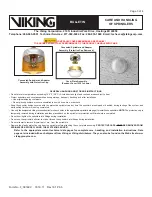
Use the original shipping containers. DO NOT place sprinklers loose in boxes, bins, 

or buckets.

• 

Keep sprinklers separated at all times. DO NOT allow metal parts to contact sprinkler 

operating elements.

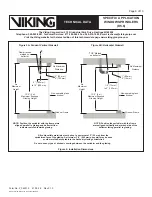
For Pre-Assembled Drops:

• 

Protect sprinklers during handling and after installation.

• 

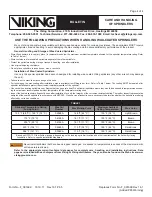
For recessed assemblies, use the protective sprinkler cap (Viking Part Number 10364).

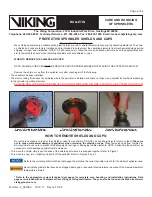
Sprinklers with Protective Shields or Caps:

• 

DO NOT remove shields or caps until after sprinkler installation and there no longer is 

potential for mechanical damage to the sprinkler operating elements.

• 

Sprinkler shields or caps MUST be removed BEFORE placing the system in 

service!

• 

Remove the sprinkler shield by carefully pulling it apart where it is snapped together.

• 

Remove the cap by turning it slightly and pulling it off the sprinkler.

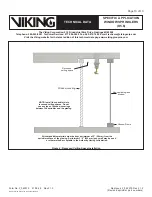
Sprinkler Installation:

• 

DO NOT use the sprinkler deflector or operating element to start or thread the sprinkler 

into a fitting.

• 

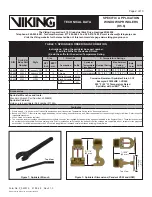
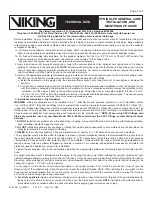
Use only the designated sprinkler head wrench!

 Refer to the current sprinkler tech-

nical data page to determine the correct wrench for the model of sprinkler used.

• 

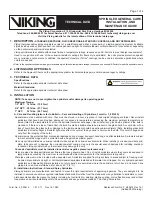
DO NOT install sprinklers onto piping at the floor level.

• 

Install sprinklers after the piping is in place to prevent mechanical damage.

• 

DO NOT allow impacts such as hammer blows directly to sprinklers or to fittings, pipe, 

or couplings in close proximity to sprinklers. Sprinklers can be damaged from direct or 

indirect impacts.

• 

DO NOT attempt to remove drywall, paint, etc., from sprinklers.

• 

Take care not to over-tighten the sprinkler and/or damage its operating parts! 

Maximum Torque:  

1/2” NPT:   14 ft-lbs. (19.0 N-m)        
3/4” NPT:   20 ft-lbs. (27.1 N-m)         
1” NPT:   30 ft-lbs. (40.7 N-m)

 WARNING

Any sprinkler with a loss of liquid from the glass bulb or damage to the fusible element should be destroyed. Never install sprinklers 

that have been dropped, damaged, or exposed to temperatures exceeding the maximum ambient temperature allowed. Sprinklers that 

have been painted in the field must be replaced per NFPA 13. Protect sprinklers from paint and paint overspray in accordance with 

the installation standards. Do not clean sprinklers with soap and water, ammonia, or any other cleaning fluid. Do not use adhesives 

or solvents on sprinklers or their operating elements.

Refer to the appropriate technical data page and NFPA standards for complete care, handling, installation, and maintenance 

instructions. For additional product and system information Viking data pages and installation instructions are available on 

the Viking Web site at www.vikinggroupinc.com.
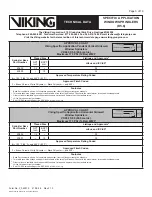
CORRECT

(Original container used)

INCORRECT

(Placed loose in box)
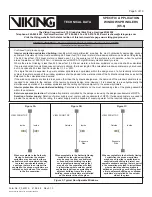
CORRECT

(Protected with caps)

INCORRECT

(Protective caps not used)
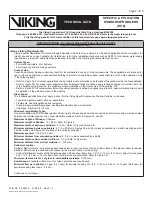
CORRECT

(Piping is in place at the 

ceiling)

INCORRECT

(Sprinkler at floor level)

CORRECT

(Special installation 

wrenches)

INCORRECT

(Designated wrench not 

used)

Replaces Form No. F_091699 Rev 16.1

(Added P65 Warning)

Содержание VK960

Страница 1: ...hown by 10 0 Material Standards Sprinkler Body Brass CW602N or QM Brass Deflector Phosphor Bronze UNS C51000 Pip Cap Shell Stainless Steel UNS S44400 Pip Cap Disc Stainless Steel UNS S30100 Belleville Spring Nickel Alloy Pip Cap Seal Polytetrafluoroethylene PTFE Compression Screw Brass CW612N CW508L UNS C36000 or UNS C26000 Shipping Cap Polyethylene Bulb Glass nominal 3 mm diameter Ordering Inform...

Страница 2: ...nkler Finish ENT Example 23832JNE VK960 200 F 93 C Temperature Rated Sprinkler with an ENT3 4 finish VK962 23831 HSW 15 Black Polyester M B ENT3 4 JN Accessories Sprinkler Wrenches and tools Standard Wrench Part Number 23559MB Sprinkler Cabinet Holds up to 6 sprinklers Part number 01724A Footnotes 1 Where a dash is shown in the Finish suffix designation insert the desired Temperature Rating suffix...

Страница 3: ...ings and approvals available at the time of publication Check with the manufacturer for any additional approvals 3 Other colors are available upon request with the same Listings and Approvals as the standard colors 4 cULus Listed as corrosion resistant 5 See ICC ES Evaluation Report No ESR 4288 at www icc es org APPROVAL CHART Viking Specific Application Horizontal Sidewall Window Sprinklers VK962...

Страница 4: ...ior spatial separation is defined as exposure protection open window sprinklers must be installed on the exterior portion of the building Glass Types The following specifications must apply in order for the Viking Specific Application Window Sprinkler to be used Type Non operable and or stronger assemblies Treatments heat strengthened and tempered Glazing single glazed single pane double glazed do...

Страница 5: ...te hydraulic design area However it is necessary to prove hydraulically the simultaneous operation of the window sprinklers and the ceiling sprinklers adjacent to the window sprinklers Interior protection of non sprinklered building Calculate all sprinklers on the most demanding side of the glazing assembly within the enclosure Exterior exposure protection Calculate all sprinklers controlled by th...

Страница 6: ...indow sprinklers must be installed on the exterior portion of the building Glass Types The following specifications must apply in order for the Viking Specific Application Window Sprinkler to be used Type Non operable and or stronger assemblies Treatments heat strengthened and tempered Glazing single glazed single pane double glazed double pane or insulated Thickness Minimum 1 4 6 mm Window Frame ...

Страница 7: ... area reduction for quick response sprinklers is utilized the linear length of the calculated window sprinklers may be reduced but in no case shall be less than 36 linear feet 1 2 x 900 If a single fire can be expected to operate window sprinklers and sprinklers within the design area of a hydraulically calculated system the water demand of the window sprinklers shall be added to the water demand ...

Страница 8: ...ions 6 0 1 8 m 6 0 1 8 m Pendent VSW 12 0 3 7 m Max Pendent VSW 12 0 3 7 m Max HSW 8 0 2 4 m Max HSW 8 0 2 4 m Max Minimum Sprinkler Pendent VSW or HSW Minimum The minimum distance between Window Sprinklers must be 6 0 1 8 m unless separated by a baffle or mullion of adequate depth to act as a baffle Window Sprinklers are not required to be located with respect to horizontal or vertical butt joint...

Страница 9: ...tor facing parallel to glazing NOTE Position the sprinkler with the frame arms aligned parallel to glazing and deflector flow indicator pointed towards glazing All combustible materials must be kept a minimum of 2 50 mm from the sprinklered face of the glazing A minimum 3 0 900 mm pony wall may be used or other method acceptable to the Authority Having Jurisdiction Do not use any type of window co...

Страница 10: ... this technical data page www vikinggroupinc com Recessed ceiling space Window covering All combustible materials must be kept a minimum of 2 50 mm from the sprinklered face of the glazing A minimum 3 0 900 mm pony wall may be used or other method acceptable to the Authority Having Jurisdiction NOTE Install the sprinklers into recessed ceiling spaces Do not use any type of window coverings between...

Страница 11: ...stall sprinklers onto piping at the floor level Install sprinklers after the piping is in place to prevent mechanical damage DO NOT allow impacts such as hammer blows directly to sprinklers or to fittings pipe or couplings in close proximity to sprinklers Sprinklers can be damaged from direct or indirect impacts DO NOT attempt to remove drywall paint etc from sprinklers Take care not to over tight...

Страница 12: ...D CAPS MUST BE REMOVED FROM SPRINKLERS BEFORE PLACING THE SYSTEM IN SERVICE Figure 1 Sprinkler shield being removed from a pendent sprinkler Figure 2 Sprinkler cap being removed from a pendent sprinkler Figure 3 Sprinkler cap being re moved from and upright sprinkler HOW TO REMOVE SHIELDS AND CAPS No tools are necessary to remove the shields or caps from sprinklers DO NOT use any sharp objects to ...

Страница 13: ... these sprinklers NOTE The protective cap is temporarily removed during installation and then placed back on the sprinkler for protection until finish work is completed Do not over tighten the sprinklers into fittings during installation Do not use the sprinkler deflector to start or thread the sprinklers into fittings during installation Do not attempt to remove drywall paint etc from the sprinkl...

Страница 14: ...t the corrosion resistant properties of the sprinkler Use care when locating sprinklers near fixtures that can generate heat Do not install sprinklers where they would be exposed to temperatures exceed ing the maximum recommended ambient temperature for the temperature rating used Inspect the coated sprinklers frequently soon after installation to verify the integrity of the corrosion resistant co...

Страница 15: ... the sprinkler technical data page Never install any glass bulb sprinkler if the bulb is cracked or if there is a loss of liquid from the bulb A small air bubble should be present in the glass bulb Any sprinkler with a loss of liquid from the glass bulb or damage to the fusible element should be destroyed immediately Note Installing glass bulb sprinklers in direct sunlight ultraviolet light may af...

Страница 16: ...uctile iron or Nibco CPVC threaded tee fittings for wet systems that meet the dimensional requirements of ANSI B16 3 Class 150 or cast iron threaded tee fittings that meet the dimensional requirements of ANSI B16 4 Class 125 even at branch line ends The threaded end of the dry sprinkler is designed to allow the seal to penetrate and extend into the fitting to a predetermined depth This prevents co...

Страница 17: ...ther To remove caps from frame style sprinklers turn the caps slightly and pull them off the sprinklers SPRINKLER CAPS OR BULB SHIELDS MUST BE REMOVED FROM SPRINKLERS BEFORE PLACING THE SYSTEM IN SERVICE Retain a protective cap or shield in the spare sprinkler cabinet 5 For flush style sprinklers the ceiling ring can now be installed onto the sprinkler body Align the ceiling ring with the sprinkle...

Страница 18: ...Prior to removing the system from service notify all Authorities Having Jurisdiction Consideration should be given to employment of a fire patrol in the affected area 1 Remove the system from service drain all water and relieve all pressure on the piping 2a For frame style sprinklers use the special sprinkler wrench to remove the old sprinkler by turning it counterclockwise to unthread it from the...

Страница 19: ...ction of fire protection products are provided herin as they relate to legally mandated jurisdictional regions WARNING STATE OF CALIFORNIA USA Installing or servicing fire protection products such as sprinklers valves piping etc can expose you to chemicals including but not li mited to lead nickel butadiene titaninum dioxide chromium carbon black and acrylonitrile which are known to the State of C...

Отзывы: