


13
12
Operation
O
p
e
ra
ti
o
n
Your warming drawer works in two ways:
1. Seals moisture within the drawer to keep food moist.
2. Allows moisture to escape and keep food crisp.
The purpose of the warming drawer is to keep hot, cooked foods at
serving temperature. Always start with hot food; cold food cannot be
heated in the warming drawer.
Warming Element
Turn the control knob clockwise to the desired setting. The element
will cycle on and off to maintain the desired heat setting. When
finished turn the control to “OFF.”
Note:
The majority of foods are held at a medium setting to maintain
a serving temperature.
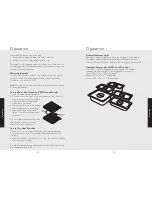
To use Moist Heat function (VEWD models only)
1. Place low racks in warming drawer.
2. Fill the moisture cup with 1/2 cup water and place the cup in the
rear center opening of the low rack.
3. Place the food or cookware with
food directly on the rack.
4. Turn the control knob to the desired
heat setting and close the drawer.
5. Slide the moisture control to the
right to close the vents which seals
in the heat.
Use moist heat when proofing breads
and keeping foods moist such as
casseroles, meats, and sauces.
To use Dry Heat Function
1. Place the food or cookware with food in the empty drawer pan.
2. Turn the control knob to the desired heat setting and close the
drawer.
3. Slide the moisture control to the left to open the vents which allows
the moist heat to escape.
Use dry heat when warming dishes and keeping foods crispy such as
pies, breads and fried foods.
O
p
e
ra
tio
n
Operation
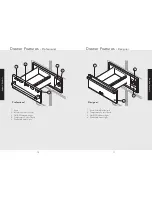
Low
racks
Moisture
cup
Drawer Indicator Light
The drawer indicator light is located on the front panel of the drawer.
The drawer indicator light will glow red when the drawer element is
heated. The light will cycle on and off as the temperature is maintained.
Optional Accessories for Moist or Dry Heat
Pans/Lids - This warming drawer is designed to accommodate
standard size pan inserts. The optional pan/lid set consists of:
1) one 4” D. x 12” L. x 10½” W. pan/lid
2) two 4” D. x 12” L. x 7” W. pans/lids
3) two 2½” D. x 12” L. x 7” W. pans/lids
Содержание F1614H
Страница 12: ...22 23...