Use/Installation
GUIDE
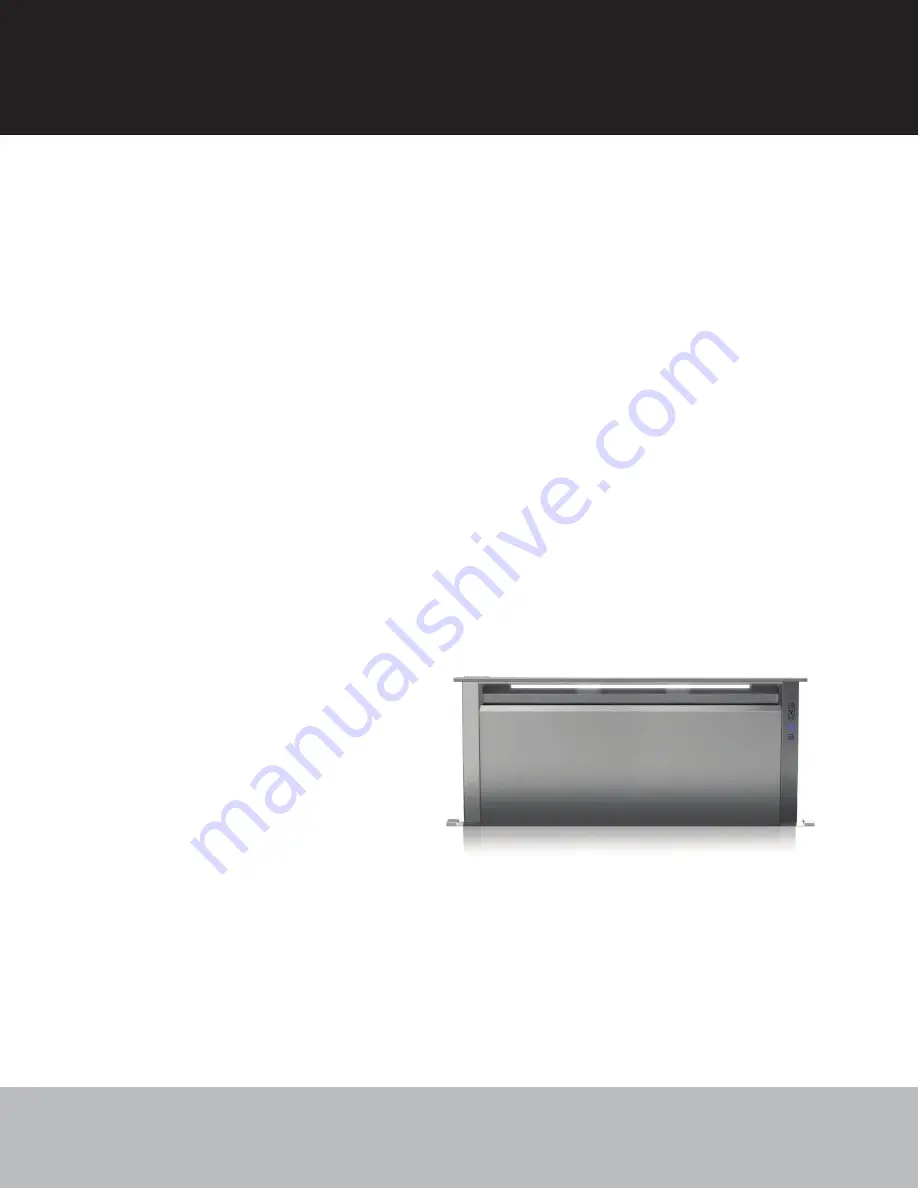
5 SERIES
Rear Downdraft Ventilators
VDD5300/CVDD5300
VDD5360/CVDD5360
VDD5450/CVDD5450
VDD5480/CVDD5480
Страница 1: ...Use Installation GUIDE 5 SERIES Rear Downdraft Ventilators VDD5300 CVDD5300 VDD5360 CVDD5360 VDD5450 CVDD5450 VDD5480 CVDD5480 ...
Страница 2: ...must be grounded 12 To reduce the risk of fire or electric shock it is recommended thatthedowndraftbeinstalledwithadedicatedcircuitseparate from the appliance TO REDUCE THE RISK OF A RANGE TOP GREASE FIRE a Never leave surface units unattended at high settings Boilovers cause smoking and greasy spillovers that may ignite Heat oils slowly on low or medium settings b Always turn hood ON when cooking...
Страница 3: ...t countertop is required behind cooktop and that 2 1 2 is necessary between the back edge of the cooktop and the inside of cabinet back A B C D E F HOUSING 1 The downdraft blower system is designed for use with 8 round ductwork using a flex blower or 10 Round ductwork using a remote blower Purchase blowers separately Six 6 different discharge connections are available with side to side adjustment ...
Страница 4: ...L and the clamp channel Tighten the hex nuts to secure blower and panels in place LOWER CHANNEL COVER PLATE COVER PLATES included with blower FLEX BLOWER FRONT PANEL If blower discharge is down electrical panel must be relocated See Step 6 PLAN CABINET CUTOUTS CAUTION BEFORE CUTTING HOLE IN CABINET FOR DUCTWORK check for interference with floor joists wall studs electrical wiring or plumbing Use t...
Страница 5: ...he clamp channel Tighten the hex nuts to secure the plates in place LOWER CHANNEL 8 OR 10 ROUND REMOTE DISCHARGE PLATE Purchase Separatly FRONT PANEL All Installations 5 Slide UPPER SUPPORT BRACKETS into SLIDE CHANNEL at top left and right of unit Attach LONG OR SHORT SUPPORT LEGS depending upon cabinet height to bottom sides of unit with HEX SCREWS provided Do not tighten hex screws completely at...
Страница 6: ...pliers to bend 6 tabs outward 90 Use these tabs to connect 2 x 19 rectangular ductwork or 2 x 19 to 8 or 10 round transition to housing when installing ductwork RECTANGULAR DISCHARGE COVERS Cut aluminum tape and remove only one cover This Front Panel remains in place 6 TABS Ducting out right side of housing shown Electrical Panel Dimensions 18 3 16 46 2 cm 17 7 16 44 3 cm Slot Center 4 1 2 11 4 cm...
Страница 7: ...reful not to chip edges of coun tertop INSTALL HOUSING INTO CABINET 1 Remove cooktop 2 Set housing into cabinet countertop opening as far back as possible and make sure it is level 3 Extend SUPPORT LEGS and attach to bottom of cabinet with 2 SCREWS through each leg Tighten HEX SCREWS SUPPORT LEG 2 SCREWS HEX SCREW 4 Extend UPPER SUPPORT BRACKETS and attached to sides of cabinet with 2 SCREWS throu...
Страница 8: ...l electrical wiring should be done by a qualified person s in accordance with all applicable codes and standards Installations using FLEX BLOWER only Installations using REMOTE BLOWER only 4 Run 2 wire plus ground power cable from the exterior or in line blower to wiring box on adaptor plate Remove WIRING BOX COVER 5 Connect blower wires to power cable from exterior or in line blower Black to blac...
Страница 9: ...sure that there is no interference when air vent is raised and lowered There should be a gap of 1 32 1 16 between the back of the cooktop and the front of the downdraft cover MAKE UP AIR DAMPER OPTIONAL Connects to 2 CONTACTS on ELECTRICAL PANEL Compatible with G6MD and G8MD damper FINISH TRIM SCREW COUNTERTOP CHIMNEY DOWNDRAFT HOUSING Available for application with free standing range where gap i...
Страница 10: ...n task light OFF 30 Hour Filter Clean Reminder After 30 hours of blower ON time filter clean icon will blink continuously To reset touch and hold icon for 2 or more seconds Indicator will turn off 4 Speed Fan Speed Control 2 Level Task Light 30 Hour Filter Clean Reminder Up Down Button Up Down Button To raise lower chimney touch up down button Any feature that is active will shut off when chimney ...
Страница 11: ...up and out Use a mild detergent DO NOT USE ABRASIVE CLOTH STEEL WOOL PADS OR SCOURING POWDERS Replace front panel and filters before using downdraft SERVICE INFORMATION Only authorized replacement parts may be used in performing service on the appliance All servicing should be referred to a qualified technician Contact Viking Range LLC 1 888 845 4641 for the nearest service parts distributor in yo...
Страница 12: ...unction the owner is entitled to either a refund or replacement of the product or its component part or parts Replacement of a component part includes its free installation except as specified under the limited warranty Under the terms of this warranty service must be performed by a factory authorized Viking Range LLC service agent or representative Service will be provided during normal business ...
Страница 13: ...Utilisation Installation GUIDE SÉRIE 5 Hottes arrière encastrées VDD5300 CVDD5300 VDD5360 CVDD5360 VDD5450 CVDD5450 VDD5480 CVDD5480 ...
Страница 14: ...une mise à la terre 12 Pour réduire les risques d incendie et de choc électrique il est recommandé d installer cette hotte sur un circuit séparé de l appareil de cuisson POURRÉDUIRELESRISQUESD INCENDIECAUSÉSPARDELAGRAISSE SUR LE PLAN DE CUISSON a Nelaissezjamaislesélémentsdesurfaceallumésàhautetempérature Les débordements peuvent causer de la fumée et occasionner des écoulements de graisse inflamm...
Страница 15: ... est conçu pour utiliser des conduits ronds de 20 3 cm 8 po avec un ventilateur Flex ou des conduits ronds de 25 4 cm 10 po avec un ventilateur installé à distance Ventilateur vendu séparément Six 6 raccords de sortie sont disponibles avec des possibilités d ajustement latéral pour un alignement précis du conduit A 20 3 cm 8 po rond sortie à gauche ventilateur Flex B 20 3 cm 8 po rond sortie à dro...
Страница 16: ...au électrique ailleurs Voir l étape 6 PLANIFICATION DE LA DÉCOUPE DU COMPTOIR ATTENTION AVANT DE DÉCOUPER L OUVERTURE DES CONDUITS DANS L ARMOIRE vérifiez que les solives du plancher les montants des murs les fils électriques et la plomberie ne présentent aucune nuisance Utilisez les dimensions indiquées dans l illustration ci dessus pour planifier l accès des conduits dans l armoire En règle géné...
Страница 17: ...ge Serrez les écrous hexagonaux pour fixer les plaques en place PROFILÉ INFÉRIEUR PLAQUE DE COUVERCLE PLAQUE DE SORTIE POUR CONDUITS RONDS DE 20 3 CM 8 PO OU DE 25 4 CM 10 PO vendue séparément PANNEAU AVANT Toutes les installations 5 Glissez les SUPPORTS SUPÉRIEURS dans la COULISSE en haut à gauche et à droite de l unité Fixez les PIEDS DE SUPPORT COURTS OU LONGS selon la hauteurdel armoire aubasd...
Страница 18: ...extérieur à 90 Utilisez ces ergots pour raccorder le conduit rectangulaire de 5 cm x 48 3 cm 2 po x 19 po ou la transition ronde de 20 3 cm 8 po ou de 25 4 cm 10 po sur le boîtier lors de la pose du conduit COUVERCLES RECTANGULAIRES DE SORTIE couper le ruban d aluminium et enlever un seul couvercle Le panneau avant demeure en place 6 ERGOTS Conduit sortant du côté droit du boîtier illustré Dimensi...
Страница 19: ...erture de la hotte Prenez garde de ne pas ébarber les bords du comptoir INSTALLER LE BOÎTIER DANS L ARMOIRE 1 Enlevez la surface de cuisson 2 Placez le boîtier dans l armoire et l ouverture du comptoir aussi loin que possible vers l arrière et assurez vous qu il est de niveau 3 Allongez les PIEDS DE SUPPORT et fixez les au bas de l armoire avec 2 VIS dans chaque pied Serrez les VIS HEXAGONALES PIE...
Страница 20: ...erre du ventilateur extérieur ou intermédiaire jusqu au boîtier de câblage sur la plaque d adaptateur Retirez le COUVERCLE DU BOÎTIER DE CÂBLAGE 5 Raccordez les fils du ventilateur aux fils de l alimentation du ventilateur extérieur ou intermédiaire Connectez le fil noir avec le noir le blanc avec le blanc et le vert avec la vis de terre 6 Replacez le couvercle du boîtier de câblage 7 Branchez le ...
Страница 21: ...ouverture et à la fermeture de la cheminée d évacuation Il doit y avoir un écart de 0 8 mm à 1 6 mm 1 32 po à 1 16 po entre l arrière de la surface de cuisson et l avant du couvercle de la hotte encastrée CLAPET D AIR DE COMPENSATION FACULTATIF Branchez les 2 CONTACTS sur le PANNEAU ÉLECTRIQUE Compatible avec les clapets G6MD et G8MD BORDURE DE FINITION VIS COMPTOIR CHEMINÉE BOÎTIER DE LA HOTTE EN...
Страница 22: ...e Rappel de nettoyage des filtres après 30 heures Après 30 heures d utilisation du ventilateur l icône de rappel de nettoyage des filtres clignote en continu Pour remettre le compte à zéro touchez l icône et maintenez la pendant au moins 2 secondes Le voyant s éteindra alors Commande de ventilateur à 4 vitesses Éclairage à 2 niveaux Rappel de nettoyage des filtres après 30 heures Bouton Haut Bas B...
Страница 23: ...r la hotte Pour nettoyer l intérieur de la cheminée d évacuation Retirez le panneauavantverslehaut Enlevezlesfiltres Utilisezunesolution de détergent doux N UTILISEZ PAS DE CHIFFONS ABRASIFS DE LAINE D ACIER NI DE POUDRE À RÉCURER Replacez le panneau avant et les filtres avant de réutiliser la hotte INFORMATIONS DE SERVICE Lors d une réparation de l appareil n utiliser que les pièces de rechange a...
Страница 24: ...et que le garant après un nombre raisonnable de tentatives de réparation ne parvient pas à corriger la défectuosité le propriétaire a alors droit au remboursement ou au remplacement du produit ou desdites pièces Le remplacement d une pièce comprend son installation gratuite sauf stipulation contraire dans la garantie limitée Selon les conditions de cette garantie les réparations doivent être exécu...
Страница 25: ...Uso Instalación GUÍA SERIE 5 Ventiladores de tiro descendente posterior VDD5300 CVDD5300 VDD5360 CVDD5360 VDD5450 CVDD5450 VDD5480 CVDD5480 ...
Страница 26: ...odeincendioodescargaeléctrica recomendamos queinstaleeltirodescendenteconuncircuitodedicadoporseparado del electrodoméstico PARA REDUCIR EL RIESGO DE INCENDIO PROVOCADO POR GRASA PRESENTE EN LA ESTUFA a Nunca deje desatendidas las unidades de la superficie cuando estén en ajustes altos de calor Los alimentos en ebullición provocan derrames grasosos y con humo que se pueden incendiar Caliente el ac...
Страница 27: ...un ventilador flexible o conductos redondos de 10 pulg 25 4 cm con un ventilador remoto Los ventiladores se compran por separado Hay disponibles seis 6 conexiones diferentes de descarga con ajuste de lado a lado para la alineación adecuada de los conductos A Conducto redondo de 8 pulg 20 3 cm de descarga izquierda por el ventilador flexible B Conducto redondo de 8 pulg 20 3 cm de descarga derecha ...
Страница 28: ...ILADOR FLEXIBLE PANEL FRONTAL Si la descarga del ventilador es baja se debe reubicar el panel eléctrico Consulte el paso 6 PLANEE LOS CORTES DEL GABINETE PRECAUCIÓN ANTES DE HACER LA ABERTURA EN EL GABINETE PARA EL SISTEMA DE CONDUCTOS revise que no haya interferencia con vigas del piso montantes de la pared cableado eléctrico ni tubería Utilice las dimensiones de la ilustración anterior para ayud...
Страница 29: ...as placas en su lugar CANAL INFERIOR PLACA DE CUBIERTA PLACAS DE CUBIERTA PLACA DE DESCARGA REMOTA REDONDA DE 8 PULG 20 3 CM O DE 10 PULG 25 4 CM se compra por separado PANEL FRONTAL Todas las instalaciones 5 Deslice los SOPORTES DE APOYO SUPERIORES en el CANAL DE DESLIZAMIENTO de la parte superior izquierda y derecha de la unidad FijelasPATASDEAPOYOCORTASOLARGAS dependiendo de la altura del gabin...
Страница 30: ...conducto rectangularde2x19pulg 5x48 3cm cortadoalalongitudadecuada 8 Retire solo una CUBIERTA DE DESCARGA RECTANGULAR 9 Debajo de la cubierta de descarga rectangular que acaba de retirar utiliceunaspinzasparadoblarlasseis 6 lengüetas90 haciaafuera Utiliceestaslengüetasparaconectarunconducto rectangular de 2 x 19 pulg 5 x 48 3 cm o el conducto de 2 x 19 pulg 5 cm x 48 3 cm a la transición redonda d...
Страница 31: ...r los bordes de la superficie del gabinete INSTALE LA CUBIERTA EN EL GABINETE 1 Quite la estufa 2 Fije la cubierta en el gabinete o la abertura de la superficie tan atrás como sea posible y asegúrese de que esté nivelada 3 Extienda las PATAS DE APOYO y fíjelas a la parte inferior del gabinete con dos 2 TORNILLOS a través de cada pata Apriete los TORNILLOS HEXAGONALES PATA DE APOYO 2 TORNILLOS TORN...
Страница 32: ...Quite la CUBIERTA DE LA CAJA DE CABLEADO 5 Conecte los cables del ventilador al cable de alimentación desde el ventilador exterior o en línea Conecte negro con negro blanco con blanco y verde con tornillo de tierra 6 Vuelva a colocar la cubierta de la caja de cableado 7 Conecte el CABLE DEL PANEL ELÉCTRICO en el RECEPTÁCULO del lado inferior derecho de la cubierta del tiro descendente 8 Conecte el...
Страница 33: ...cia cuando el sistema de ventilación se eleve o baje Debe haber una separación de 1 32 a 1 16 pulg 0 8 a 1 6 mm entre la parte posterior de la estufa y la parte frontal de la cubierta del tiro descendente REGULADOR DE AIRE DE REPUESTO OPCIONAL Se conecta a los 2 CONTACTOS en la PANEL ELÉCTRICO Es compatible con el regulador G6MD y G8MD CONTACTOS DEL REGULADOR DE AIRE DE REPUESTO MOLDURA DE ACABADO...
Страница 34: ...io para limpiar el filtro de 30 horas Eliconoderecordatoriodelimpiezadelfiltroseiluminaráunavez que transcurran 30 horas de tiempo parpadeará continuamente del ventilador Para reiniciarlo mantenga presionado el icono por 2 segundos o más El indicador se apagará Control del ventilador de 4 velocidades Luz de tarea de 2 niveles Recordatorio para limpiar el filtro de 30 horas Botón de ascenso descens...
Страница 35: ...cocinar para establecer un flujo de aire en la cocina Después de apagar la estufa deje que el ventilador funcione durante unos minutos para limpiar el aire de la cocina Así mantendrá toda la cocina más limpia y brillante ADVERTENCIA Siempre desconecte el suministro eléctrico antes de limpiar o dar servicio a la unidad Limpieza Servicio Es posible que sea necesario quitar el sistema de ventilación ...
Страница 36: ... derecho de recibir un reembolso o reemplazo del producto o de su pieza o piezas componentes El reemplazo de una pieza componente incluye su instalación gratuita con excepción de lo especificado bajo la garantía limitada Según los términos de esta garantía el servicio debe ser realizado por un agente o representante de servicio autorizado por la fábrica de Viking Range LLC El servicio se brindará ...