background image

ENGLISH

33

ViewSonic

                                                                                          VT2205LED/VT2405LED

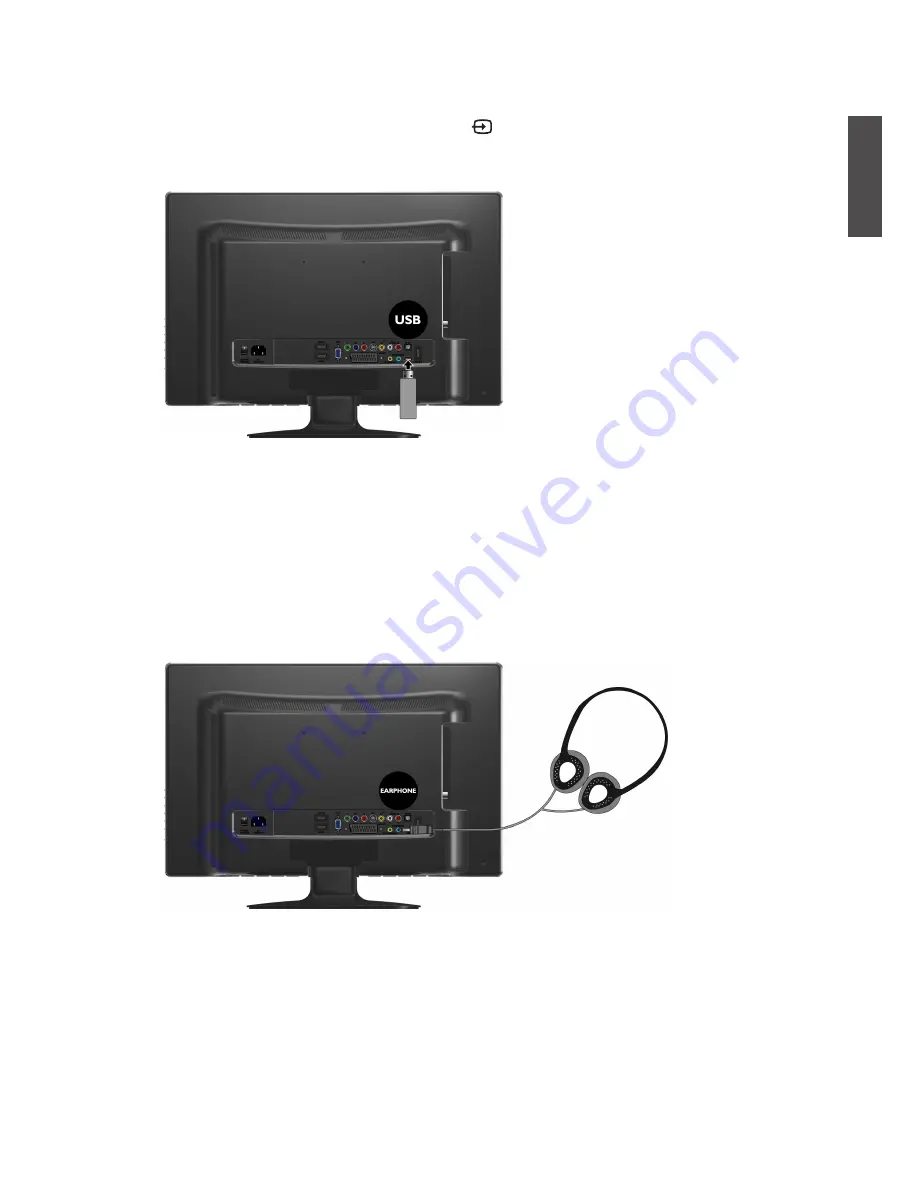
Connecting the headset audio output

This display provides a stereo headset output socket for delivering the audio signal to a 

stereo headset.

Connect the stereo headset plug (3.5mm Mini-jack type) to the stereo headset output socket 

on the display using a suitable audio cable.


Once connected, the display speakers will be muted automatically.


Please be aware that excessive and/or extreme volume might damage your hearing 

ability.

Connecting the USB input

Connect the USB device to the USB IN jack on TV.

To view video image from this input, press   

INPUT

 and use 

▲▼ 

button to select 

Media


then press 

OK

 button.


This unit can play the media files contained in the USB device.

Headset

USB device

Содержание VT2405LED

Страница 1: ...Model No VS13749 1E VS13750 1E User Guide Guide de l utilisateur Bedienungsanleitung Guida dell utente VT2205LED VT2405LED LCD TV ...

Страница 2: ...Installing the Base 8 5 Disconnecting the base and arm 9 6 Adjust the viewing angle 10 7 Connect the antenna cable 10 8 Connect the power cable 11 9 Activate the remote control 12 Installing batteries 12 Battery safety notice 12 Using the remote control 13 10 Initialize your TV 14 11 View the TV programs 14 Care and cleaning information 15 What s next 15 User Manual Getting to know your TV 16 Fron...

Страница 3: ...structure 35 Navigating the OSD menu 37 Operations in the OSD menu 37 PICTURE menu 38 SOUND menu 41 TIME menu 42 OPTION menu 43 LOCK menu 45 CHANNEL menu 46 Connecting CI Common Interface card 47 Media Play USB Device 48 Precautions when using a USB device 48 Media Screen Display 49 Viewing Photo or Slide Show 50 Display the Text 51 Other Information VT2205LED Dimensions 52 VT2405LED Dimensions 53...

Страница 4: ...hat the battery has a heavy metal content of more than 0 0005 Mercury or more than 0 002 Cadmium or more than 0 004 Lead Marking for the content condition of chemicals Coarse Classification Chemical Substance Table Pb Hg Cd Cr6 PBBs PBDEs Front bezel Back cover LCD panel Power PCBA exempted Main PCBA exempted Keypad PCBA Stand Power cord I O cable PWBA consisted of bare printed circuit board solde...

Страница 5: ...lade and the third prong are provided for your safety If the plug does not fit into your outlet consult an electrician for replacement of the outlet 10 Protect the power cord from being tread upon or pinched particularly at the plug and the point where if emerges from the equipment Be sure that the power outlet is located near the equipment so that it is easily accessible 11 Only use attachments a...

Страница 6: ... 1 0 1 Polybrominated biphenyls PBB 0 1 0 1 Polybrominated diphenyl ethers PBDE 0 1 0 1 Certain components of products as stated above are exempted under the Annex of the RoHS Directives as noted below Examples of exempted components are 1 Mercury in compact fluorescent lamps not exceeding 5 mg per lamp and in other lamps not specifically mentioned in the Annex of RoHS Directive 2 Lead in glass of...

Страница 7: ... document may be copied reproduced or transmitted by any means for any purpose without prior written permission from ViewSonic Corporation Product Registration To meet your future needs and to receive any additional product information as it becomes available please register your product on the Internet at www viewsonic com For Your Records Product Name Model Number Document Number Serial Number P...

Страница 8: ...ot be located in the vicinity of overhead power lines or other electric light or power circuits or where it can fall into such power lines or circuits When installing an outside antenna system extreme care should be taken to keep from touching such power lines or circuits as contact with them might be fatal Antenna Antenna discharge unit Grounding conductors Power service grounding electrode syste...

Страница 9: ...nts Unpack the TV and check that all the following items are included The type of power cable supplied may differ from that illustrated dependant upon your region of purchase If any item is missing or damaged contact your place of purchase immediately and notify them of the discrepancy Please keep the product documentation in a safe place for later reference Dispose of packaging wisely The cardboa...

Страница 10: ...e wall structure and not just the wall render lining or cladding Ensure the bracket is level horizontally Do not glue the bracket to the wall Do NOT place the display in an enclosed place without allowing for ventilation All Liquid Crystal Display LCD screens have a very thin protective layer of glass which is liable to marking or scratching and cracking if struck or pressured The liquid crystal s...

Страница 11: ...ecautions not be let any objects come into contact with the panel It is recommended that you use a soft clean and lint free towel to protect the display when installing Pay attention to the stability of the location where the display will be placed Follow the instructions below to install the TV stand Open the box and make sure all necessary parts are in the box The package contains 1 Cover an eve...

Страница 12: ...Place the LCD Display unit face down on the cloth Fit the stand onto the bottom of the LCD Display unit as shown 2 Pull the hinge cover on the arm upward to remove it as shown above by 2 3 Remove the 4 screws from the hinge then pull off the arm slowly as shown below by 3 4 Removal of the arm from the stand base completed ...

Страница 13: ...a poor picture and or sound on your TV For high quality picture and sound you will need a high quality TV signal Depending upon your location for best TV signal reception you should have a properly aligned outdoor TV antenna system If need be consult a professional antenna specialist 6 Adjust the viewing angle This display is equipped with a adjustable base If necessary turn the display screen to ...

Страница 14: ...ower cable plug and socket illustrated may differ from the type used in your region Only use an appropriate power cable for your region Never use a power cable which appears damaged or frayed Never change the plug type on a power cable Be aware of total loading when using extension cords or multiple outlet power boards WARNING This TV has been engineered and manufactured with the highest priority ...

Страница 15: ...leaks and or explosion Please note the following Always ensure that the batteries are inserted with the positive and negative terminals in the correct direction as shown in the battery compartment Different types of batteries have different characteristics Do not mix different types Do not mix old and new batteries Mixing old and new batteries will shorten battery life and or cause chemical leaks ...

Страница 16: ...window on the front of the display below the power indicator lamp or place objects in front of it which will block the direct line of sight between the remote control and the sensor window on the display Do not let the remote control become wet or place it in humid environments like bathrooms If the remote control sensor window on the display is in direct sunlight or strong light the remote contro...

Страница 17: ...n at any time to interrupt the memorization process The list cannot be created if interrupted 10 Initialize your TV Press Power button on the remote control the TV will turn on and the power indicator will light up blue When first turned on and until tuned the Initial Menu will display 11 View the TV programs Press PROG or PROG on the remote control to sequentially cycle through your TV channels T...

Страница 18: ...creen burn in or image retention which can be found on the screen as visible fixed lines and shades and can t be removed If the circumstance is caused due to improper use by the user such as the left and right straight lines occurred from displaying still pictures for long periods of time the channel logos etc an appropriate service fee should be charged To avoid such permanent damage to the screen...

Страница 19: ...in front of it which will hinder the reception of signals 3 CH button Press these buttons to sequentially change channels In the OSD menu moves the selection highlight up or down 4 INPUT button Select input source In the OSD menu confirms the selection 5 Power Standby button Toggles the display between standby mode and on 6 MENU button Displays the OSD On Screen Display menu if not visible or exit...

Страница 20: ...he HDMI digital audio video output or DVI digital video output on digital video devices F VGA PC Video Input Connect to the RGB video D sub output of PCs G SCART Input Connect to external equipment with scart socket This scart input allows audio and CVBS YC RGB CVBS RGB S VIDEO from an external devise to be shown on your TV H AV Composite Video Input Connect to the Composite video AV output of vid...

Страница 21: ...onnect to the HDMI digital audio video output on digital video devices M SPDIF Optical output Connect this port to the SPDIF input of A V device N Audio In L R Connect to the left right audio channel output of video devices O S VIDEO Input Connect to the S Video output of video devices P CAM Card Slot Plug the CAM Card into this slot Q RF Antenna Cable TV Input Connect to RF Cable or CATV cable ...

Страница 22: ...ime 7 0 9 Channel selection Press these buttons to select the program you wish to view 8 SRS Press to switch on off SRS TruSurround HD function 9 GUIDE Displays the Electronic Program Guide on the screen in DTV mode Pressing again to turn Guide off 10 VOL VOL Press these buttons to raise or lower the volume level information 11 BACK In the OSD menu press this button to return to the previous menu ...

Страница 23: ...ust your desired screen backlight level 20 TV AUDIO Select sound modulation in ATV Select audio language in DTV Select the Left Right Audio Channels in other sources except ATV DTV and Media 21 ATV DTV Swap between ATV DTV Swap to the last TV source when in other source 22 PICTURE Press this button to select a desired preset picture mode Standard Mild User Dynamic 23 SUBTITLE ATV Switch between av...

Страница 24: ... sub pages or timed pages these pages can be seen by using sub code function TEXT MIX In TV Mode Press the TEXT MIX button to enter the Teletext mode In TELETEXT Mode Press the button again to superimpose a Teletext broadcast onto the screen of current TV program mixed Mode In MIXED Mode Press the button again to return back to the normal TV Screen current program INDEX Press the Index button to r...

Страница 25: ...s horizontally and vertically in Media 32 Blue Skip Forwards Blue Function key for teletext program edit or electric program guide Skip Go to next chapter track file in Media for Photo and Text 33 Scan Forwards Page down for text function 34 Stop Stops playback in Media 1 21 22 24 23 25 2 3 4 8 6 7 12 11 10 13 17 20 5 9 19 16 15 18 26 29 32 33 34 28 27 30 31 14 ...

Страница 26: ...ases in length as volume falls Mute setting Press MUTE on the remote control to turn off the sound temporarily Press MUTE once more or press VOL or VOL to restore the sound level Selecting a TV sound mode Press TV AUDIO on the remote control to toggle TV sound among available modes The modes available will depend on the TV or Video sound system being received 1 Turn on all connected equipment or d...

Страница 27: ...ou to quickly switch between the current selected channel and the previous one Selecting favorite channels Press FAVORITE key to display the favorite channels you ve added to the FAVORITE LIST You can use or to select a favourite channel and then press OK to direct to that channel immediately To set up favourite channels select the Program Edit function in CHANNEL menu Selecting a picture modes To...

Страница 28: ... dimly lit rooms it is recommended to reduce the backlight which will reduce the image brightness and make the dark areas of the image darker thus maintaining a high contrast image in a dark environment Freeze image on screen Press FREEZE once to stop the screen at the current image and press again to resume the screen playing This function allows you to stop the screen at the current image Howeve...

Страница 29: ...portion Auto To facilitate the handling of various aspect ratios of program material received by TV input 4 3 Resize the image to 4 3 aspect proportions Under Scan Displays the original signals on the screen in 1 1 output Recommended for use when in HDMI PC source The Underscan aspect ratio will be only appear when in HDMI input source and the resolution is video timing When viewing PC only Full a...

Страница 30: ...1 for sub page number 1 Wait until the page appears UPDATE Input a page number and then press this button The teletext page will be closed and will show the update symbol on the top left corner When the update symbol changes to the page number it means the page is complete downloaded Press this button again to open the teletext page HOLD Press this button to remove the information from the display...

Страница 31: ...on to return back to index page When you press this button in Teletext mode a CURSOR appears This cursor rectangular box contains a page number and you can select the desired page simply by using the four colours RED button Move cursor down GREEN button Move cursor up YELLOW button Change from current page to selected page BLUE button Exit the CURSOR Mode Press the appropriate colour keys to perfo...

Страница 32: ...ct connections are made picture quality may be adversely affected Connecting the Composite Video input Connect the Composite Video output of your output equipment to the VIDEO and AUDIO L R terminals on the display using the Composite Video cable as illustrated not provided A Composite Video cable consists of three connectors Yellow video White left channel audio and Red right channel audio Ensure...

Страница 33: ...deo cable not provided A Component Video cable consists of three plugs Green Y Blue Cb Pb and Red Cr Pr Ensure that the colours of the plugs and terminals match when making connection 2 Connect the corresponding audio output of your output equipment to the AUDIO INPUT L R input terminals on the display using an audio cable not provided To view video image from these inputs press INPUT and use butt...

Страница 34: ...ther supported resolutions PC Audio cable Mini D Sub cable Connecting the S Video input 1 Connect the S Video output jack on your output equipment to the S VIDEO jack on your display using an S Video cable not provided Pay attention to the pins in the plugs when inserting so to keep the pins from bending 2 Connect the S Video audio output jack of the output equipment to the AUDIO L R input jacks u...

Страница 35: ...e native resolution of the display for example 1024 x 768 pixels See Supported PC D Sub DVI input signal resolutions on page 55 on other supported resolutions Connecting the HDMI input Connect the HDMI output of your output equipment to the HDMI1 HDMI2 or HDMI3 IN terminal on the display using an HDMI cable not provided To view video image from this input press INPUT and use button to select HDMI1...

Страница 36: ...tput socket on the display using a suitable audio cable Once connected the display speakers will be muted automatically Please be aware that excessive and or extreme volume might damage your hearing ability Connecting the USB input Connect the USB device to the USB IN jack on TV To view video image from this input press INPUT and use button to select Media then press OK button This unit can play t...

Страница 37: ... SPDIF optical cable not provided from A V device into the SPDIF output connector of LCD TV If you want to enjoy digital broadcasting through your external speakers connect the SPDIF terminal on the back of TV to a Home Theater or amp A V Device Audio cable SPDIF Optical Cable Stereo System ...

Страница 38: ...ACE Noise Reduction Picture Mode Contrast Brightness Colour Tint Sharpness Colour Temperature Red Green Blue Aspect Ratio Skin Tone Auto Adjust H Position V Position Size Phase SOUND Sound Mode Balance Bass Treble SRS TruSurround HD AVC AD Switch AD Volume Audio only SPDIF Output TIME Clock Off Time On Time Sleep Timer Auto Sleep Time Zone OPTION Language Audio Languages Subtitle Language Hearing ...

Страница 39: ...actory Default LOCK Lock System Set Password Block Program Parental Guidance not available CHANNEL Select Auto Tuning DTV Manual Tuning ATV Manual Tuning Program Edit CI Information not available The available menu items are dependent on the input source being selected Unavailable items will be greyed out or not displayed ...

Страница 40: ...our display To display the OSD menu press MENU on the display Operations in the OSD menu For example to adjust picture sharpness 1 Press MENU to display the OSD menu on screen 2 Press or to select your main menu 3 Press OK to enter the submenu 4 Press or to make selection 5 Press or to make adjustment 6 Press MENU to close the OSD menu ...

Страница 41: ...stment Standard Mild User Dynamic Contrast Adjusts image white level so that whites do not wash out surrounding colors 0 to 100 Brightness Adjusts image black level so that detail in the dark areas of an image can be seen 0 to 100 Colour Adjusts image color intensity 0 to 100 Tint Controls the difference between the green and red regions of the picture R50 to G50 Sharpness Adjusts image sharpness ...

Страница 42: ...uto Adjust Press the OK button to automatically adjust the display settings to optimize performance based on the VGA mode Press OK H Position Adjusts the position of the picture left and right in the window based on the VGA mode Press or to change selection 0 to 100 V Position Adjusts the position of the picture up and down in the window based on the VGA mode 0 to 100 Size Controls the width of th...

Страница 43: ...ntrol to select these modes directly 1 Press MENU to display the OSD menu on screen 2 Press or to select PICTURE and then press OK to enter the PICTURE menu 3 Press to select Picture Mode and then press or to select User 4 Press or to select Contrast Brightness Colour Tint Sharpness and then press or to adjust the settings to your satisfaction 5 Press MENU to save the settings and close the OSD me...

Страница 44: ...s selection is On you are unable to change the sound mode On Off AVC To turn on off AVC automatic volume control function On Off AD Switch To turn on off the Audio Descriptor This function is available only in supported stream in DTV On Off AD Volume Adjusts the volume of Audio Descriptor 0 to 100 Audio only To turn off the screen picture but keep the sound on Press any key except VOL VOL or MUTE ...

Страница 45: ... that the TV will switch on automatically and tune to the mode of your choice at the time you select Activate Hour Minute Volume Mode Sleep Timer Set the Sleep Timer to automatically turn off the display 1 minute before shutdown a message will display onscreen At this time if you wish to cancel the function press any button on the remote control Once the time expires the display will be put to the...

Страница 46: ...e in DTV Primary Secondary Hearing Impaired To provide close captioning function for the hearing impaired if the program provides it only available in DTV On Off Country Displays the country you selected before performing Auto Tuning function The country cannot be selected from here To change country go to Auto Tuning in the Channel menu OSD Time Out Allows selection of the display time of the on ...

Страница 47: ...io When in HDMI1 input select where the audio source comes from Auto PC In HDMI Press or to change selection Auto PC In HDMI Backlight Adjusting the backlight brightness Home Medium Low High Restore Factory Default Restores factory settings Press OK use or to select Yes to confirm ...

Страница 48: ...Item Function Operation Range Lock System Selects to activate the TV Lock programs Press or to change selection On Off Set Password Allows to set the password Use the function must enter a four digit password The factory password is 0000 Press OK to enter Block Programme Selects to setup the TV Program Lock options Press OK to enter Parental Guidance Allows to setup the TV Parental Guidance Press ...

Страница 49: ...y creates a list of receivable channels Press OK to enter Auto Tuning Menu DTV Manual Tuning Allows adjustment manually for the particular channel with optimal reception Press OK to enter DTV Manual Tuning Menu ATV Manual Tuning Allows adjustment manually for the particular channel with optimal reception Press OK to enter ATV Manual Tuning Menu Program Edit Allows addition removal edition of chann...

Страница 50: ...he slot in the direction of the arrow until it fits 2 TO REMOVE A CI CARD When removing the CI card do not attempt to pull it from its slot Please push the EJECT button as illustrated below 3 This function enables you to watch the scrambled services pay services in some channels If you remove the CI Module you can watch the available digital analogue programme in some channels ...

Страница 51: ...th multiple partitions Please connect directly to the USB port of your TV If you are using a separate cable connection or through a USB hub there may be a USB compatibility problem Before connecting your device to the TV please back up your files to prevent them from damage or loss of data Any data file damage or data loss is at your own risk The higher the resolution of the image the longer it ta...

Страница 52: ...Information Section Display the detail information of the media file Item Information Section Shows the number of pages of available folders and files Using the Remote Control Button in Media source Button Operations Move the cursor and select an item OK Select the currently selected item While playing a slide show Play pause or resume the slide show of photos BACK Exit the current folder Stop the...

Страница 53: ...t photo 5 You may start the slide show from your desired photo by moving the light bar cursor to the desired file then press 6 You may Pause Resume Jump to next previous Rotate 90 clockwise Zoom the current displayed photo Perform a Slide Show with only selected files 1 Follow the instruction above to enter the desired sub folder 2 Press or to choose the photo Then press OK to select the photo The...

Страница 54: ... may wish to start from your desired text Simply press or to move the light bar cursor to the desired text file then press to display the text 5 You may Jump to Next Page Previous Page Go to Next Text File Previous Text File Play only the selected files 1 Follow the instruction above to enter the desired sub folder 2 Press or to choose then press OK to select the text file The mark will appear to ...

Страница 55: ...ENGLISH 52 ViewSonic VT2205LED VT2405LED Other Information VT2205LED Dimensions ...

Страница 56: ...ENGLISH 53 ViewSonic VT2205LED VT2405LED VT2405LED Dimensions ...

Страница 57: ... 16 9 Native resolution 1920 x 1080 Brightness typical 250 nits 300 nits Built in speakers 3W x 2 Signal input Composite Video AV 1 S Video 1 Component Video Y Cb Pb Cr Pr 1 Audio 1 SCART 1 USB 1 HDMI DVI 3 PC D Sub 1 HDMI DVI PC audio 1 Signal output Headset 1 SPDIF 1 Power supply AC 100 240V 60 50 Hz Power consumption 38W Max Operating temperature 0 C 40 C at sea level Storage temperature 20 C 6...

Страница 58: ...0 023 75 029 78 750 1152 x 864 67 500 75 000 108 000 VESA 1280 x 960 60 000 60 000 108 000 VESA 1280 1024 63 981 60 020 108 000 VESA 1280 1024 79 976 75 025 135 000 1440 x 900 55 935 59 887 106 500 VESA 1400 x 1050 65 316 59 900 121 750 VESA 1680 x 1050 65 290 59 954 146 250 VESA 640 x 480 35 000 66 667 30 240 Apple MAC 832 x 624 49 725 74 550 57 283 Apple MAC 1152 x 870 68 681 75 062 100 000 Appl...

Страница 59: ... adjust the resolution in the display properties of the computer to closely match the native resolution of the display for example 1920 x 1080 pixels To view the best quality picture when using the PC input you will then need to instruct the display to calibrate itself to the PC signal timing To do so select Auto in the Picture menu See Auto Adjust on page 39 Supported Component Video input signal...

Страница 60: ...p right click and select Properties from the menu that appears 2 Click the Settings tab in the window that follows 3 Drag the Resolution slider and select a compatible resolution according to Supported PC D Sub DVI input signal resolutions on page 55 If your PC supports it select 1680 1050 as the output resolution for the best result 4 Click OK to save the setting and close the window 5 Press INPU...

Страница 61: ...ts The LCD TV should be repaired by a qualified technician only Do not remove the LCD TV cabinet There is high voltage parts inside that may cause electric shock to human bodies even when the power cord is disconnected Stop using the LCD TV if the cabinet is damaged Have it checked by a service technician Put your LCD TV only in a clean dry environment Unplug the LCD TV immediately if it gets wet ...

Страница 62: ...r indicator should be blue Try a different input source to confirm if the symptom is still present or whether the source is at fault Check for mis connection of cables for that input Adjust the volume control to check that isn t turned down Make sure that the Speaker Out option in the Audio menu is not set to Off Improper screen position or size Try selecting a different aspect ratio Try a differe...

Страница 63: ...ceurope com uk service_ie viewsoniceurope com Italy www viewsoniceurope com it service_it viewsoniceurope com Latvia www viewsoniceurope com lv service_lv viewsoniceurope com Lithuania www viewsoniceurope com lt service_lt viewsoniceurope com Luxembourg www viewsoniceurope com lu service_lu viewsoniceurope com The Netherlands www viewsoniceurope com nl service_nl viewsoniceurope com Macedonia www ...

Страница 64: ...formation about receiving service under warranty contact ViewSonic Customer Support please refer to Customer Support page You will need to provide your product s serial number 2 To obtain warranted service you will be required to provide a the original dated sales slip b your name c your address d a description of the problem and e the serial number of the product 3 Take or ship the product freigh...

Страница 65: ......

Отзывы: