ViewSonic VS12078 Скачать руководство пользователя страница 6

VT3245-NT/VT3745-NT/VT4245-NT

Antenna Installation Instructions

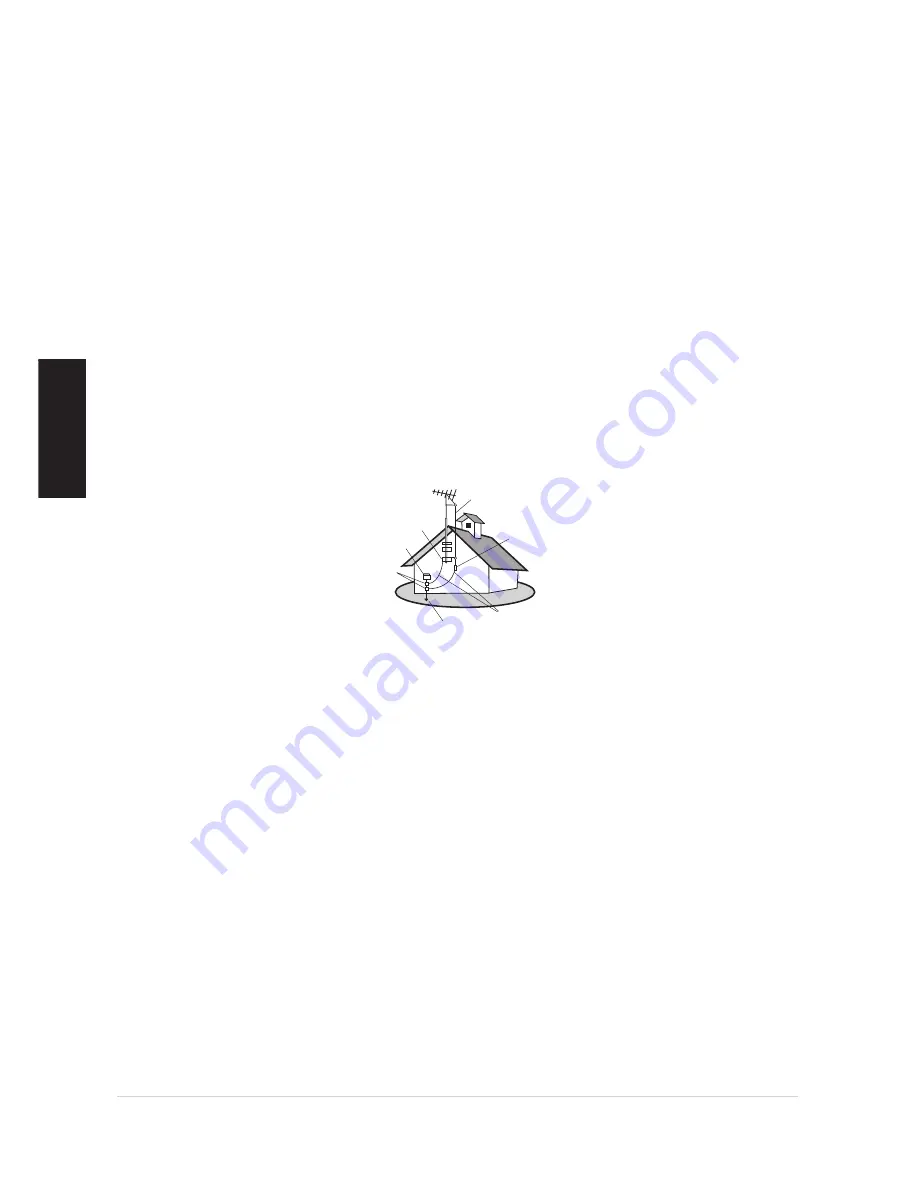
Outdoor Antenna Grounding


If an outside antenna or cable system is connected to the product be sure the antenna or cable 

system is grounded so as to provide some protection against voltage surges and built-up static 

charges, Article 810 of the National Electrical Code, ANSI/NFPA 70, provides information with 

regard to proper grounding of the mast and supporting structure, grounding of the lead-in wire to 

an antenna discharge unit, connection to grounding electrodes, and requirements for the grounding 

electrode.

Lightning


For added protection for this product during a lightning storm, or when it is left unattended and 

unused for long periods of time, unplug it from the wall outlet and disconnect the antenna or cable 

system. This will prevent damage to the product due to lightning and power-line surges. Do not 

disconnect the antenna or the power cord during a heavy storm lighting may strike while you are 

holding the cable cord, causing serious injury; turn off your LCD Display and wait for the weather 

to improve.

Power Lines


An outside antenna system should not be located in the vicinity of overhead power lines or 

other electric light or power circuits, or where it can fall into such power lines or circuits, When 

installing an outside antenna system, extreme care should be taken to keep from touching such 

power lines or circuits as contact with them might be fatal.

Antenna

Antenna discharge unit

Power service grounding electrode system 

Ground clamps

Electric service equipment

Ground clamp

Grounding conductors

Cleaning the LCD Display

Make sure the LCD Display is turned off.
Never spray or pour any liquid directly onto the screen or case.

To clean the screen:

Wipe the screen with a clean, soft, lint-free cloth. This removes dust and other particles.
If still not clean, apply a small amount of non-ammonia, non-alcohol based glass cleaner onto a 

clean, soft, lint-free cloth, and wipe the screen.

To clean the case:

Use a soft, dry cloth.

If still not clean, apply a small amount of a non-ammonia, non-alcohol based, mild non-abrasive 

detergent onto a clean, soft, lint-free cloth, then wipe the surface.

Disclaimer

ViewSonic® does not recommend the use of any ammonia or alcohol-based cleaners on the LCD Display 

screen or case. Some chemical cleaners have been reported to damage the screen and/or case of the LCD 

Display. ViewSonic will not be liable for damage resulting from use of any ammonia or alcohol-based 

cleaners.

1.

2.

3.


1.

2.

1.

2.

4

ViewSonic

ENGLISH

Содержание VS12078

Страница 1: ...ViewSonic Digital Photo Frame DPX702 Quick Start Guide Model No VS12078 Model No VT3245 NT VT3745 NT VT4245 NT 32 37 42 Full HD User Guide 32 37 42 Inch Full HD LCD Display ViewSonic ENGLISH...

Страница 2: ...7 Rear view 32 42 inch 8 Remote Control 9 Remote Control 10 Getting started 11 Inserting the remote control batteries 11 Connecting power 11 Cable Connections 12 Basic Operation 15 Basic Operation 16...

Страница 3: ...hole for safety concerns M4 x 14mm 1 Follow the incrtuctions in the image on the right to intall the stand on the VT3245 NT model Do not defeat the safety purpose of the polarized or grounding type p...

Страница 4: ...Lead Declaration of RoHS Compliance This product has been designed and manufactured in compliance with Directive 2002 95 EC of the Eu ropean Parliament and the Council on restriction of the use of ce...

Страница 5: ...th out prior written permission from ViewSonic Corporation Product Registration To meet your future needs and to receive any additional product information as it becomes available please register your...

Страница 6: ...of overhead power lines or other electric light or power circuits or where it can fall into such power lines or circuits When installing an outside antenna system extreme care should be taken to keep...

Страница 7: ...dy construction Maximum display resolution 1920 x 1080 Audio Video support HDMI analog audio input Component YCbCr YPbPr video audio input S Video Audio input AV Video Audio input VGA input PC audio i...

Страница 8: ...the button to enter On Screen Display OSD 3 VOL Increase or decrease the volume 4 CH p q Increase or decrease channel number 5 POWER crease or decrease ch Power indicator LED indicates if the LCD powe...

Страница 9: ...rtable computer or A V device 6 PC AUDIO IN Connect to the audio output of your computer 7 AUDIO OUT Connect to the audio input jack of your audio device 8 PC IN Connect to the VGA output of your PC o...

Страница 10: ...output jack of your A V device 6 COMPONENT IN Connect to the component output jack of your component device 7 COMPONENT AUDIO IN 8 AUDIO OUT Connect to the audio input jack of your audio device 9 AV I...

Страница 11: ...TE Disable the audio output 6 EXIT Exit OSD menus 7 OSD MENU UP FAST FORWARD Move up in OSD menus fast forward media 8 OSD MENU RIGHT SKIP FORWARD Move right in OSD menus skip to next media 9 ENTER PL...

Страница 12: ...dio 15 GUIDE ONLY IN DTV OSD MENU Enter the program guide of DTV OSD 16 SLEEP TIMER Press repeatedly to set the sleep timer from 15 to 60 minutes 17 OSD MENU LEFT SKIP BACKWARD Move left in OSD menus...

Страница 13: ...heck the and ends of the batteries before inserting them in the compartment Replace the cover and make sure it snaps securely back into place 3 1 2 A B A B Do not mix old and new batteries or batterie...

Страница 14: ...solution Composite SVHS YPbPr RGB HDMI DOS 720x400 70Hz No No No Yes Yes VESA 640x480 60Hz No No No Yes Yes VESA 800x600 60Hz No No No Yes Yes VESA 1024x768 60Hz No No No Yes Yes VESA 1360x768 60Hz No...

Страница 15: ...such as VCRs VCD players and DVD players 3 HDMI Connect to devices with HDMI output such as Blu ray players DVD players Cable boxes VCR VCD play ers PCs and portable PCs 4 Component cable Connect to...

Страница 16: ...and the sound Your VCR might have a copy protection system which could distorted the DVD image Set the stereo system to the correct channel or source if your video equipment is also connected to a st...

Страница 17: ...ress or key to increase or decrease the channel number 3 Adjust Volume Press key to increase or decrease the volume 4 Menu Press key to enter current source OSD Menu 5 Switch the input source Press ke...

Страница 18: ...mation of ouput signal 7 MTS Press key to switch monaural and stereo modes This function enable you to receive a second language or unrelated audio 8 PICTURE MODE Press key to change the picture quali...

Страница 19: ...ANDARD AUTO Gamma ON DCR OFF Move Select Return Exit HDMI 1 1 Press key on the control panel or the remote control to view OSD menu 2 Press pq key to select the function 3 Press key to enter the sub m...

Страница 20: ...key to select PICTURE MODE item HDMI 1 Move Select Return Exit PICTURE MODE STANDARD NOISE REDUCTION WEAK COLOR TEMP STANDARD AUTO Gamma ON DCR OFF PICTURE 3 Press tu or key to select User Standard V...

Страница 21: ...n your screen Adjust this setting until the colors on the screen look natural Hue Change the color balance Adjust this setting so that colors on the screen are neither too green or too magenta Not app...

Страница 22: ...R OFF Move Select Return Exit HDMI 1 2 Press pq key to select Sound mode Press tu or key to enter sub menu 0 HDMI 1 SOUND STANDARD Move Select Return Exit SOUND MODE BALANCE SPEAKER ON HDMI AUDIO OUTP...

Страница 23: ...ey on the remote control to exit OSD menu Treble Base Adjust the high frequency content in audio output Balance Balance the volume of right and left speakers AUTO VOLUME Turn Auto Volume Control on or...

Страница 24: ...DCR OFF Move Select Return Exit HDMI 1 2 Press pq key to select Channel mode Press tu or key to enter sub menu CHANNEL Move Select Return Exit TV CATV AIR AUTO SEARCH CATV CHANNEL EDIT SIGNAL STRENGT...

Страница 25: ...DTV channel system will be automatically search all channels Press key on the control panel or the remote control to view OSD menu Press pq key to select DTV mode then press tu or key to enter sub men...

Страница 26: ...ions 1 Press pq key to select Auto Search item and press u to start scanning channels Add Delete Favorite CHANNEL Move Select DTV AUTO SEARCH CHANNEL EDIT SIGNAL STRENGTH Discovered TV channels are di...

Страница 27: ...ey to enter sub menu H POSITION V POSITION PHASE CLOCK VGA 0 0 0 0 PC SETUP Move Select Return Exit OFF AUTO ADJUST 3 Press pq key to select Auto Adjust Press u key to auto adjust screen to the best p...

Страница 28: ...NGLISH SLEEP TIMER OFF ASPECT FULL BLUE BACK OFF RESET VERSION 2 Press pq key to select Setup mode Press tu or key to enter sub menu HDMI 1 OSD TIME 15 SEC VS32_V0 12 SETUP Move Select Return Exit LAN...

Страница 29: ...DIO MPEG 1 Layer 3 File Type mp3 PC Support Timing kHz 32 44 1 48 Supported Bit rate Kbits sec 32 40 48 56 64 80 96 112 128 160 192 224 256 320 MPEG 2 Layer 3 File Type mp3 PC Support Timing kHz 22 05...

Страница 30: ...m list within a 2 hour range Current program will be shown in the first block 3 Channel menu Shows all channel names 4 Program List Descends the manifestation program name in time zone according to th...

Страница 31: ...this situation Remote control unit does not operate Check if the batteries are inserted with the polarity correctly aligned Check if the batteries are discharged Please replace with new batteries Make...

Страница 32: ...t your reseller You will need the product serial number Country Region Website T Telephone F Fax E mail Taiwan www viewsonic com tw T 886 2 2246 3456 F 886 2 2249 1751 Toll Free 0800 061 198 service t...

Страница 33: ...receiving service under warranty contact ViewSonic Customer Support please refer to Customer Support page You will need to provide your product s serial number 2 To obtain warranted service you will...

Страница 34: ......

Отзывы: