background image

17

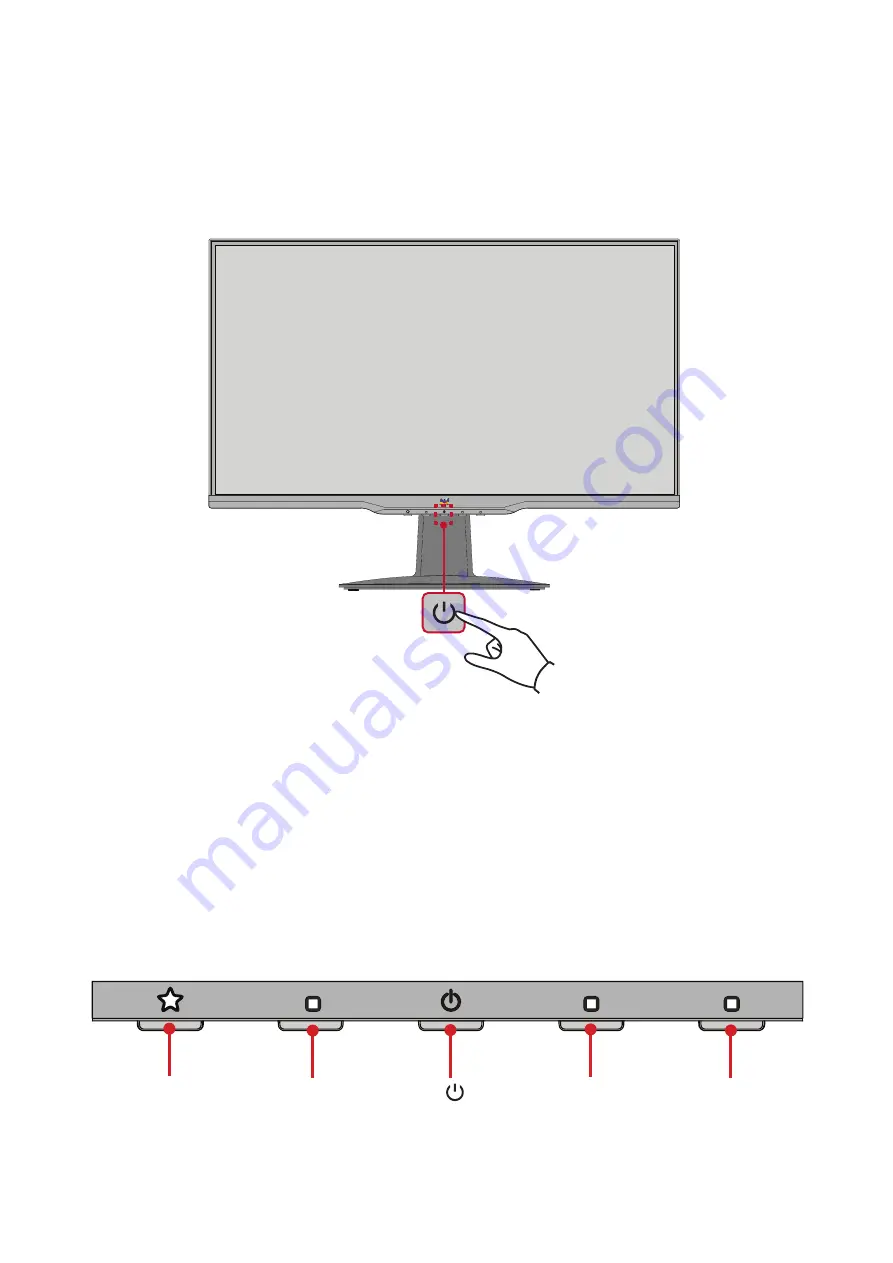
Turning the Device On/Off

1. 

Plug the power cord into a power outlet.

2. 

Press the 

Power

 button to turn on the monitor.

3. 

To turn the monitor off, press the 

Power

 button again.

NOTE: 


The monitor will still consume some power as long as the power cord 

is connected to the power outlet. If the monitor is not being used for a 

long period of time, please disconnect the power plug from the power 

outlet.


Using the Control Panel Keys

Use the control panel keys to access the Quick Menu, activate Hot Keys, navigate 

the On-Screen Display (OSD) Menu, and change the settings.

1(

«

)

2

3

5( ) 

4

Содержание VA2201-H

Страница 1: ...registering your product for future service Warranty information contained in this User Guide will describe your limited coverage from ViewSonic Corporation which is also found on our web site at http www viewsonic com in English or in specific languages using the Regional selection box in the upper right corner of our website Antes de operar su equipo lea cu idadosamente las instrucciones en este...

Страница 2: ...eeding the world s expectations for technological evolution innovation and simplicity At ViewSonic we believe that our products have the potential to make a positive impact in the world and we are confident that the ViewSonic product you have chosen will serve you well Once again thank you for choosing ViewSonic ...

Страница 3: ...ontains high voltage parts Do not use this equipment near water To reduce the risk of fire or electric shock do not expose the monitor to rain or moisture Avoid exposing the monitor to direct sunlight or other sources of sustained heat Do not install near any heat sources such as radiators heat registers stoves or other devices including amplifiers that may increase the temperature of the monitor ...

Страница 4: ...is dangerous to continue using the display Do not attempt to circumvent the safety provisions of the polarized or grounding type plug A polarized plug has two blades with one wider than the other A grounding type plug has two blades and a third grounding prong The wide blade and the third prong are provided for your safety If the plug does not fit into your outlet obtain an adaptor and do not atte...

Страница 5: ...ng the Security Slot 12 Making Connections 13 Connecting to Power 13 Connecting External Devices VA2201 h 14 Connecting External Devices VA2201 mh 15 Using the Monitor 16 Adjusting the Viewing Angle 16 Tilt Angle Adjustment 16 Turning the Device On Off 17 Quick Menu VA2201 h 18 Quick Menu VA2201 mh 19 Hot Keys 20 Configuring the Settings 22 General Operations 22 On Screen Display OSD Menu Tree VA2...

Страница 6: ...e 39 Regulatory and Service Information 40 Compliance Information 40 FCC Compliance Statement 40 Industry Canada Statement 40 Declaration of RoHS2 Compliance 41 Indian Restriction of Hazardous Substances 42 Product Disposal at End of Product Life 42 Copyright Information 43 Customer Service 44 Limited Warranty 45 Mexico Limited Warranty 48 ...

Страница 7: ...ckage Contents Monitor Power Adapter Video cable Quick start guide NOTE The power cord and video cables included in your package may vary depending on your country Please contact your local reseller for more information ...

Страница 8: ...8 Product Overview VA2201 h Front and Rear View I O Ports 1 2 3 1 HDMI 2 VGA 3 DC IN NOTE For more information about the 1 2 3 4 5 key and its functions refer to Hot Keys on page 20 ...

Страница 9: ...oduct Overview VA2201 mh Front and Rear View I O Ports 1 2 3 4 5 1 HDMI 2 VGA 3 DC IN 4 Audio In 5 Audio Out NOTE For more information about the 1 2 3 4 5 key and its functions refer to Hot Keys on page 20 ...

Страница 10: ...10 Initial Setup Installing the Stand 1 2 3 NOTE Always place the device on a flat stable surface Failure to do so may cause the device to fall and damage the device and or result in personal injury ...

Страница 11: ...eces NOTE Wall mount kits are sold separately To obtain a wall mounting kit contact ViewSonic or your local dealer 1 Turn off the device and disconnect all cables 2 Place the device on a flat stable surface with the screen facing down 3 Remove the monitor stand 1 2 4 Attach the mounting bracket to the VESA mounting holes at the rear of the device Then secure it with four 4 screws M4 x 10 mm 5 Foll...

Страница 12: ...g device to secure the device to a fixed object Additionally fastening the monitor to a wall or fixed object using a security cable can help support the weight of the monitor in order to prevent the monitor from falling over Below is an example of setting up a security slot locking device on a table ...

Страница 13: ...ctions This section guides you on how to connect the monitor with other equipment Connecting to Power 1 Connect the power cord to the DC IN jack at the rear of the device 2 Connect the power adapter to a power outlet 1 2 ...

Страница 14: ...14 Connecting External Devices VA2201 h VGA VGA HDMI HDMI ...

Страница 15: ...15 Connecting External Devices VA2201 mh VGA VGA HDMI HDMI ...

Страница 16: ... Viewing Angle Tilt Angle Adjustment Tilt the monitor forwards or backwards to the desired viewing angle 5 to 20 NOTE When adjusting support the stand firmly with one hand while tilting the monitor forwards or backwards with the other hand ...

Страница 17: ... monitor will still consume some power as long as the power cord is connected to the power outlet If the monitor is not being used for a long period of time please disconnect the power plug from the power outlet Using the Control Panel Keys Use the control panel keys to access the Quick Menu activate Hot Keys navigate the On Screen Display OSD Menu and change the settings 1 2 3 5 4 ...

Страница 18: ... Mac Mono NOTE Follow the key guide that appears on the bottom of the screen to select the option or make adjustments Menu Description ViewMode Select one of the preset color settings Contrast Brightness Adjust the contrast or brightness level Input Select Select the input source Exit Exit the Quick Menu ...

Страница 19: ... the key guide that appears on the bottom of the screen to select the option or make adjustments Menu Description ViewMode Select one of the preset color settings Volume Adjust the level or mute the volume Contrast Brightness Adjust the contrast or brightness level Input Select Select the input source Exit Exit the Quick Menu ...

Страница 20: ...escription 1 3 Press and hold the keys to lock unlock the OSD Menu When the menu appears on the screen continue holding both keys for 10 seconds to lock unlock the OSD Menu 1 OSD Lock Unlock Locking OSD Press and hold for 10s to lock OSD If the OSD Menu is locked the below message will appear on the screen OSD Lock Unlock OSD Locked ...

Страница 21: ...conds to lock unlock the Power button 3 Power Lock Unlock Locking Power Button Press and hold for 10s to lock power If the Power button is locked the below message will appear on the screen Power Lock Unlock Power Button Locked 2 4 Press the keys to display hide the boot up screen when the device is turned on Boot Up Screen On Off Off Press to turn on ...

Страница 22: ...ct Audio Adjust D SUB HDMI VA2201 h VA2201 mh 2 Press the 1 or 2 key to select the main menu Then press the 3 key to enter the selected menu 1920 x 1080 60Hz 75 Setup Menu ViewMode Manual Image Adjust Input Select Color Adjust Contrast Brightness Color Temperature Contrast Brightness Standard 1920 x 1080 60Hz 75 Setup Menu Color Adjust ViewMode Manual Image Adjust Input Select Audio Adjust Contras...

Страница 23: ...key to adjust select the setting Then press the 3 key to confirm 1920 x 1080 60Hz 75 Setup Menu ViewMode Manual Image Adjust Input Select Color Adjust Contrast Brightness Color Temperature sRGB Bluish Cool Native Warm User Color Standard 1920 x 1080 60Hz 75 Setup Menu Color Adjust ViewMode Manual Image Adjust Input Select Audio Adjust Contrast Brightness Color Temperature Color Space Color Range s...

Страница 24: ...enu Sub menu Menu Option Input Select D SUB HDMI ViewMode Standard Game Movie Web Text MAC Mono Color Adjust Contrast Brightness Contrast 0 100 Brightness 0 100 Color Temperature sRGB Bluish Cool Native Warm User Color Red 0 100 Green 0 100 Blue 0 100 ...

Страница 25: ...D SUB only Horizontal Position 0 100 Vertical Position 0 100 Fine Tune for D SUB only 0 100 Sharpness 0 25 50 75 100 Blue Light Filter 0 100 Aspect Ratio 4 3 5 4 16 9 16 10 Distortion Correction On Off Overscan On Off Black Stabilization 0 10 20 30 4 0 50 60 70 80 90 100 Advanced DCR 0 25 50 75 100 Response Time Standard Advanced Ultra Fast ...

Страница 26: ...ska Русский Türkçe Česká 日本語 한국어 繁體中文 简体中文 Resolution Notice On Off Information OSD Time Out 5 15 30 60 OSD Background On Off Power Indicator On Off Auto Power Off On Off Sleep 30 Minutes 45 Minutes 60 Minutes 120 Minutes Off ECO Mode Standard Optimize Conserve Auto Detect On Off DDC CI On Off Memory Recall ...

Страница 27: ...On Off Audio Input HDMI for HDMI input Audio In for D SUB input ViewMode Standard Game Movie Web Text MAC Mono Color Adjust Contrast Brightness Contrast 0 100 Brightness 0 100 Color Temperature sRGB Bluish Cool Native Warm User Color Red 0 100 Green 0 100 Blue 0 100 Color Space Auto RGB YUV Color Range Auto Full Range Limited Range ...

Страница 28: ...D SUB only Horizontal Position 0 100 Vertical Position 0 100 Fine Tune for D SUB only 0 100 Sharpness 0 25 50 75 100 Blue Light Filter 0 100 Aspect Ratio 4 3 5 4 16 9 16 10 Distortion Correction On Off Overscan On Off Black Stabilization 0 10 20 30 4 0 50 60 70 80 90 100 Advanced DCR 0 25 50 75 100 Response Time Standard Advanced Ultra Fast ...

Страница 29: ...ub menu Menu Option Setup Menu Language English Français Deutsch Español Italiano Suomi Svenska Русский Türkçe Česká 日本語 한국어 繁體中文 简体中文 Adaptive Sync On Off Resolution Notice On Off Information OSD Time Out 5 15 30 60 ...

Страница 30: ...nu Option Setup Menu OSD Background On Off Power Indicator On Off Auto Power Off On Off Sleep 30 Minutes 45 Minutes 60 Minutes 120 Minutes Off ECO Mode Standard Optimize Conserve Auto Detect On Off DDC CI On Off Memory Recall ...

Страница 31: ... 60Hz Resolution1 Supported 1920 x 1080 50 60 75Hz 1680 x 1050 60Hz 1600 x 1200 60Hz 1600 x 900 60Hz 1440 x 900 60 75Hz 1440 x 576 50Hz 1400 x 1050 60 75Hz 1366 x 768 60Hz 1360 x 768 60Hz 1280 x 1024 50 60 75Hz 1280 x 960 50 60 75Hz 1280 x 800 60 75Hz 1280 x 768 50 60 75Hz 1280 x 720 50 60Hz 1152 x 900 66Hz 1152 x 870 75Hz 1152 x 864 60 75Hz 1024 x 768 50 60 70 72 75Hz 1024 x 600 60Hz 848 x 480 60...

Страница 32: ...0 000 feet 12 1 km Dimensions Physical W x H x D 491 8 x 366 9 x 164 8 mm 19 4 x 14 4 x 6 5 Wall Mount Dimensions 100 x 100 mm Weight Physical 2 4 kg 5 3 lbs Power saving modes On3 25W Typical Off 0 5W 1 Do not set the graphics card in your computer to exceed these timing modes doing so may result in permanent damage to the display 2 Please use the power adapter from ViewSonic or an authorized sou...

Страница 33: ... the white whiter in a bright environment Audio Adjust Adjusts the volume mutes the sound or toggles between inputs if you have more than one source Auto Detect If the current input source has no signal the monitor will automatically switch to the next input option This function on some models is disabled by default Auto Image Adjust Automatically sizes centers and fine tunes the video signal to e...

Страница 34: ...ature to 7500K Native Default color temperature Recommended for general use Warm Set the color temperature to 5000K Contrast Adjusts the difference between the image background black level and the foreground white level I Information Displays the timing mode video signal input coming from the graphics card in the computer the LCD model number the serial number and the ViewSonic website URL See you...

Страница 35: ...rmost edges of the film R Recall Resets the ViewMode monitor settings Resolution Notice The notice tells users that the current viewing resolution is not the correct native resolution This notice will appear in the display settings window when setting up the display resolution Response Time Adjusts the response time creating smooth images without streaking blurring or ghosting A low response time ...

Страница 36: ...iewMode ViewSonic s unique ViewMode feature offers Game Movie Web Text MAC and Mono presets These presets are specifically designed to deliver an optimized viewing experience for different screen applications ...

Страница 37: ...e missing check the video cable to make sure it is properly and securely connected Loose or broken pins in the cable connector could cause an improper connection Connect the monitor to another computer If you have an older graphics card contact ViewSonic for a non DDC adapter Screen image is too light or dark Adjust brightness and contrast settings via the OSD Menu Reset the monitor to factory set...

Страница 38: ...nsure the mini stereo jack is connected Make sure the volume is not muted nor set to 0 Check the Audio Input setting The monitor will not adjust Make sure there are no obstructions near or on the monitor and that there is adequate spacing For more information see Adjusting the Viewing Angle on page 14 USB devices connected to the monitor do not work Make sure the USB cable is connected properly Tr...

Страница 39: ...not clean apply a small amount of non ammonia non alcohol based glass cleaner onto a clean soft lint free cloth then wipe the screen Cleaning the Case Use a soft dry cloth If the case is still not clean apply a small amount of non ammonia non alcohol based mild non abrasive detergent onto a clean soft lint free cloth then wipe the surface Disclaimer ViewSonic does not recommend the use of any ammo...

Страница 40: ...ent generates uses and can radiate radio frequency energy and if not installed and used in accordance with the instructions may cause harmful interference to radio communications However there is no guarantee that interference will not occur in a particular installation If this equipment does cause harmful interference to radio or television reception which can be determined by turning the equipme...

Страница 41: ...ximum Concentration Actual Concentration Lead Pb 0 1 0 1 Mercury Hg 0 1 0 1 Cadmium Cd 0 01 0 01 Hexavalent Chromium Cr6 0 1 0 1 Polybrominated biphenyls PBB 0 1 0 1 Polybrominated diphenyl ethers PBDE 0 1 0 1 Bis 2 ethylhexyl phthalate DEHP 0 1 0 1 Butyl benzyl phthalate BBP 0 1 0 1 Dibutyl phthalate DBP 0 1 0 1 Diisobutyl phthalate DIBP 0 1 0 1 Certain components of products as stated above are ...

Страница 42: ...E waste Rule 2011 and prohibits use of lead mercury hexavalent chromium polybrominated biphenyls or polybrominated diphenyl ethers in concentrations exceeding 0 1 weight and 0 01 weight for cadmium except for the exemptions set in Schedule 2 of the Rule Product Disposal at End of Product Life ViewSonic respects the environment and is committed to working and living green Thank you for being part o...

Страница 43: ...rotection Agency EPA As an ENERGY STAR partner ViewSonic Corporation has determined that this product meets the ENERGY STAR guidelines for energy efficiency Disclaimer ViewSonic Corporation shall not be liable for technical or editorial errors or omissions contained herein nor for incidental or consequential damages resulting from furnishing this material or the performance or use of this product ...

Страница 44: ...nic com my Middle East www viewsonic com me Myanmar www viewsonic com mm Nepal www viewsonic com np New Zealand www viewsonic com nz Pakistan www viewsonic com pk Philippines www viewsonic com ph Singapore www viewsonic com sg 臺灣 Taiwan www viewsonic com tw ประเทศไทย www viewsonic com th Việt Nam www viewsonic com vn South Africa Mauritius www viewsonic com za Americas United States www viewsonic ...

Страница 45: ...ts e g Projector Lamps Please refer to What the warranty excludes and does not cover section How long the warranty is effective ViewSonic displays are warranted for between 1 and 3 years depending on your country of purchase for all parts including the light source and for all labor from the date of the first consumer purchase Who the warranty protects This warranty is valid only for the first con...

Страница 46: ...d in the product User Guide Removal installation and set up service charges including wall mounting of the product How to get service For information about receiving service under warranty contact ViewSonic Customer Support Please refer to the Customer Service page You will need to provide your product s serial number To obtain warranty service you will be required to provide a the original dated ...

Страница 47: ... by anyone not authorized by ViewSonic Effect of state law This warranty gives you specific legal rights and you may also have other rights which vary from state to state Some states do not allow limitations on implied warranties and or do not allow the exclusion of incidental or consequential damages so the above limitations and exclusions may not apply to you Sales outside the U S A and Canada F...

Страница 48: ...er purchase Who the warranty protects This warranty is valid only for the first consumer purchaser What the warranty excludes and does not cover Any product on which the serial number has been defaced modified or removed Damage deterioration or malfunction resulting from Accident misuse neglect fire water lightning or other acts of nature unauthorized product modification unauthorized attempted re...

Страница 49: ...tainer packaging to an authorized ViewSonic service center Round trip transportation costs for in warranty products will be paid by ViewSonic Limitation of implied warranties There are no warranties express or implied which extend beyond the description contained herein including the implied warranty of merchantability and fitness for a particular purpose Exclusion of damages ViewSonic s liability...

Страница 50: ...l 4136954 E Mail Cefeo soluglobales com Cuernavaca Compusupport de Cuernavaca SA de CV Francisco Leyva 178 Col Miguel Hidalgo C P 62040 Cuernavaca Morelos Tel 01 777 3180579 01 777 3124014 E Mail aquevedo compusupportcva com Distrito Federal QPLUS S A de C V Av Coyoacán 931 Col Del Valle 03100 México D F Tel 01 52 55 50 00 27 35 E Mail gacosta qplus com mx Guadalajara Jal SERVICRECE S A de C V Av ...

Страница 51: ...C0 M91 Y72 K24 Process Color C0 M0 Y0 K100 Process Color C0 M91 Y72 K24 Process Color Pantone Black C Spot Color Pantone 187 C Spot Color ...

Отзывы: