ViewSonic PJ106D Скачать руководство пользователя страница 32

ViewSonic


PJ106D 

27

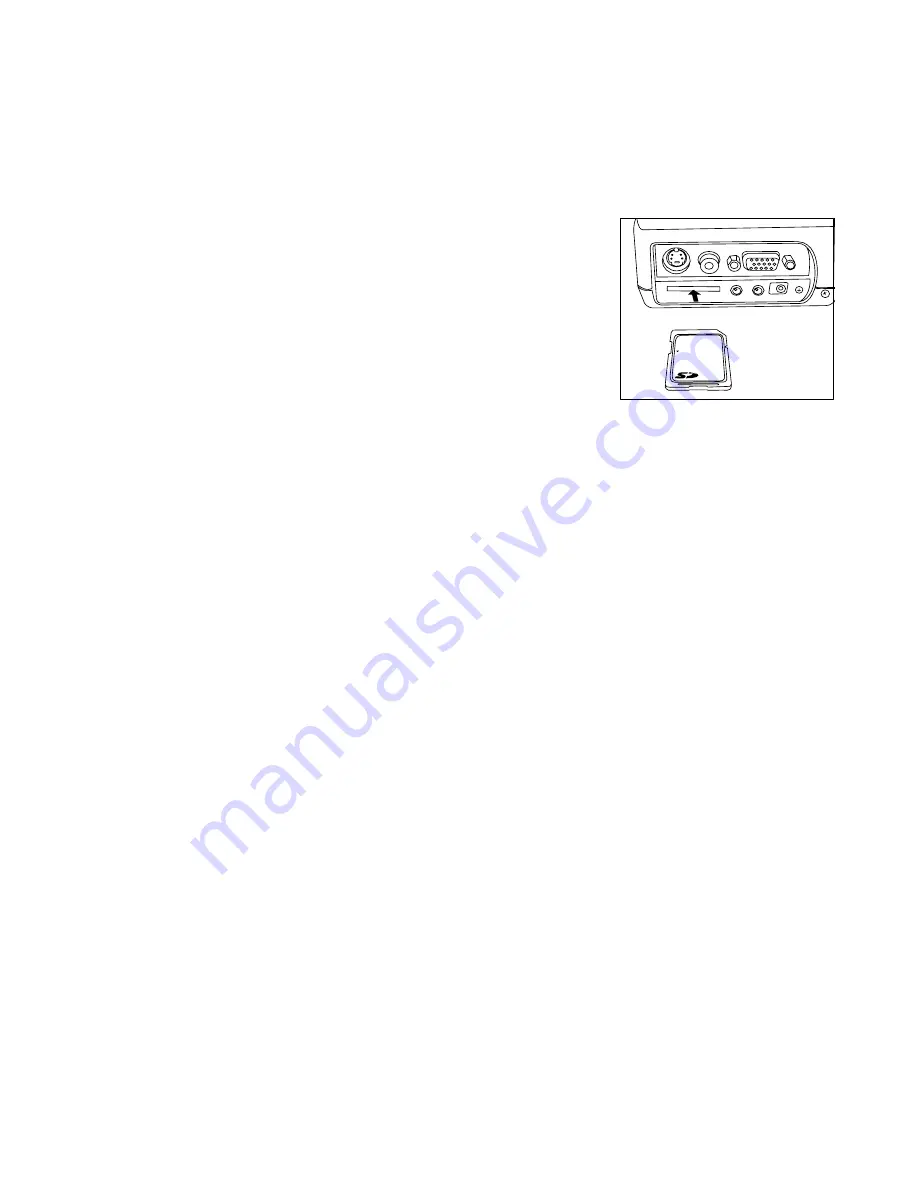
Inserting/Removing an SD Card

1.   Insert the SD card in the correct orientation shown.
2.   To removing an SD card, press lightly on the edge 

of the SD card and it will eject.

Playing Back Files in SD Card

1. Insert an SD card stored image and video files into the SD card slot.
2.  Select SD Card as input source.


  Thumbnail display will appear on the screen.

3. You may press remote control’s Source button to change thumbnail display mode
  if still images and video clips saved in an SD card.

  The still image thumbnail will display first and then automatically followed by video 

clip thumbnail.

4.  Use  four  directional  buttons  to  select  the  desired  image/video  clip,  and  press  remote 

control’s Enter button or control panel’s OK button to playback.

   Pressing  remote  control’s  Enter  button  or  control  panel’s  OK  button  again  will  stop, 

pause or exit from playback.

5. Press remote control’s Source button again to exit SD Card mode.

Lock

Содержание PJ106D

Страница 1: ...PJ106D SVGA LED Projector ViewSonic User Guide Guide de l utilisateur Bedienungsanleitung Gu a del usuario Guida dell utente Guia do usu rio Anv ndarhandbok K ytt opas Py Model No VS11244...

Страница 2: ...communications However there is no guarantee that interference will not occur in a particular installation If this equipment does cause harmful interference to radio or television reception which can...

Страница 3: ...nada For European Countries CE Conformity The device complies with the requirements of the EEC directive 89 336 EEC as amended by 92 31 EEC and 93 68 EEC Art 5 with regard to Electromagnetic compaty a...

Страница 4: ...MS and DDC are trademarks of VESA PS 2 VGA and XGA are registered trademarks of International Business Machines Corporation Disclaimer ViewSonic Corporation shall not be liable for technical or editor...

Страница 5: ...com The ViewSonic Wizard CD ROM also provides an opportunity for you to print the registration form which you may mail or fax to ViewSonic For Your Records Product Name Model Number Document Number Se...

Страница 6: ...feguards 2 Overview 7 Power 8 Remote control optional accessory 10 Installation 13 Basic connections 15 Preparation 17 Basic operation 19 Menu operation 22 Using an SD Card 25 Troubleshooting 28 Maint...

Страница 7: ...ered to 4 Instructions All operating instructions must be followed 5 Cleaning Unplug this projector both from the wall outlet and battery before cleaning it Do not use liquid aerosol cleaners Use a da...

Страница 8: ...ted only from the type of power source indicated on the marking label If you are not sure of the type of power please consult your appliance dealer or local power company 11 Power cord protection Powe...

Страница 9: ...or to its normal operation e If the projector has been exposed to rain or water f If the projector has been dropped or the cabinet has been damaged g If the projector exhibits a distinct change in per...

Страница 10: ...lectric shock Except as speci cally explained in User Manual do not attempt to service this product by yourself Please contact your dealer when you want to x adjust or inspect the projector Do not mod...

Страница 11: ...ir outlet grilles and bottom plate Do not touch them or put other equipment close to the air outlet grilles because they become hot during operation The heated air outlet grilles and bottom plate may...

Страница 12: ...ly 8 Speaker 9 Air inlet grille Control panel 1 LAMP indicator 2 POWER indicator 3 CHARGE indicator 4 POWER button 5 Four directional buttons 6 OK button 7 MENU button Terminal board 1 S VIDEO termina...

Страница 13: ...nto the AC adapter 3 Insert the plug on the power cord into a wall outlet The POWER indicator lights red when using the AC adapter Using the optional battery The projector must be used with speci ed L...

Страница 14: ...d turns off when charging is completed We recommended that you full charge the battery all the time When the projector is off the charger works as a fast charging mode It takes approximately 5 hours t...

Страница 15: ...on 5 Keystone buttons 6 Volume buttons 7 Source button 8 Mute button 9 Blank button 10 4 3 16 9 button 11 Auto button For the rst time use Remove the transparent insulation tape by pulling it before u...

Страница 16: ...remote control and the remote sensor on the projector or if strong light falls on the remote sensor A weak battery will also prevent the projector from operating This sample may be slightly different...

Страница 17: ...losion if battery is incorrectly replaced Replace only with the same or equivalent type recommended by the manufacturer Dispose of used batteries according to your local regulations Do not recharge di...

Страница 18: ...he screen and the front edge of the projector A Height of the projected image under the horizontal line Optical offset B A 27 13 C D 41 59 Screen diagonal size Distance L inch cm inch cm 12 30 5 15 4...

Страница 19: ...blocked Do not use the projector in the following locations and manners which may cause re or electric shock a In a dusty or humid place b In a sideways or upside down position c Near a heater d In an...

Страница 20: ...AC adapter of the projector and the connected devices firmly When unplugging hold and pull the plug Do not pull the cord When the projector and the connected devices are located too close to each othe...

Страница 21: ...er with D SUB Important When you use a longer RGB cable instead of the common length cable the image may not be projected correctly Some computers require additional connectors or analog RGB output ad...

Страница 22: ...dealer for replacement because it may cause re or electric shock Do not modify or alter the AC adapter If the AC adapter is modi ed or altered it may cause re or electric shock Caution Plug in the pow...

Страница 23: ...s In addition stripes may appear or straight lines may bend in images with complicated patterns They are not due to product malfunctions Noise may appear on the screen during the keystone adjustment b...

Страница 24: ...he projector stops charging battery when battery is fulled 3 Press the POWER button either on the control panel or the remote control The LAMP indicator lights up and the POWER indicator goes off The...

Страница 25: ...unplugging the power cord while the lamp is on Unplugging while the lamp is on degrades the lamp s performance and causes failure in the projector 1 Press the POWER button either on the control panel...

Страница 26: ...tor simultaneously press the Source but tonThe projector will detect your source Important The image may not be projected or auto adjustmentsetting may not be performed correctly for input signals oth...

Страница 27: ...Brightness Mode Color Temperature Color R Color G Color B Brightness 0 100 0 100 On Off PC Movie Photo Enhanced Saturation 1 0 100 0 6 0 100 0 100 0 100 15 15 10 10 4 3 16 9 6 0 31 Management AV Set K...

Страница 28: ...e to adjust the color balance of the image Color Temperature Use to adjust the color temperature Color R Use to adjust the red color Color G Use to sdjust the green color Color B Use to adjust the blu...

Страница 29: ...Reset Press control panel s OK button or remote control s Enter button and then choose Yes to turn the display parameters to the factory default settings 4 AV Set Volume Use to adjust the volume Mute...

Страница 30: ...16k 22k 24k 32k 48k Hz Note 44 1KHz is not supported Supported brand name Supported model name Canon PowerShot S45 PowerShot S50 PowerShot A40 PowerShot G3 Casio Exilim EXS2 QVR4 Fuji Film FinePixA30...

Страница 31: ...C700 C920Z 5050 PanoasonicLeica Digilux 1 Lumix DMC LC5 Pentax 330 RS Optio 330 Sanyo AZ1 Sony CD Mavica CyberShot Note 1 The accessing time varies depending on the le size Memory Card SD Supported b...

Страница 32: ...3 You may press remote control s Source button to change thumbnail display mode if still images and video clips saved in an SD card The still image thumbnail will display rst and then automatically fo...

Страница 33: ...e occasion the lamp fails to light up In such cases try to light the lamp again Check that the cable connected to the external device isn t broken When an extension cord is being used replace it with...

Страница 34: ...t with the supplied cable and check whether images are projected correctly Images aren t projected correctly Problem Cause and solution Projected images are shaking Projected images are displaced Chec...

Страница 35: ...ojector away from equipment generating interfering radio waves When the keystone adjustment is carried out the image may not be displayed correctly because of the type of input signal This isn t a pro...

Страница 36: ...outlet Wait about 1 minute plug the power cord in and try again The remote control doesn t function easily at all Check that the battery is loaded in the remote control or the battery isn t weak Check...

Страница 37: ...loth dampened with diluted mild detergent and then wipe them with a dry cloth To protect the surface of the projector from fading or deteriorating Do not spray insecticide on or inside the projector D...

Страница 38: ...rn the projector off and consult your appliance dealer Normal condition AC Adaptor only LAMP Green POWER Red CHARGE Red CONDITION ON OFF OFF System ON OFF ON OFF System standby Normal condition AC Ada...

Страница 39: ...OFF Flashing x 10 OFF Low Battery System turned off Abnormal condition LAMP Green POWER Red CHARGE Red CONDITION OFF Off x 1 Flashing System Failure OFF Off x 3 Flashing Fan abnormal OFF Off x 4 Flash...

Страница 40: ...XGA Compress 640 x 480 800 x 600 1024 x 768 1280 x 1024 Video compatibility NTSC M 4 43 PAL60 PAL M N SECAM HDTV 480i 480p 720p 1080i from analog RGB connector I O Connectors DC IN jack Yellow RCA jac...

Страница 41: ...ViewSonic PJ106D 36 Dimensional drawings unit mm...

Страница 42: ...User s Manual 1 Quick Start Guide 1 Composite Video Cable 1 AC Adaptor 1 Power Cord US EU UK AU CN TW 1 Remote Control It depends on different countries or areas only 1 cord is included Optional acce...

Страница 43: ...A 75 640 x 480 37 50 75 00 VGA VESA 85 640 x 480 43 27 85 01 VGA VESA 85 720 x 400 37 93 85 04 SVGA VESA 56 800 x 600 35 16 56 00 SVGA VESA 60 800 x 600 37 88 60 00 SVGA VESA 72 800 x 600 48 08 72 00...

Страница 44: ...x 1080 33 80 60 00 1080i 50 1920 x 1080 28 10 50 00 Important Some computers aren t compatible with the projector The projector s maximum resolution is 800 x 600 pixels It may not display images of hi...

Страница 45: ...ope Middle East Baltic countries and North Africa www viewsoniceurope com Contact your reseller service eu viewsoniceurope com Australia and New Zealand www viewsonic com au support AUS 1800 880 818 N...

Страница 46: ...eck with your local dealer or local ViewSonic of ce for the warranty information Lamp warranty subject to terms and conditions veri cation and approval Applies to manufacturer s installed lamp only Al...

Страница 47: ...repair or replacement of the product ViewSonic shall not be liable for 1 Damage to other property caused by any defects in the product damaged based upon inconvenience loss of use of the product loss...

Страница 48: ......

Отзывы: