background image

ViewSonic 

N2600w

ENGLISH

Contents

Compliance Information.............................................................................................1 

Important Safety Instructions .....................................................................................2 

Copyright Information ................................................................................................3 

Product Registration ..................................................................................................3 

Antenna Installation Instructions................................................................................4 

Cleaning the LCD TV.................................................................................................4 

Getting Started 

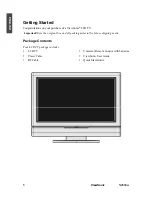
Package Contents .....................................................................................................5 

The wall type is installed............................................................................................6 

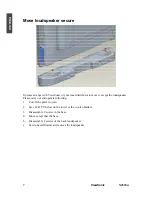
Move loudspeaker secure..........................................................................................7 

Side View of the Product ...........................................................................................8 

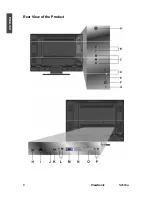
Rear View of the Product...........................................................................................9 

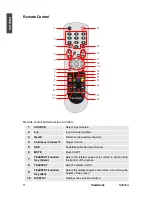
Remote Control .......................................................................................................11 

Installation ...............................................................................................................13 

Basic Operation .......................................................................................................22 

OSD Functions 

OSD style and operation tips ...................................................................................23 

OSD Operation ........................................................................................................23 

Other Information 

Specifications ..........................................................................................................32 

Troubleshooting.......................................................................................................33 

Customer Support ...................................................................................................35 

Limited Warranty .....................................................................................................36 

Содержание N2600W

Страница 1: ......

Страница 2: ...Cleaning the LCD TV 4 Getting Started Package Contents 5 The wall type is installed 6 Move loudspeaker secure 7 Side View of the Product 8 Rear View of the Product 9 Remote Control 11 Installation 13 Basic Operation 22 OSD Functions OSD style and operation tips 23 OSD Operation 23 Other Information Specifications 32 Troubleshooting 33 Customer Support 35 Limited Warranty 36 ...

Страница 3: ...s with the requirements of the EEC directive 89 336 EEC as amended by 92 31 EEC and 93 68 EEC Art 5 with regard to ϘElectromagnetic compatibilityϙ and 73 23 EEC as amended by 93 68 EEC Art 13 with regard to ϘSafety ϙ User Information for all Countries Notice Use the cables which are included with the unit or specified ʳ ...

Страница 4: ...and the third prong are provided for your safety If the plug does not fit into your outlet consult an electrician for replacement of the outlet 10 Protect the power cord from being tread upon or pinched particularly at the plug and the point where if emerges from the equipment Be sure that the power outlet is located near the equipment so that it is easily accessible 11 Only use attachments access...

Страница 5: ...of this document may be copied reproduced or transmitted by any means for any purpose without prior written permission from ViewSonic Corporation Product Registration To meet your future needs and to receive any additional product information as it becomes available please register your product on the Internet at www viewsonic com For Your Records Product Name N2600w ViewSonic LCD TV Model Number ...

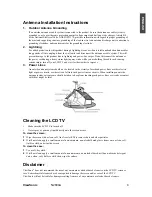
Страница 6: ...ather to improve 3 Power Lines An outside antenna system should not be located in the vicinity of overhead power lines or other electric light or power circuits or where it can fall into such power lines or circuits When installing an outside antenna system extreme care should be taken to keep from touching such power lines or circuits as contact with them might be fatal Cleaning the LCD TV y Make...

Страница 7: ...of a ViewSonic LCD TV Important Save the original box and all packing material for future shipping needs Package Contents Your LCD TV package includes y LCD TV y Power Cable y RF Cable y Universal Remote Control with batteries y ViewSonic User Guide y Quick Start Guide ʳ ʳ ʳ ʳ ...

Страница 8: ...ed service personnel Please contact ViewSonic or your local distributor for the installation instruction and service Before hanging your LCD TV on the wall please follow the steps below 1 Turn off the AC switch on the back of your LCD TV 2 Spread cushion over the base area to lay the LCD screen on 3 Unfasten 9 screws in the base to detach the stand from the LCD screen 4 Contact qualified service p...

Страница 9: ...o move it except the loudspeaker Please carry out and operate following 1 Cut off the power to join 2 Face LCD TV below on the towel or the woolen blanket 3 Disassemble 9 screws in the base 4 Move except that the base 5 Disassemble 4 screws of the back loudspeaker 6 Exert oneself downward remove the loudspeaker ...

Страница 10: ...ion B Volume Up Increase volume or adjust a highlighted increasingly control while in OSD menu C Volume Down Decrease volume or adjust a highlighted control decreasingly while in OSD menu D CH Up Channel up Scroll up E CH Down Channel down Scroll down F MENU Turn OSD menu ON OFF G Power Turn the power ON OFF ...

Страница 11: ...9 ViewSonic N2600w ENGLISH Rear View of the Product ...

Страница 12: ...DVD and video game into this jack F S Video input Connect the external video device such as VCR DVD and video game into this jack G Earphone output H AC power switch Default ON I Power AC input Using cable provided connect to a power source J PC Audio input K HDMI signal input L HDMI DVI Audio input Connect the external video devices with RCA audio output to these jacks M VGA signal input N SCART2...

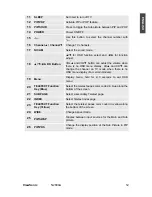
Страница 13: ...me 5 SRS Enable Disable Surround Sound 6 MUTE Mute On Off 7 TELETEXT Function Key Green Select the teletext pages color coded in green along the bottom of the screen 8 TELETEXT Switch Teletext On Off 9 TELETEXT Function Key Red Select the teletext pages color coded in red along the bottom of the screen 10 DISPLAY Displays the sources and time 11 20 7 5 17 24 23 18 10 9 8 6 4 2 16 14 1 2 2 12 13 21...

Страница 14: ... no OSD menu display CHŸ and CHź can change the channel on TV mode when there is no OSD menu display For certain models 19 Menu Display menu hold for 2 3 seconds to exit OSD menu 20 TELETEXT Function Key Blue Select the teletext pages color coded in blue along the bottom of the screen 21 SUB PAGE Select a secondary Teletext page 22 INDEX Select Teletext index page 23 TELETEXT Function Key Yellow S...

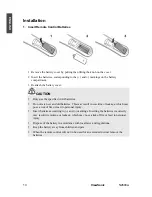
Страница 15: ...y Do not mix new and old batteries This may result in cracking or leakage which may pose a risk of fire or lead to personal injury y Insert batteries according to and markings Inserting the batteries incorrectly may result in cracking or leakage which may pose a risk of fire or lead to personal injury y Dispose of the battery in accordance with local laws and regulations y Keep the battery away fr...

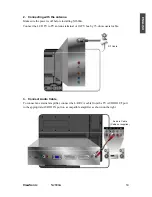
Страница 16: ... Connect the LCD TV to TV antenna terminal or CATV box by 75 ohm coaxial cable 3 Connect Audio Cable To connect an external amplifier connect the L R RCA cable from the TV AUDIO OUT port to the appropriate AUDIO IN port on a compatible amplifier as shown on the right RF Cable Audio in Cable Cable not supplied ...

Страница 17: ...deo YCbCr YPbPr HDMI to Video Devices Connect Video Audio cables from compatible devices into the right side of N2600w AV Mode S Video Mode RCA A V Cable Cable not supplied VCR S Video Cable Cable not supplied Audio in Cable Cable not supplied VCR ...

Страница 18: ...ic N2600w 16 ENGLISH YCbCr Mode YPbPr Mode Audio in Cable Cable not supplied DVD Player or VCR YCbCr Cable Cable not supplied Audio in Cable Cable not supplied DVD Player or VCR YCbCr Cable Cable not supplied ...

Страница 19: ...cket and the SCART1 input source can be received These signals are transmitted for example by a pay TV decoder game machine or photo CD unit etc and that digital signal can be recorded via SCART1 socket SCART2 Mode Connect the scart socket of the VCR to the SCART2 socket on the LCD TV Note In SCART2 socket the video output is not available SCART Cable Cable not supplied SCART Cable Cable not suppl...

Страница 20: ...on Sound Menu of OSD for selecting HDMI audio to YCbCr However the input source should be in HDMI 2 HDMI cable Note To receive the sound from DVD please turn on Sound Menu of OSD for selecting HDMI audio to HDMI However the input source should be in HDMI DVD Player DVD Palyer should have the HDMI output terminal DVD Player DVD Player should have the HDMI output terminal HDMI Cable Cable not suppli...

Страница 21: ...VGA output of PC to the VGA terminal input of N2600w PC up to 1280 x 1024 or 1360 x 768 is the preferred resolution PC Audio in Connect the Audio In cable green from audio output of your PC to the audio input terminal green of N2600w PC VGA 15 Pin Cable PC PC Audio in Cable Cable not supplied ...

Страница 22: ...ect the HDMI cable from HDMI output of PC to the DVI terminal input of N2600w Earphone Connect Earphone from compatible devices into the earphone input at the left side of N2600w PC HDMI Cable Cable not supplied Earphone Cable not supplied ...

Страница 23: ...unded AC outlet Turn on the AC Switch on the back of N2600w 7 Turn Power ON Press the Power button under the LCD TV or press the Power On red button on the Remote Control Turn Video source power ON 8 Select input source for your LCD TV via either OSD menu or Remote control AC wall socket AC Switch Switch to ON ...

Страница 24: ...urn on off the TV The power LED indicator is green when the LCD TV is on Select input source Select the required input sources Press the Input button at the right side of the LCD TV or on the remote control repeatedly until the desired source appears VOLUME Adjusting Press VOL at the right side of the LCD TV to adjust the volume or press VolŸ and Volź on the remote control to adjust the volume To ...

Страница 25: ...ton to select the sub menu and pressŻ or Ź to enter the sub menu Press Ÿ or ź to select the function you would like to adjust and then press Ż or Ź or OK to adjust it or execute the function Press the Menu button on your remote control or right side of the LCD TV again to close the OSD Main Menu The 5 icons at the left of the OSD Main menu stand for the 6 sub menus Picture Sound TV Option PC and O...

Страница 26: ...tone Ż to increase the reddish color Saturation Adjust color saturation Ź to increase the brilliant color Ż to increase the pale color Sharpness Adjust the picture sharpness Ź to sharpen the display Ż to soften the display Color Temp Set the color temperature to Normal Warm or Cool Ź or Ż activate your selection Aspect Ratio Set the view mode 16 9 Zoom 14 9 4 3 Panorama Ź or Ż activate your select...

Страница 27: ...se lower pitched sound Treble Adjust the treble Ź to increase higher pitched sound Ż to decrease higher pitched sound Balance Adjust the left and right audio balance Ź to emphasize the right speaker Ż to emphasize the left speaker NICAM This item is available only when the current TV broadcast supports stereo or SAP audio output format You can switch among Mono Stereo or SAP ŻŹ select Mono Stereo ...

Страница 28: ... Frequency Current TV Channel Frequency Ź or Ż change the value ADD Delete ADD Restores the TV channel previous deleted Delete Deletes the current TV channel Ź or Ż select ADD or Delete System Select the TV input source Antenna or Cable Ź or Ż select Cable or Antenna Country Set TV Channel Country Ź or Ż select used country Auto Scan Fully Search Scan all the TV channels Ź or Ż execute Auto Scan W...

Страница 29: ...peration Sleep Timer Set the timer for the TV to automatically turn off Available options are OFF 15 Min 30 Min 45 Min and 60 Min ŹorŻ to select OFF 15 Min 30 Min 45 Min and 60 Min Multi Picture Adjust sub picture functions Ź or Ż enter Multi Picture sub menu ...

Страница 30: ...ly if PIP is Selected Adjust the horizontal position of the sub picture Ź to move toward the right Ż to move toward the left V Position This item is available only if PIP is Selected Adjust the vertical position of the sub picture Ź to move downward Ż to move upward Border color Sub picture Border color setup Ź or Ż to select color Swap Change Main source and PIP source Ź or Ż to change ...

Страница 31: ... the left V Position VGA only Adjust the vertical position of the video Ź to move upward Ż to move downward Clock VGA only Adjust the delay time between horizontal synchronous signal and video Ź to increase the delay time Ż to decrease the delay time Phase VGA only Adjust the delay time Ź to increase the delay time Ż to decrease the delay time Color Mode Select color Mode Ź or Ż enter Color Mode s...

Страница 32: ...B User and Cool Ź or Ż to select color User R You can adjust R to change color temp Ź to increase the color temp Ż to decrease the color temp User G You can adjust G to change color temp Ź to increase the color temp Ż to decrease the color temp User B You can adjust B to change color temp Ź to increase the color temp Ż to decrease the color temp ...

Страница 33: ...ward Ż move downward OSD Time Out Adjust OSD display time Range 0 60 sec Ź increase the OSD display time Ż decrease the OSD display time Transparency Adjust OSD s transparency level Ź increase the transparency Ż decrease the transparency Information Show some Picture information including main sub picture source and firmware version Ź or Ż display information Memory Recall Reset the OSD settings t...

Страница 34: ...A L R stereo jack Earphone Mini stereo ӥ3 5mm x 1 Power Voltage 90 240 VAC 50 60 Hz auto switch Display Area Full Scan 575 769mm H x 323 712 mm V Operating Temperature 32 F to 104 F 0 C to 40 C Conditions Humidity 10 to 90 non condensing ʳ Storage Temperature 4 F to 140 F 20 C to 60 C Conditions Humidity 10 to 90 non condensing ʳ Dimensions Physical 688 mm W x 546 mm H x 250 mm D ʳ 27 08 in W x 21...

Страница 35: ...im in a brightly lit room y Adjust brightness and contrast y Check the input signal setting No Sound y Check your audio connections y The MUTE button may have been pressed try pressing this button again y Check your audio settings your TV audio may be set to minimum y Press the Volume Up button on the remote control Remote control unit does not operate y Make sure batteries are inserted correctly ...

Страница 36: ...n or no reception above CH13 y Is the AIR CABLE option set correctly Please set the AIR CABLE option to CABLE y CATV is connected improperly or not connected please check all the CATV connections y The cable TV service is interrupted please contact your cable operator Picture is cut off with sidebar screen y Is the image positioned correctly y Are screen mode adjustments such as picture size set c...

Страница 37: ...om fi 09 2311 3413 France www viewsoniceurope com fr 03 8717 1616 Germany www viewsoniceurope com de 0696 630 8051 Republic of Ireland www viewsoniceurope com uk 01 411 8936 Italy www viewsoniceurope com it 02 4527 9033 Luxembourg www viewsoniceurope com lu 40 6661 5618 The Netherlands www viewsoniceurope com nl 053 484 9308 Norway www viewsoniceurope com no 22 57 77 38 Portugal www viewsoniceurop...

Страница 38: ... receiving service under warranty contact ViewSonic Customer Support at 800 888 8583 You will need to provide your product s serial number 2 To obtain warranted service you will be required to provide a the original dated sales slip b your name c your address d a description of the problem and e the serial number of the product 3 Take or ship the product freight prepaid in the original container t...

Страница 39: ......
Отзывы: