background image

5

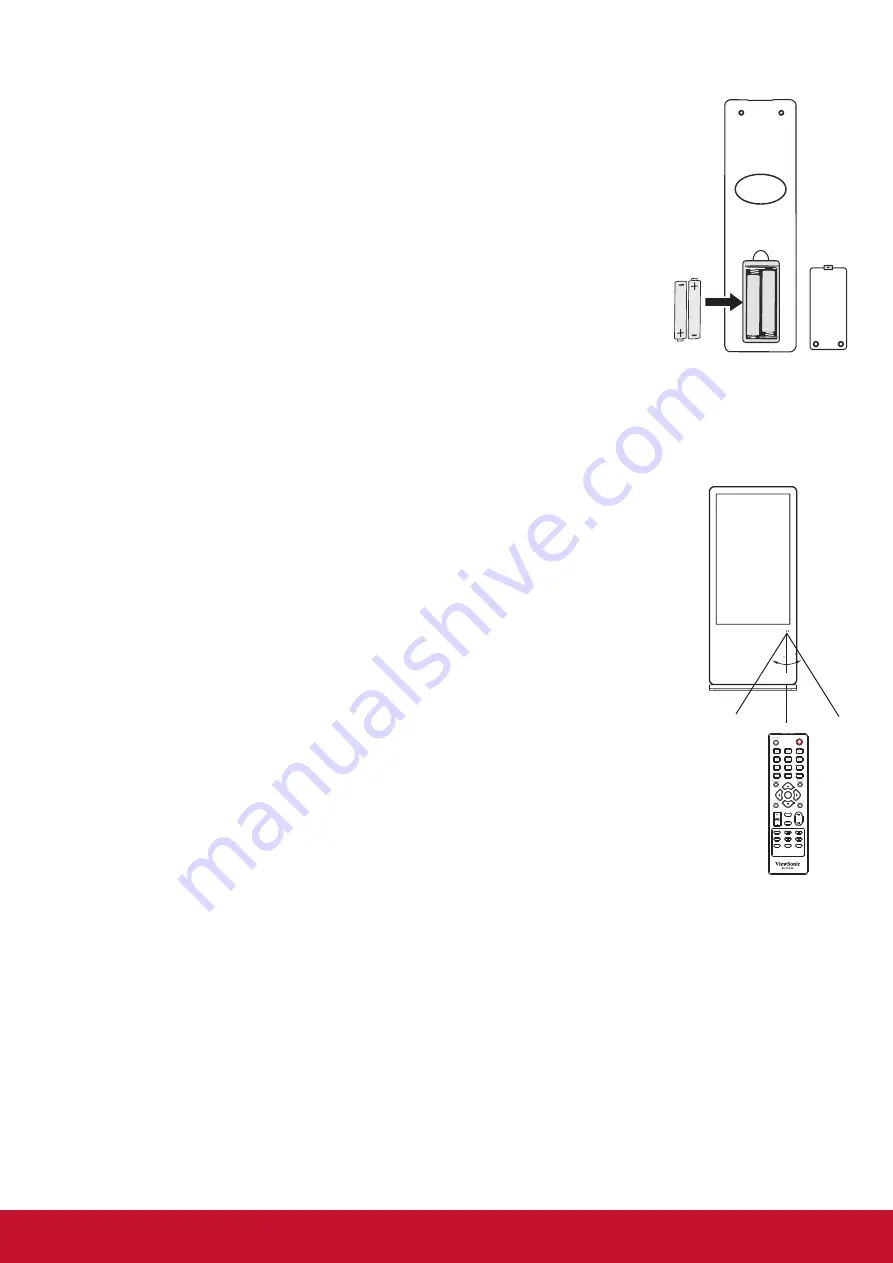
2.1.1.  Installing remote control Batteries

To install remote control batteries:

1.  Open the battery cover.
2.  Insert two AAA batteries into the battery compartment. Make sure that the + and – 

symbols on the batteries match the + and – symbols in the battery compartment.

3.  Replace the cover.

Battery precautions:

Improper use of batteries can result in a leakage of chemicals and/or explosion. Be 

sure to follow the instructions below.

• 

Place batteries with their terminals corresponding to the (+) and (–)indications.

• 

Different types of batteries have different characteristics. Do not mix batteries of 

different types.

• 

Do not mix old and new batteries. Mixing old and new batteries can shorten the 

life of new batteries and/or cause old batteries to leak chemicals.

• 

Remove batteries as soon as they are non-operable. Chemicals that leak from batteries can cause a 

rash. If chemical leakage is found, wipe with a cloth.

• 

Dispose of batteries in a proper manner.

• 

If the remote control is not used for an extended period of time, remove the batteries.

•  The batteries shall not be exposed to excessive heat such as sunshine, fire or the like.

2.1.2.  Aiming the remote control  

Use the remote control by pointing it towards the remote sensor on the front of your 

display. Objects between the remote control and the remote sensor may prevent 

proper operation.

Cautions regarding use of remote control

• 

Do not expose the remote control to shock. In addition, do not expose the remote 

control to liquids, and do not place in an area with high humidity.

• 

Do not install or place the remote control under direct sunlight. The heat may cause 

deformation of the unit.

• 

The remote control may not work properly if the remote sensor window of the main 

unit is under direct sunlight or strong lighting. In such a case, change the angle of 

the lighting or the display set, or operate the remote control closer to the remote 

sensor window.

30

30

5m

Содержание EP5520

Страница 1: ...gistering your product for future service Warranty information contained in this User Guide will describe your limited coverage from ViewSonic Corporation which is also found on our web site at http w...

Страница 2: ...ding the world s expectations for technological evolution innovation and simplicity At ViewSonic we believe that our products have the potential to make a positive impact in the world and we are confi...

Страница 3: ...he instructions may cause harmful interference to radio communications Operation of this equipment in a residential area is likely to cause harmful interference in which case the user will be required...

Страница 4: ...210 To prevent radio interference to the licensed service this device is intended to be operated indoors and away from windows to provide maximum shielding Equipment or its transmitting antenna that...

Страница 5: ...0 1 Certain components of products as stated above are exempted under the Annex III of the RoHS2 Directives as noted below Examples of exempted components are 1 Mercury in cold cathode fluorescent la...

Страница 6: ...or rules of your municipality to dispose of the tube properly Do not bend power cord Do not use monitor in high temperature humid dusty or oily areas If monitor or glass is broken do not come in conta...

Страница 7: ...nk often Position the monitor at a 90 angle to windows and other light sources to minimize glare and reflections Clean the LCD monitor surface with a lint free nonabrasive cloth Avoid using any cleani...

Страница 8: ...Overview 8 4 4 Home Menu Overview 9 5 File Explorer 10 6 vSignage overview Content Management 13 6 1 Dashboard 14 6 2 Campaign Manager 14 6 2 1 Campaign 15 6 3 Edit Presentation 18 6 4 Group Manager...

Страница 9: ...vii 11 Supported media files format 42 12 Troubleshooting 43 13 Specifications 44 14 Other Information 45 Customer Support 45 Limited Warranty 46 Mexico Limited Warranty 48...

Страница 10: ...cument may be copied reproduced or transmitted by any means for any purpose without prior written permission from ViewSonic Corporation Product Registration To meet your future needs and to receive an...

Страница 11: ...n All rights reserved All trademarks registered or otherwise are the property of their respective companies Disclaimer ViewSonic Corporation shall not be liable for technical or editorial reeors or om...

Страница 12: ...2 1 2 3 Remote Sensor 1 USB 1 USB for PC 2 USB 2 USB for the poster Embedded Player 3 RJ45 Enable connection to cable and log on to Internet...

Страница 13: ...screen on your Poster HDMI2 ARC Connect an ARC enabled home theater receiver to this jack 4 Connect headphones to this jack The Poster is the current audio output 5 RS 232 For service RS232 control a...

Страница 14: ...udio and schedule setting Control buttons for USB multimedia playback Previous next Play Pause button STOP button Fast forward fast reverse To list all recently used Apps Set up the sleep timer Take a...

Страница 15: ...h If chemical leakage is found wipe with a cloth Dispose of batteries in a proper manner If the remote control is not used for an extended period of time remove the batteries The batteries shall not b...

Страница 16: ...ake sure the fastened connection Audio cable VGA cable USB cable Audio output devices HDMI cable HDMI cable Network cable Router Touch output for touch model only USB cable RS232 cable USB devices USB...

Страница 17: ...pop up for first time power on Select desired menu language then press START and turn to next page 4 3 Float menu for touch series only 1 Set the FLOAT MENU to on in the Lock menu 2 Slide up from bot...

Страница 18: ...op up sub menu Pen Click to make annotation in the picture Click to change color Eraser Click to erase symbols Click to change eraser size Screen shot Click to screenshot the current image Clean Click...

Страница 19: ...HOME button to show desktop menu 2 Use arrow and OK button for desired selection 3 Press EXIT button to leave Mainly for network Date time and Language setting File manager web Browser External USB st...

Страница 20: ...press OK to confirm 2 Press EXIT button to return to previous menu or exit the menu Category selection Click to entry file explorer Function Item Description Exit Click to exit file manager Theme Clic...

Страница 21: ...or file Click to select storage Item Description New Click to add file or folder Search Click to search file or folder Refresh Click to refresh file status Cleaner Click to clean not necessary file Mo...

Страница 22: ...Press and hold to show the file management tool Item Description Copy Click to copy file Cut Click to cut file Delete Click to delete file Rename Click to rename file More Click to show more function...

Страница 23: ...Signage overview Content Management 1 Dashboard Information overview 2 Campaign Manager Edit schedule and manage playlist 3 Edit Presentation Edit play items 4 Group Manager Group player and player se...

Страница 24: ...on Go to Group Manager Go to Group Manager Go to Campaign Manager Refresh Home Select itself group Go to Edit Presentation Go to Campaign Manager 6 2 Campaign Manager Export campaign Import campaign G...

Страница 25: ...player A campaign contains several playlists One playlist contains several presentations and could be played at several time slots 1 Campaign Name Change campaign name 2 Playlist Edit this playlist go...

Страница 26: ...16 4 Rename Rename this playlist 5 Remove Remove this playlist 6 Time slot Edit this time slot 7 Remove time slot Remove this time slot...

Страница 27: ...17 8 Add time slot Add new time slot 9 Add new playlist Add the other playlist for this campaign...

Страница 28: ...Presentation Presentation list Go to Group Manager Go to Campaign Manager Go to Dashboard Go to Campaign Manager Preview 3 10 Save 3 11 Play 3 12 Edit area 1 Add presentation Add one presentation to t...

Страница 29: ...py this presentation 4 Remove presentation Remove this presentation from this playlist 5 Video Template Add 1 video only template Import Video Change Video Click Import to import video and then change...

Страница 30: ...20 6 Presentation Change duration If you have more than two presentations in the playlist you can change the playback duration for each presentation 7 Widget Template Add 3 widgets template...

Страница 31: ...ousel image and video PowerPoint RSS Webpage Click save after modify Carousel Import image or video Carousel change duration Duration only effect at image video would play to the end PowerPoint Import...

Страница 32: ...22 RSS Change color Web Page Set web page URL...

Страница 33: ...23 9 Image Text template Add ViewSonic QSR 34 fields template Image Zone Click the image area user can change image...

Страница 34: ...e Click the text area user can change text and text setting 10 Preview Click 5 Preview go to preview mode 11 Save Click 7 Save save the playlist and sync to other players 12 Play Click 9 Play go to pl...

Страница 35: ...nge Create Group 4 1 4 2 Device Setting Go to Campaign Manager Go to Dashboard Devices list Group Players Player in the same group play the same campaign content Player would check update every 2 minu...

Страница 36: ...Presentation 3 At Edit Presentation a Delete original presentation 3 4 b Add Widget Template 3 widgets template 3 7 c Use carousel at left zone Add some images and videos 3 8 1 d Use RSS at upper rig...

Страница 37: ...t input method To set Android keyboard AOSP The QR code leads to web site link for product upgrade or releated information To set on screen language To set Date and time Note Date time synchronizes wi...

Страница 38: ...28 7 1 Network Settings 1 Press button to select desktop menu option press OK to confirm 2 Press EXIT button to leave Wired network Display current net state Proxy setting IP settings...

Страница 39: ...etwork USB WiFi dongle Turn on off the WiFi Scanning Wi Fi signal Display of all the Wi Fi signal Connect via WPS Add new network Setting Portable WiFi hotspot Scanning Wi Fi direct device Enable disa...

Страница 40: ...30 7 2 System update 1 Press button to entry About and then select System update System update 2 Select System net update...

Страница 41: ...is the latest firmware version it will show Your System is up to date 4 If you have a new firmware in the OTA server folder it will automatically notify the user to upgrade The user will click OK to s...

Страница 42: ...32 5 Start to download firmware 6 Complete the download screen...

Страница 43: ...33 7 The user manually complete the OTA upgrade successful upgrade will automatically restart to retain the user s original data...

Страница 44: ...and phase Color temperature Select the color temperature Bluelight Filter Reduce the bluelight disturbance to sight protect sight health The Color temperature select User you can set the level of the...

Страница 45: ...tes 60 Minutes 90 Minutes 120 Minutes 180 Minutes 240 Minutes Lock Set Password Password settings The default password is 0000 and the super one is 2580 Float Menu Turn on off the float menu display S...

Страница 46: ...w buttons on the remote scroll to the right and select the Lock option 4 Press OK to enter Lock menu 5 When prompted enter use the remote to enter the password default standard user password is 0000 a...

Страница 47: ...7 9 After the copying of files have completed a Please remove the USB disk message will display At this point it is safe to remove the USB drive Playback of the copied content will automatically begin...

Страница 48: ...ata Please name your files in English Otherwise the file names can not be shown correctly Some USB device may not be compatible with this display USB multi media interface introduction File folder you...

Страница 49: ...laying Photo Support photo in JPG BMP or PNG format Previous photo Play pause Next photo Zoom in Zoom out Show information Notes You can also use Play Pause STOP Previous Next on the remote control to...

Страница 50: ...ay Next song Repeat mode select Repeat Mode repeat to play single music repeat to play all music files in current folder when it plays to the end no repeat when it plays to the end Notes For touch mod...

Страница 51: ...B Section repeat Playing settings Show information Show playlist A B repeat Trun the Section Replay to On then set starting point A and ending point B No repeat Turn the Section Replay to Off Skip to...

Страница 52: ...gressive JPEG 1024x768 None Interlace PNG 9600 x 6400 Interlace PNG 1200x800 BMP 9600 x 6400 Max File name length 128 letters Video File extension mpg mkv mov mp4 vob dat Codec Bitrate MPEG 1 bitrate...

Страница 53: ...ed Press MUTE again to cancel Audio noise Communication problems may occur if infrared communication equipment e g infrared cordless headphones is used near the display Move the infrared communication...

Страница 54: ...kg 149 91 lb Operating conditions Temperature 0 C to 40 C 32 F to 104 F Humidity 20 80 non condensing Storage conditions Temperature 20 C to 60 C 4 F to 140 F Humidity 10 90 non condensing Atmospheric...

Страница 55: ...onic com Latin America www viewsonic com la C http www viewsonic com la soporte servicio tecnico soporte viewsonic com Nexus Hightech Solutions Cincinnati 40 Desp 1 Col De los Deportes Mexico D F Tel...

Страница 56: ...uct d Causes external to the product such as electrical power fluctuations or failure e Use of supplies or parts not meeting ViewSonic s specifications f Normal wear and tear g Any other cause which d...

Страница 57: ...er by any other party 4 Repair or attempted repair by anyone not authorized by ViewSonic Effect of state law This warranty gives you specific legal rights and you may also have other rights which vary...

Страница 58: ...ct s serial number so please record the product information in the space provided below on your purchase for your future use Please retain your receipt of proof of purchase to support your warranty cl...

Страница 59: ...oluglobales com Cuernavaca Compusupport de Cuernavaca SA de CV Francisco Leyva 178 Col Miguel Hidalgo C P 62040 Cuernavaca Morelos Tel 01 777 3180579 01 777 3124014 E Mail aquevedo compusupportcva com...

Страница 60: ...50...

Отзывы: