ViewSonic DPG807BK-51P Скачать руководство пользователя страница 12

ViewSonic

6

DPG807BK-51P

english

Getting Started

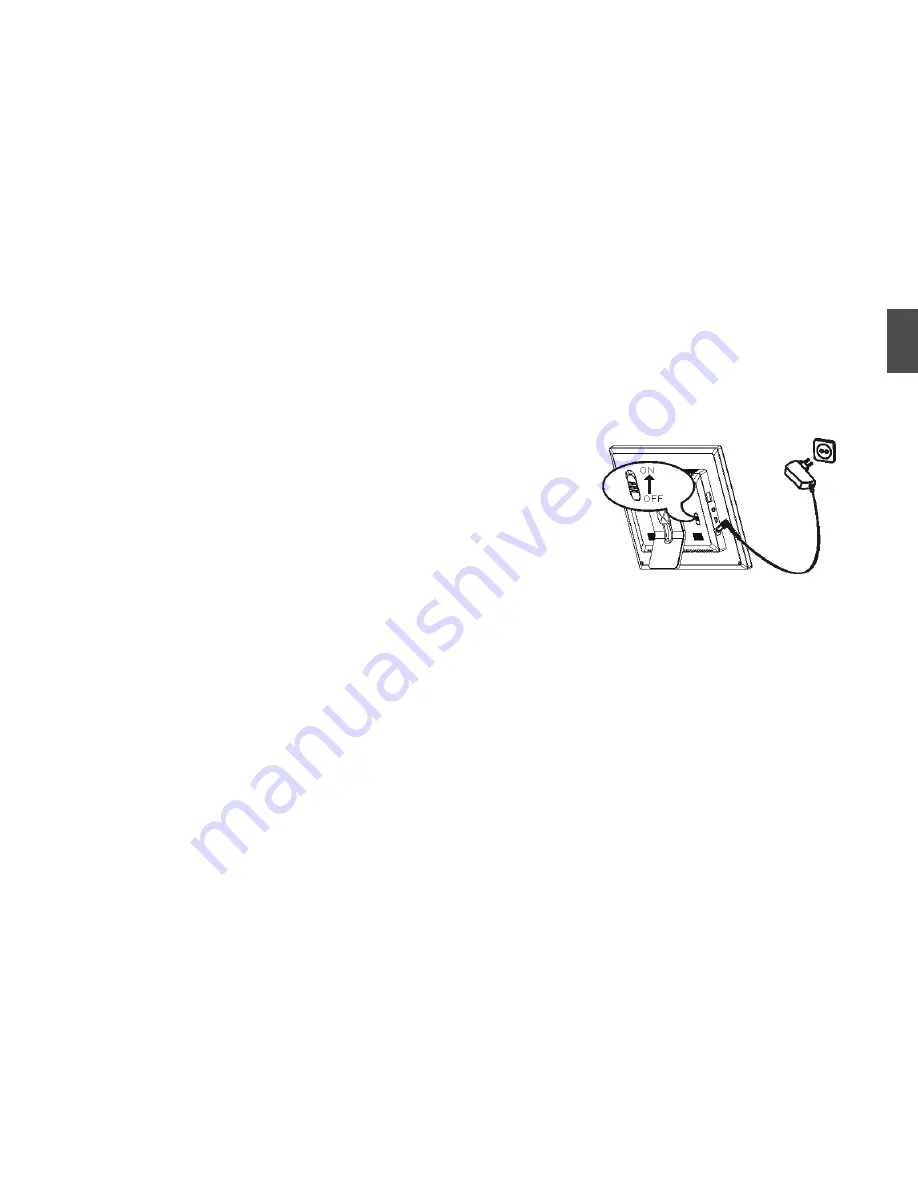
Connecting the power cable

1.   Fix the Photo Frame stand on the slot at the back of the unit so that it is 

stands up.

2.   Use the supplied power adapter to connect the digital photo frame to an 

electrical outlet.

3.  Slide the power switch on the back of the photo frame from OFF to ON.

Note: 

• 

 To turn off the power of the Digital Photo Frame completely, slide the power 
switch from ON to OFF.

Содержание DPG807BK-51P

Страница 1: ...DPG807BK 51P Digital Photo Frame Model No VS12289 User Guide Guide de l utilisateur Bedienungsanleitung Gu a del usuario Guida dell utente...

Страница 2: ...ect the power cord if the product will not be used for an extended period 11 Do not repair disassemble or modify the product Only qualified ViewSonic personnel can check and repair any damage to the m...

Страница 3: ...ber states The mark shown to the right is in compliance with the Waste Electrical and Electronic Equipment Directive 2002 96 EC WEEE The mark indicates the requirement NOT to dispose the equipment as...

Страница 4: ...0 1 Polybrominated biphenyls PBB 0 1 0 1 Polybrominated diphenyl ethers PBDE 0 1 0 1 Certain components of products as stated above are exempted under the Annex of the RoHS Directives as noted below E...

Страница 5: ...hange product specifications without notice Information in this document may change without notice No part of this document may be copied reproduced or transmitted by any means for any purpose without...

Страница 6: ...Copy files from computer 8 Viewing Photos 9 Main screen 9 Viewing thumbnails 11 Browsing a single picture 12 Running a slideshow 12 Using OSD menu 13 Listening to Music 14 Watching Videos 15 Managing...

Страница 7: ...to view digital photo directly from your camera s memory card This manual contains important safety instructions and correct operation information so please read all the information carefully before...

Страница 8: ...he Digital Photo Frame away from direct sunlight and heat source such as radiators or stoves Do not block the ventilation openings Slots and openings on the unit are provided for ventilation The openi...

Страница 9: ...clean the screen To clean the plastic casing use a soft dry cloth If it still is not clean apply a small amount of non ammonia non alcohol based mildly non abrasive detergent on a clean soft lint fre...

Страница 10: ...stantly plays MP3 music with built in speakers Digital photos slide show with MP3 music on the background Supports playback of MPEG 1 MPEG 4 and M JPEG Supports multiple repeat mode of music video pla...

Страница 11: ...M Touch to return to the main menu Touch and hold to display the OSD menu while playing photos or movies 10 Touch to return to the previous menu 11 Touch to move the cursor left or rotate the picture...

Страница 12: ...at the back of the unit so that it is stands up 2 Use the supplied power adapter to connect the digital photo frame to an electrical outlet 3 Slide the power switch on the back of the photo frame from...

Страница 13: ...the SD MMC MS XD card into the 4 in 1 card slot with the metallic contacts facing towards the display Insert the CF card into the CF card slot with the pinholes pointing towards the CF card slot open...

Страница 14: ...n identify the drivers in the order CF SD MMC XD MS Nand flash 3 Move the files on your computer to the built in memory or card inserted on the photo frame in the usual way drag and drop 4 Follow the...

Страница 15: ...res change frame settings or display the calendar 1 Press the M button to access the main screen All connected source setup and calendar icons are displayed USB driver Appears when you inserted a USB...

Страница 16: ...uched for 6 seconds in the main screen after inserting a memory source the slideshow will start automatically If several memory devices connect to the frame simultaneously the Digital Photo Frame will...

Страница 17: ...a time 1 Select a memory source e g USB SD MMC in the main screen and press the button The mode menu appears 2 Press the or to select Photo and press the button The pictures are displayed on the scree...

Страница 18: ...ess the or button 2 To return to the thumbnail view press the button 3 To start slide show from the current picture press the button 4 When you touch the touchpad while playing photos there are 2 inst...

Страница 19: ...resume slide show from the current picture highlight and press the button The icon is changed to icon To skip to previous picture highlight and press the button To skip to next picture highlight and p...

Страница 20: ...ic list and playback interface appears 3 Use the or button to select the desired track and press the button to play To pause playback press the button To resume playback press the button once again To...

Страница 21: ...t Movie and press the button The video list with a thumbnail video window appears 3 Press the or button to select a video file The corresponding video starts playback in thumbnail view 4 Press the but...

Страница 22: ...een and press the button The mode menu appears 2 Press the or button to select File and press the button The file list appears 3 Use the or button to navigate between files and folders When a file is...

Страница 23: ...emory source is displayed 4 Use the or button to select a memory device and press the button to select the destined directory 5 Press the button to start coping files Deleting files 1 Highlight a file...

Страница 24: ...or button and then press the button to confirm 4 Press the button to exit Settings menus Setting options Description Language Choose the on screen language Slideshow Time Specify how long each pictur...

Страница 25: ...contrast of TFT screen The available options include 3 2 1 0 1 2 3 TFT Saturation Adjust the saturation of TFT screen The available options include 3 2 1 0 1 2 3 Auto Power On Set the Digital Photo Fr...

Страница 26: ...ryday The Digital Photo Frame will turn on or off at the preset time everyday Once The Digital Photo Frame only turns on or off at the preset time once 4 Press the button to confirm Setting time You c...

Страница 27: ...d press the or button to adjust the time select the ring or select the schedule as below Off Disables the auto power on or off function Everyday The Digital Photo Frame will turn on or off at the pres...

Страница 28: ...1 Select the Calendar icon in the main screen and press the button The Calendar is displayed on the screen and all photos in the all memory source start slide show in thumbnail 2 To exit the Calendar...

Страница 29: ...nto the unit This Digital Photo Frame always reads the files in the USB device if USB device and a card are inserted simultaneously The file formats on your card might not be supported only JPEG pictu...

Страница 30: ...automatically turn on or turn off its display exactly at the Auto on or Auto off time If the time has already passed for the day it will start entering Auto on or Auto off status at the specified time...

Страница 31: ...Host 2 0 USB device 2 0 Supports USB flash media Supported peripheral devices SD Secure Digital Card MMC MultiMedia Card MS Memory Stick XD memory card CF Compact Flash Supported photo format JPEG Max...

Страница 32: ...niceurope com 359 2 817 3650 Czech Republic www viewsoniceurope com 420 22012 1432 Denmark www viewsoniceurope com dk 35 25 65 12 Estonia www viewsoniceurope com 372 651 9972 Finland www viewsoniceuro...

Страница 33: ...www viewsoniceurope com 21359 1423 Slovak Republic www viewsoniceurope com 421 244 648 151 Slovenia www viewsoniceurope com 386 839 4617 Russia www viewsoniceurope com ru 095 7258 106 Spain www views...

Страница 34: ...nauthorized product modification or failure to follow instructions supplied with the product b Repair or attempted repair by anyone not authorized by ViewSonic c Causes external to the product such as...

Страница 35: ...f the product ViewSonic shall not be liable for 1 Damage to other property caused by any defects in the product damages based upon inconvenience loss of use of the product loss of time loss of profits...

Страница 36: ......

Отзывы: