background image

   OPERATION AND FUNCTIONS 

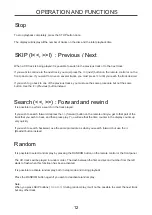
Stop

To stop playback completely, press the STOP button once.

The display will display 

all

 the number of tracks on the disc and the total playback time.

SKIP

 (

I

<<, >>I)  : Previous / Next

When a CD track is being played it is possible to switch to the previous track or to the next track. 

If you want to continue to the next track, you must press the >>I (next) button on the remote control or on the 
front panel once. If you want to move on several tracks, you must press >>I until you reach the track desired.

If you wish to go back to one of the previous tracks, you must use the same procedure but not the same 
button. Use the I<< (Previous) button instead.

1

2

Search (<<, >>) : 

Forward and rewind

It is possible to perform a search in the track played.

If you wish to search forward, depress the >> (forward) button on the remote until you get to that part of the 
track that you wish to hear, and then press play. You will see that the time counter in the display counts up 
very quickly. 

If you wish to search backward, use the same procedure as when you search forward, but use the << 
(Rewind) button instead.

Random

It is possible to select random play by pressing the RANDOM button on the remote control or the front panel.

The CD tracks will be played in random order. The dash between the first and second number from the left 
starts to flash when this functiopn has been activated.

It is possible to activate random play both in stop mode and during playback.

Press the RANDOM button again if you wish to deactivate random play.

Note:
When you press 

SKIP


buttons

 ( I<< or >>I ) during random play, it will not be possible to select the next track 

but any other track.

Содержание HCD30

Страница 1: ......

Страница 2: ......

Страница 3: ...mación importante 04 OPERACIÓN Y FUNCIONES CONEXIÓN ELÉCTRICA ON OFF y Standby 11 Cargar un disco 11 REPRODUCCIÓN PAUSA 11 Conexión eléctrica 05 Stop parar Skip saltar Search buscar Random modo aleatorio 12 MANDO A DISTANCIA RESOLUCIÓN DE PROBLEMAS Inserción de las pilas 06 Cómo usar el mando a distancia 06 Resolución de problemas 13 Funciones del mando a distancia 07 FICHA TÉCNICA CONEXIONES DEL ...

Страница 4: ...al anterior o que éste haya sido recomendado por el fabricante PARA EVITAR DESCARGAS ELÉCTRICAS ES IMPORTANTE QUE INTRODUZCA CORRECTAMENTE EL ENCHUFE EN LA TOMA 03 PRECAUCIONES DE SEGURIDAD Un triángulo con el símbolo del rayo avisa al usuario de que el voltaje peligroso sin aislamiento de la carcasa supone un riesgo de descarga eléctrica Un triángulo con el símbolo de exclamación aconseja al usua...

Страница 5: ...rtes del interior y puede causar daños o lesiones No abra la carcasa No coloque cuerpos extraños en la unidad Interferencia Colocar la unidad cerca de un televisor radio o vídeo puede causar una mala calidad de sonido e imagen Si esto ocurre aleje la unidad del televisor radio o vídeo Condensación Se puede producir condensación en los siguientes casos Cuando se traslada la unidad desde un lugar fr...

Страница 6: ...oma apropiada Si va a usar la unidad en el extranjero quizás necesite un adaptador 05 CONEXIÓN ELÉCTRICA 220 240VCA 50HZ No conecte la unidad a la red eléctrica hasta que las conexiones hayan sido correctamente realizadas Compruebe que todas las conexiones se han realizado correctamente antes de encender el equipo Compruebe que el voltaje eléctrico es 220 240V CA 50Hz antes de encender el equipo ...

Страница 7: ... A DISTANCIA Inserción de las pilas 1 Retire la tapa conforme aparece en el dibujo 3 Retire la tapa 2 Coloque dos pilas del tipo AAA R03 UM4 en el compartimento de pilas Asegúrese de que la orientación de las mismas es la adecuada véase la imagen debajo No mezcle pilas nuevas y usadas ni de diferente tipo Si el mando a distancia no se utiliza durante un periodo prolongado retire las pilas para evi...

Страница 8: ...Repetición Repite una pista o todas las del CD 6 Random Modo aleatorio Reproduce las pistas del CD de modo aleatorio 7 Selector USB CD Para reproducir CD o USB posición opuesta 8 PLAY PAUSE Reproducción pausa Se inicia la reproducción pulsando una vez y se interrumpe pulsando 2 veces 9 Eject Botón de expulsión Abre y cierra la bandeja del disco en HCD30B 10 Puerto USB Introduzca USB para reproducc...

Страница 9: ......

Страница 10: ...e el voltaje corresponde con el indicado en el texto situado en el panel trasero de la carcasa Explicaciones sobre el visor VFD Esta unidad no cuenta con la función OSD Información en pantalla Sin embargo cuenta con un sistema de información VFD más descriptivo que visualiza toda la información solicitada Debajo podrá ver una imagen del visor y la explicación de los diferentes símbolos 09 CONEXION...

Страница 11: ...audio Esta página sólo contiene indicaciones de conexión de su HCD30B Observe que los accesorios de las imágenes de esta página no se proporcionan al adquirir la unidad 10 CONEXIÓN CON AMPLIFICADOR Receptor amplificador analógicos ...

Страница 12: ...al mínimo para garantizar que la unidad usa la mínima cantidad de energía En el modo standby la unidad sólo puede ser activada mediante los botones de ENTRADA CD USB DVD SINTONIZADOR AUX AUDIO ENTRADA DE LÍNEA en el mando a distancia 3 4 Proteja el medioambiente desconectando la unidad después de usarla Cargar un disco Si quiere reproducir un disco tiene que cargarlo Para ello pulse el botón de ex...

Страница 13: ...anzar en el mando a distancia hasta que llegue a la parte de la pista que desea escuchar y posteriormente pulse play reproducir Verá que el contador del visor avanza con mucha rapidez Si desea realizar la búsqueda hacia atrás use el mismo procedimiento que para la búsqueda hacia delante pero emplee el botón retroceder en su lugar Modo aleatorio Podrá seleccionar la reproducción aleatoria pulsando ...

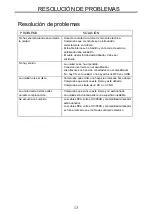
Страница 14: ...sido conectados con el amplificador No hay CD en la unidad o no hay archivos MP3 en el USB La unidad no lee el disco Compruebe que el disco no haya sido colocado boca abajo Compruebe que el disco esté limpio y esté dañado Compruebe si se trata de un CD o un CD R La unidad salta ciertas partes durante la reproducción Compruebe que el disco esté limpio y no está dañado La unidad está colocada sobre ...

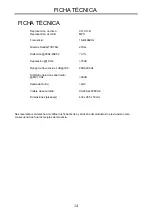
Страница 15: ... 1 KHz 70dB Rango de frecuencias 1dB 1KHz 20Hz 20KHz S N Ratio relación señal ruido 8Ω 1 KHz 90dB Salida de Ruido 2mV Voltaje de suministro CA220 240V50HZ Dimensiones alxanxpr 430 x 285 x 50 mm Nos reservamos el derecho a modificar los ficha técnica y el diseño del producto sin previo aviso como consecuencia de futuras mejoras del producto 14 FICHA TÉCNICA ...

Страница 16: ......

Страница 17: ......

Страница 18: ...batteries 06 Using the remote control 06 Remote control functions 07 FRONT PANEL CONNECTIONS Front panel 08 BACK PANEL CONNECTIONS Connections 09 Explanation of LCD Display 09 CONNECTION WITH AMPLIFIER Audio connection layout 10 OPERATION AND FUNCTIONS ON OFF and Standby 11 Load a disc 11 Play Pause 11 Stop Skip Search Random 12 TROUBLESHOOTING Troubleshooting 13 TECHNICAL DATA Technical data 14 0...

Страница 19: ...t the new plug has been recommended by the manufacturer A triangle with a lightning symbol draws the user s attention to dangerous voltage without insulation in the cabinet which may be high enough to entail a risk of electric shock A triangle with an exclamation mark draws the user s attention to important instructions for use and maintenance in the accompanying manual which should be studied TO ...

Страница 20: ...unit Touching the internal parts is dangerous and may cause injury or damage Do not open the cabinet Do not place any foreign matter in the unit Interference Placing the unit near a television set radio or video player may cause poor picture and sound quality In that case move the unit further away from the television set radio or video player Condensation Condensation may occur in the following c...

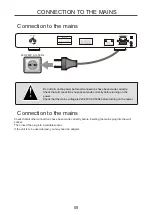
Страница 21: ...he mains voltage is 220 240V AC50Hz before turning on the power Connection to the mains Check that all other connections have been made correctly before inserting the mains plug into the wall socket Then insert the plug into a suitable socket If the unit is to be used abroad you may need an adapter CONNECTION TO THE MAINS 220 240V AC 50Hz Stereo Output AC INPUT USE ONLY WITH 250V FUSE HCD30B ...

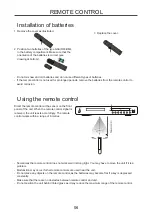
Страница 22: ...ote control Direct the remote control at the sensor on the front panel of the unit When the remote control signal is received the unit reacts accordingly The remote control works within a range of 6 metres Sometimes the remote control does not work well in strong light You may have to move the unit if it is a problem Malfunction may occur if other remote controls are used near the unit Do not plac...

Страница 23: ......

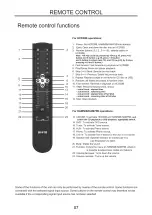
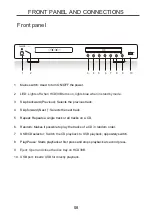
Страница 24: ...tracks on a CD 6 Random Makes it possible to play the tracks of a CD in random order 7 USB CD selector oppositely switch 8 Play Pause Starts playback at first press and stops playback at second press Lights off when HCD30B turns on lights blue when in standby mode Switch the CD playback to USB playback 9 Eject Open and close the disc tray on HCD30B 10 USB port Inserts USB for directly playback 08 ...

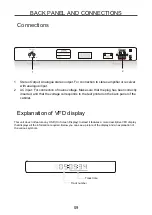
Страница 25: ...ns voltage Make sure that the plug has been correctly inserted and that the voltage corresponds to the text printed on the back panel of the cabinet Explanation of VFD display This unit does not feature any OSD On Screen Display Instead it features a more descriptive VFD display that displays all the information required Below you can see a picture of the display and an explanation of the various ...

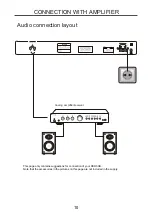
Страница 26: ...USE HCD30B CONNECTION WITH AMPLIFIER Audio connection layout Analog amplifier receiver This page only contains suggestions for connection of your HCD30B Note that the accessories in the pictures on this page are not included in the supply 10 L R ...

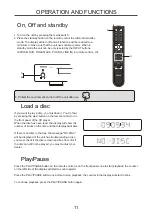
Страница 27: ... that by pressing the eject button on the remote control or on the front panel of the CD player When the disc has been read the display will show the number of tracks on the disc and the total playback time If there is not disc in the tray the message NO DISC will be displayed If the unit has trouble reading a disc you must check if the disc is clean and free from dirt If the disc can still not be...

Страница 28: ...earch in the track played If you wish to search forward depress the forward button on the remote until you get to that part of the track that you wish to hear and then press play You will see that the time counter in the display counts up very quickly If you wish to search backward use the same procedure as when you search forward but use the Rewind button instead Random It is possible to select r...

Страница 29: ...er cord has been damaged and must be replaced The unit has not been turned on Incorrect connection to the amplifier No loudspeakers have been connected to the amplifier No CD in the unit or no MP3 files in the USB Check if the disc has been turned upside down Check if the disc is clean and undamaged Check if it is a CD or a CD R Check if the disc is clean and undamaged The unit is positioned on an...

Страница 30: ...uency range 1dB 1KHz 20Hz 20KHz S N Ratio 8Ω 1KHz 90dB Nose Output 2mV Mains Voltage AC 220 240V 50Hz Dimensions WxDxH 430 x 285 x 50 mm Net Weight 4 1 kg We reserve the right to change the technical data and the design of the product without notice as a result of further development 14 Supplied Accessories 1 User manual 2 Mains Lead 3 Remote Control 4 1pcs 2 RCA cable ...

Страница 31: ......

Страница 32: ......

Страница 33: ...Bitte lesen Sie die Bedienungsanleitung vor der ersten Benutzung des Produktes und heben Sie sie für zukünftige Fragen gut auf VH CD030 Bedienungsanleitung ...

Страница 34: ......

Страница 35: ...en der Fernbedienung 8 9 VORDERSEITE UND ANSCHLÜSSE 10 RÜCKWAND UND ANSCHLÜSSE Anschlüsse 11 Erläuterung der VFD Anzeige 11 ANSCHLUSS AN VERSTӒRKER Layout des Audio Anschlusses 12 BEDIENUNG UND FUNKTIONEN AN AUS und Standby 13 Eine DVD laden 13 Play Pause 13 Stop Skip Überspringen Suchen Zufallswiedergabe 14 FEHLERBEHEBUNG 15 TECHNISCHE DATEN 16 ...

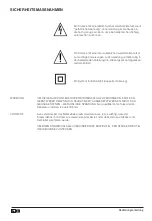
Страница 36: ...sen werden sollten Ein Symbol für KLASSE II doppelte Isolierung WARNUNG UM DIE GEFAHR VON FEUER ODER STROMSCHLAG ZU VERRINGERN DARF DAS GERÄT WEDER REGEN NOCH FEUCHTIGKEIT AUSGESETZT WERDEN NICHT DAS GEHÄUSE ÖFFNEN GEFӒHRLICHE SPANNUNG Nur qualifizierte Techniker dürfen Reparatur und Service durchführen VORSICHT wenn der Stecker des Netzkabels ersetzt werden muss ist es wichtig dass der Ersatz ide...

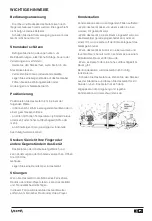
Страница 37: ...Gerät Das Berühren der Innenteile ist gefährlich und kann Verletzungen oder Schäden verursachen Öffnen Sie nicht das Gehäuse Legen Sie keine Fremdkörper in das Gerät Kondensation Kondensation kann in den folgenden Fällen auftreten Wenn das Gerät direkt von einem kalten in einen warmen Ort gebracht wird Wenn das Gerät in einem Raum eingesetzt wird wo die Heizkörper gerade eingeschaltet sind oder an...

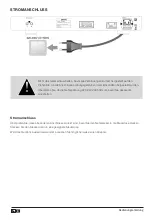
Страница 38: ...den Stecker dann in eine geeignete Steckdose Wird das Gerät im Ausland verwendet brauchen Sie möglicherweise einen Adapter Nicht das Gerät einzuschalten bevor alle Verbindungen korrekt hergestellt wurden Prüfen Sie ob alle Anschlüsse ordnungsgemäß vor dem Einschalten hergestellt wurden Überprüfen Sie ob die Netzspannung 220 240V AC50Hz ist bevor Sie das Gerät einschalten ...

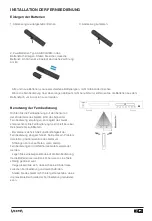
Страница 39: ...6 Metern Bei starkem Licht ist die Funktionsfӓhigkeit der Fernbedienung einsgeschrӓnkt Sollte dies ein Problem darstellen positionieren Sie das Gerӓt um Störungen kӧnnen auftreten wenn andere Fernbedienungen in der Nähe des Geräts verwendet werden Legen Sie keine Gegenstände auf die Fernbedienung da die Batterien leer werden können wenn eine Taste ständig gedrückt wird Vergewissern Sie sich dass s...

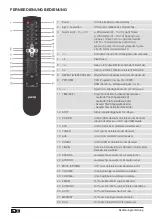
Страница 40: ... Titel Abgespielte Zeit Laufender Titel Verbleibende Zeit Gesamt Titel Abgespielte Zeit der Gesamt Titel Verbleibende Zeit der 12 STOP Stoppt die Wiedergabe im CD Player 13 CD USB Um CD USB Quelle im Verstӓrker oder Receiver wiederholt drücken um CD oder USB Quelle 14 DVD Um DVD Quelle im Verstӓrker oder Receiver 15 TUNER Um Tuner im Verstӓrker oder Receiver 16 AUX Um AUX im Verstӓrker oder Receiv...

Страница 41: ...e vorwärts im Tuner Start und Wiedergabe anhalten CD und die nächste Voreinstellung im Tuner und die letzte Voreinstellung im Tuner CD oder des USB Sticks Programmiert Titel einer CD in einer bestimmten Reihenfolge VH CD030 Alle Titel werden in zufӓlliger Reihenfolge abgespielt manuelles Rückwӓrts Tuning im Tuner bei CD Disk gesamten CD gesamten CD auszuwӓhlen Hinweis Bei VH CD030 zu wechseln ausz...

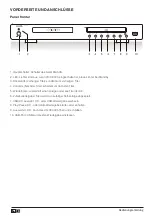
Страница 42: ...um vorherigen Titel 4 Vorwärts Nächster Titel schaltet zum nächsten Titel 5 Wiederholen wiederholt einen einzigen oder alle Titel der CD 6 Zufallswiedergabe Titel werden in zufälliger Reihenfolge abgespielt 7 USB CD Auswahl CD oder USB Wiedergabe wechseln 8 Play Pause CD oder USB Wiedergabe starten oder anhalten 9 Auswerfen CD Fach des VH CD030 öffnen und schließen 10 USB Port USB zur direkten Wie...

Страница 43: ... Stecker richtig eingesteckt wurde und dass die Spannung mit dem Text auf der Gehӓuse Rückseite übereinstimmt Anschluss mit Verstӓrker oder Receiver mit optischem Eingang Das Gerӓt verfügt nicht über OSD On Screen Display Stattdessen verfügt über ein mehr beschreibendes VFD Display das alle erforderlichen Informationen anzeigt Unten sehen Sie ein Bild von dem Display und eine Erklärung der verschi...

Страница 44: ...VERSTӒRKER Layout Audio Anschluss Diese Seite enthält nur Vorschläge für den Anschluss Ihres VH CD030 Beachten Sie dass das Zubehör in den Bildern auf dieser Seite nicht im Lieferumfang enthalten ist VH CD030 Analoger Verstärker Receiver ...

Страница 45: ...l auf der CD und die gesamte Wiedergabezeit an Wenn sich keine Disk im CD Fach befindet erscheint die Meldung NO DISC Wenn das Gerät Probleme mit dem Lesen einer Disk hat müssen Sie überprüfen ob die Disk sauber und frei von Schmutz ist Wenn sich die CD immer noch nicht abspielen lässt wenden Sie sich an Ihren Fachhändler Drücken Sie die PLAY PAUSE Taste auf der Fernbedienung oder auf der Vorderse...

Страница 46: ...n Sie nach vorne suchen möchten drücken Sie die vorwärts Taste auf der Fernbedienung bis Sie zu diesem Teil des Titels kommen die Sie hören möchten und dann auf Play drücken Sie werden sehen dass der Zeitzähler in dem Display sehr schnell zählt Wenn Sie rückwärts suchen wollen verwenden Sie das gleiche Verfahren wie beim Vorwärtssuchen aber verwenden Sie die Taste Rücklauf stattdessen Zufallswiede...

Страница 47: ...autsprecher an den Verstärker angeschlossen Keine Disk im CD Fach Das Gerät liest die CD nicht Überprüfen Sie ob die Disk umgedreht eingelegt wurde Überprüfen Sie ob die Disk sauber und unbeschädigt ist Prüfen Sie ob es sich um eine CD CD R oder MP3 Audio CD handelt Das Gerät überspringt einige Teile Überprüfen Sie ob die Disk sauber und während der Wiedergabe unbeschädigt ist Das Gerät ist auf ei...

Страница 48: ...s Design des Produkts ohne Ankündigung als Folge der Weiterentwicklung zu ändern Technische Daten Disk Wiedergabe CD CD R USB Wiedergabe MP3 Frequenzgang 16 Bit 96KHz Ausgangslevel TCD784 2Vrms Klirrfaktor 20Hz 20kHz 0 1 Trennung 1KHz 70dB Frequenzbereich 1dB 1KHz 20Hz 20KHz S N Verhältnis 8Ω 1KHz 90dB Geräusch Ausgang 2mV Spannung AC 220 240V 50Hz Abmessungen BxHxT 430 x 285 x 50 mm Gewicht 4 1 k...

Страница 49: ......

Страница 50: ...www vieta es ...

Отзывы: