background image

Call Recorder VoIP Manual EN © 2015 Vidicode® 

25

5.3.2

5.3.2

5.3.2

5.3.2


The 

The 

The 

The Search

Search

Search

Search button

 button

 button

 button    


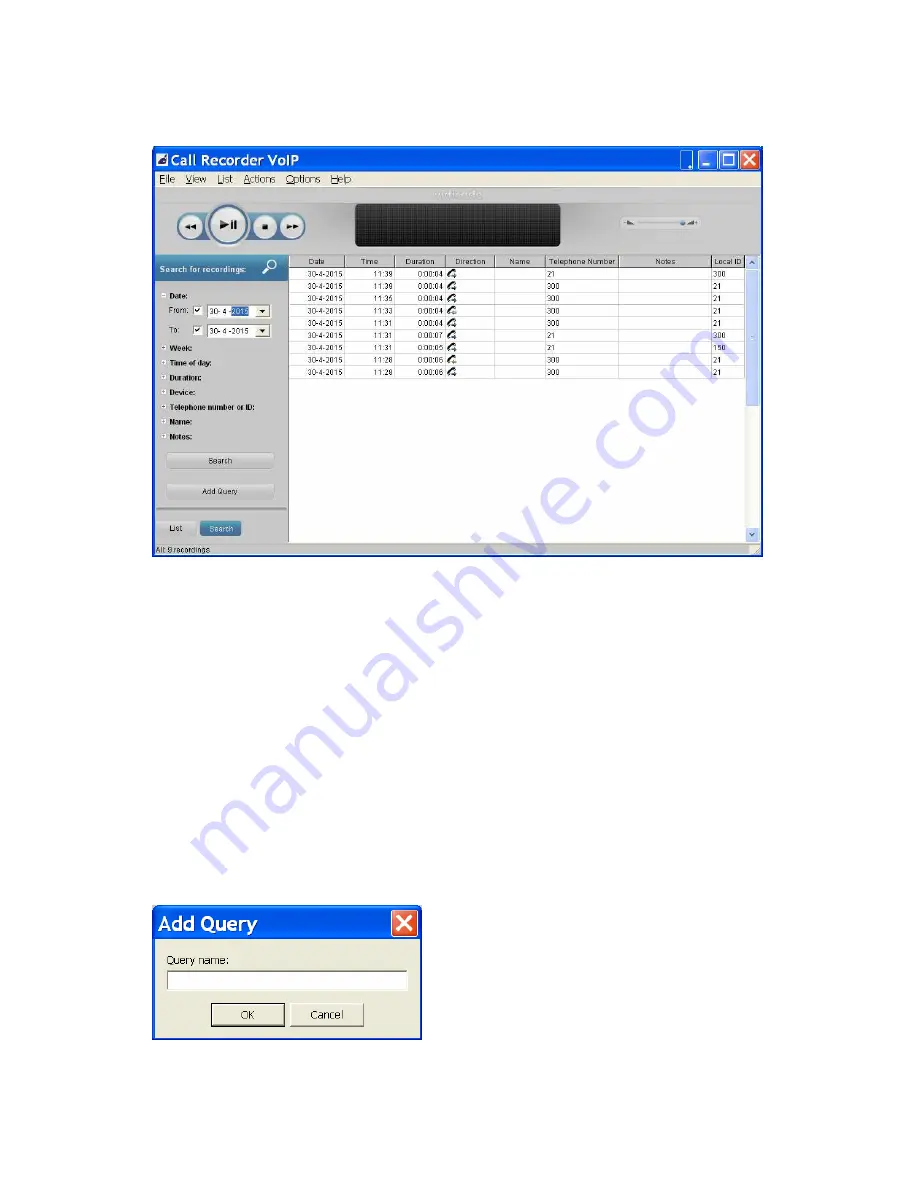
In  the  Search  tab,  you  can  define  a  Search.  A  Query  based  on  a 
recording's  date,  week,  time  of  day,  duration,  device,  telephone 
number, name or notes. 


Click  on  the  +

+

+

+  in  front  of  the  properties  you  want  to 

use in your query (one or more) and fill in the range or 
name, then click S

SS

Search

earch

earch

earch.  


Save a query

Save a query

Save a query

Save a query    

It is possible to save a custom query for regular execution. After clicking 
on  the  Search  button,  the  Add  Query  button  will  appear.  You  can 
specify a name for the query. 


Содержание CR-VoIP

Страница 1: ...Call Recorder VoIP Manual EN 2015 Vidicode 1 Call Recorder Call Recorder Call Recorder Call Recorder VoIP VoIP VoIP VoIP Manual Manual Manual Manual v1 v1 v1 v1 2 2 2 2 VC2077 VC2077 VC2077 VC2077 ...

Страница 2: ...2 1 Recording 8 3 2 2 Licensing 10 3 2 3 Playback 11 3 2 4 Data storage 12 3 2 5 Start Exit 13 3 2 6 Security 14 3 2 7 Display 15 4 Playback control 16 4 1 Hotkeys 16 5 Layout of the software 17 5 1 Main Menu 17 5 1 1 File 17 5 1 2 View 18 5 1 3 List 18 5 1 4 The Recycle Bin 19 5 1 5 Actions 20 5 2 Names en Notes 23 5 3 List and Search buttons 24 5 3 1 The List button 24 5 3 2 The Search button 25...

Страница 3: ...Call Recorder VoIP Manual EN 2015 Vidicode 3 7 Acknowledgements 28 7 1 Privacy 28 7 2 Liability 28 INDEX 29 ...

Страница 4: ...during recording but it is still needed during the installation of the software The program stores recordings in a versatile database called the archive This archive is displayed on your computer screen as a list of recordings In the list the recorded meta data like date and time of the recording is stored with the actual recording and can be viewed in the archive Pre defined queries for time inte...

Страница 5: ...nstallation USB USB USB USB PC PC PC PC LA N LA N LA N LA N PH ON E PH ON E PH ON E PH ON E vidicode vidicode vidicode vidicode Call Recorder VoIP Call Recorder VoIP Call Recorder VoIP Call Recorder VoIP PC LAN A B C D A A A A Connect the LAN cable coming from the Telephone to the CR VoIP port marked Phone B B B B Connect the LAN cable coming from the PC to the CR VoIP port marked PC C C C C Conne...

Страница 6: ...eferred language for the installation Confirm the location where the software will be installed Specify a location for the database files Select whether you want a desktop icon for the application NOTE 1 NOTE 1 NOTE 1 NOTE 1 Software installation is only possible when the CR VoIP unit is connected to a USB port on the same PC NOTE NOTE NOTE NOTE 2 2 2 2 A separate installation of the WinPcap drive...

Страница 7: ...uage of the user interface Add one or more recorder channel licenses Enter the IP address es of your local phone s NOTE NOTE NOTE NOTE You need to enter at least one recorder channel license key before the software is able to record your calls see Setup Licensing All options are further explained in the next chapter ...

Страница 8: ...ions menu 3 1 Language The Call Recorder VoIP software supports a number of languages and it is possible to change the used language at any moment Select your language and click 3 2 Setup 3 2 1 3 2 1 3 2 1 3 2 1 Recording Recording Recording Recording ...

Страница 9: ...ote2 Note2 Note2 Note2 This IP address is not used as a filter Avaya Avaya Avaya Avaya This option enables support for the special Avaya IP Office H 323 protocol Minimum Duration Minimum Duration Minimum Duration Minimum Duration Minimum Duration refers to the minimum duration of a recording for it to be stored Standard setting would be 5 seconds Recordings shorter than the set Minimum duration wi...

Страница 10: ...urrent recording channels is determined by the available license keys up to a maximum of 4 channels At least 1 license key has to be entered otherwise no call recording is done To be able to move the license from one PC to another the license needs to be deactivated first on the original PC Click the Deactivate Deactivate Deactivate Deactivate button to remove a license Use the original license co...

Страница 11: ... of recording can be selected from the list In most cases the sound card of the computer is used for playback Channel Channel Channel Channel Also the channel of the Playback device must be selected For the channel selection of the soundcard usually the Wave or PC Speakers channel must be selected Volume Volume Volume Volume The default used playback volume level can be changed here ...

Страница 12: ...the Browse button to select an existing directory Automatic re Automatic re Automatic re Automatic removal on program exit moval on program exit moval on program exit moval on program exit When this option is enabled and the calls are as old as the entered number of days or older then the recorder files are deleted permanently from the archive For example if the number of days is set to 1 it means...

Страница 13: ...ay acti Stay acti Stay active in system tray when main Window is closed ve in system tray when main Window is closed ve in system tray when main Window is closed ve in system tray when main Window is closed When this option is on the application will move to the system tray and continue to record calls when the main window is closed To completely close the software right click on the system tray i...

Страница 14: ...of recordings and settings of the program can be protected separately Check the item you want to protect Enter the password Click Apply to save the password Upon deleting a recording or entering the settings the user will be prompted to enter the password Once entered during a session the password remains active for about 10 minutes If you want to reactivate the password immediately you have to re...

Страница 15: ... the Call Recorder VoIP are stored in a database The setting Visible Columns allows you to select which columns are displayed The option Auto size columns can be checked if you want the columns in the list view to adjust to the screen size automatically NOTE NOTE NOTE NOTE Always click Apply after changing one or more settings ...

Страница 16: ... recording C C C C Stop Stop Stop Stop the playback or recording D D D D Moves the playback position forward forward forward forward Keep the button pressed to increase the speed E E E E Information Information Information Information about the current playback or recording is displayed here Click on the progress bar to move to a specific position in the playback F F F F Controls the playback volu...

Страница 17: ...remaining area 5 1 Main Menu The main Menu gives access to the sub menu s File View List Actions Options and Help In this chapter we will explain these menu options 5 1 1 5 1 1 5 1 1 5 1 1 File File File File The menu item File has three options New Open and Exit New New New New will start a new call archive This means that a new database is created in which newly made recordings will be stored A ...

Страница 18: ... lower right corner of the screen All applications running in the background are visible there as an icon To retrieve the application from the system tray just click on the icon 5 1 3 5 1 3 5 1 3 5 1 3 List List List List Recordings are saved to a database In the software this database is referred to as Archive and is shown as a list in the main screen The List menu has the same options as the Lis...

Страница 19: ...e Delete key on your keyboard or Right click and choose Delete In both cases a dialogue opens asking you to confirm the deleting Use the SHIFT Delete keys to permanently delete a recording without moving it to the recycle bin first The deleted recordings end up in the Recycle Bin They are still in an archive To Permanently delete the recordings Press View Recycle Bin Select the recordings you want...

Страница 20: ...e 5 1 5 5 1 5 5 1 5 5 1 5 Action Action Action Actions s s s In the Actions tab you can Back up the recordings to CD Import an previously made back up Export recordings as audio E mail recordings and view Sub archives To To To To CD CD CD CD This function is used to back up or export an entire database or a selection of recordings on CD Note Note Note Note that you need to use a separate CD writin...

Страница 21: ...the PC or on the network Adjust the maximum size if needed Click OK If you back up more data than the maximum size multiple directories will be created as needed for multiple CD s Import Import Import Import Will also open a dialogue in which you can select the directory from which you want to import a back up Select the database and click OK to import it Export Export Export Export Individual rec...

Страница 22: ...ng N is the name associated with the recording P is the telephone number of the recording is the direction of the call C are the notes related to the recording Press OK to execute the export E E E E mail mail mail mail It is possible to send a single or a selection of recordings using e mail First select the recording you want to send by e mail There are two ways to start an e mail Open the Action...

Страница 23: ...e Current Archive To define which Sub Archives you want to access Select Add and browse to the location of the Sub Archive Choose whether you want to copy the recordings manually click Copy new recordings from Sub Archive or automatically check Auto Copy To delete a Sub Archive Select Delete New recordings will no longer be copied from the deleted Sub Archive Previously copied recordings stay in t...

Страница 24: ... Notes field The telephone number cannot be edited Click OK OK OK OK to save the name and notes 5 3 List and Search buttons 5 3 1 5 3 1 5 3 1 5 3 1 The List button The List button The List button The List button The List button displays the List view To the left are the buttons with which a selection for the view can be made To the right the main screen displays the selection from current archive ...

Страница 25: ...me of day duration device telephone number name or notes Click on the in front of the properties you want to use in your query one or more and fill in the range or name then click S S S Search earch earch earch Save a query Save a query Save a query Save a query It is possible to save a custom query for regular execution After clicking on the Search button the Add Query button will appear You can ...

Страница 26: ...query will be saved with the entered name and a shortcut to the saved query will be added to the List tab To run the query select on the button in the List tab Naturally new recordings that satisfy the query will be included when the query is executed ...

Страница 27: ...ate Check for Update Check for Update In the pop up windows click Check Check Check Check for for for for Update Update Update Update In the case of an available update a short list of fixes of the last version is displayed Press Download Download Download Download to start downloading the update When downloading has finished the new version will be installed automatically NOTE NOTE NOTE NOTE The ...

Страница 28: ...es concerning the use of any Call Recorder Vidicode is not a source of official interpretation of laws of any country or state and shall not be construed as a source for making decisions whether to provide notification or not Vidicode assumes no liability regarding incorrect notification of call recording 7 2 Liability Correct functioning of the Call Recorder VoIP can not be guaranteed under all c...

Страница 29: ...0 23 E E E E E E E E mail mail mail mail 22 Export Export Export Export 20 21 G G G G Getting started 5 I I I I Import Import Import Import 20 21 Internet 27 Introduction 4 L L L L Layout 17 Liability 28 P P P P password 14 Playback 11 Privacy 28 protect 14 R R R R Recycle Bin 19 S S S S Search 25 Security 15 sort 19 ...

Отзывы:

Похожие инструкции для CR-VoIP