2/ENG
Memory Board for 6200 Series
The memory board has 4 management buttons plus one warning LED.
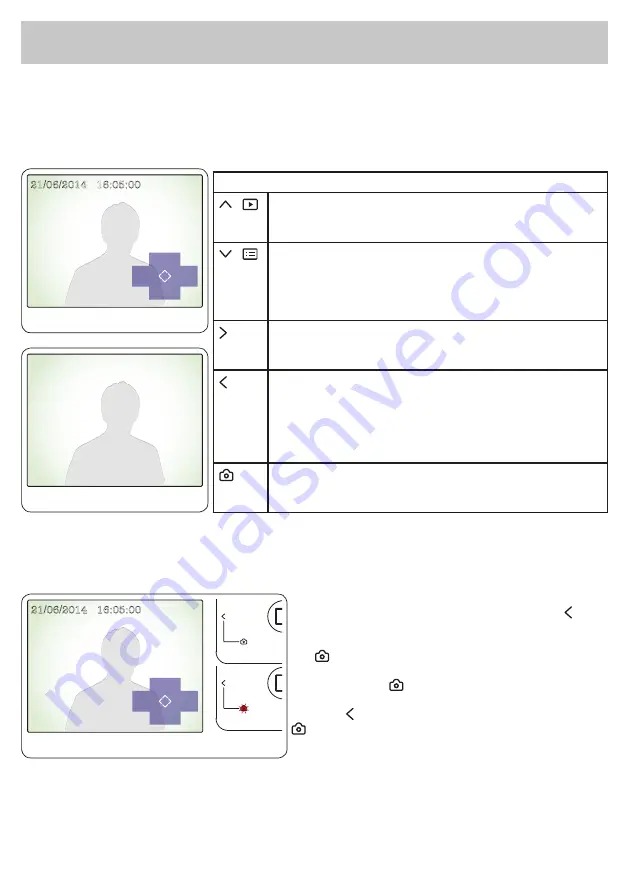
When the videophone switches on (answering a call or camera recall), you will see the picture shown in figure 1:
The video on the background plus the date & time and the function buttons as OSD, the OSD information will
disappear in after some seconds as shown in figure 2. From the status shown in figure 2 (monitor turned on
without OSD), to enable any function first press one of the buttons the press the button corresponding to the
function required according to the OSD informations (figure 1).
Standard Functions
Recorded pictures browse button. Press it to browse the re-
corded pictures. The function is available also when the vide-
ophone is in stand-by.
Screen adjustments and Date & Time menu button. Press it
to enter in a menu that allows to adjust the monitor bright-
ness, contrast and colour and allows to set the current date
and time. The function is available also when the videophone
is in stand-by.
Take a picture button. Press it to record a picture of the cur-
rently shown video during a conversation or while the vide-
ophone is ringing.
Automatic photo function button. Press it to enable the function
(the relevant LED turns ON) or press it again (the relevant LED
turns OFF) to disable the function. When the function is ena-
bled, the videophone records a picture each time it is turned
ON because of a call or because of a camera recall. The func-
tion is available also when the videophone is in stand-by.
Automatic photo function status LED. If the LED is ON the
function is enabled. When the LED flashes, it warns that there
is a new picture stored in the videophone memory.
The function of the buttons is contextual to the active menu, the LED shows the status of the function “automatic
photo” (illuminated = ON, not illuminated = OFF) and warns about new photos recorded when it flashes. The
warning for the new photos stops when you browse the recorded photos and the LED returns to show the status
of the function “automatic photo”.
To set the recording type
From the status shown in figure 3, press the button (Auto)
to enable the automatic photo recording each time that the
videophone will be turned ON.
The LED will turn ON to warn that the function is enabled.
If a new picture is stored by the automatic photo recording
function, the LED will flash until you will not browse the
recorded photos.
Press the (Auto) button again to disable the function, The
LED will turn OFF.
This button operates also when the monitor is in stand-by.
Fig.2
Memory
Menu
Auto
Photo
21/06/2014 16:05:00
Fig.1
Memory
Menu
Auto
Photo
21/06/2014 16:05:00
Fig.3
OPERATION


