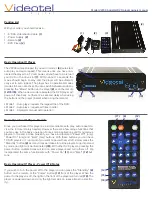

Setup Menu
Your player is pre set and most of our customers won’t need to access this
section. Please note that not all functions are active on this model, such as
“HD mode” and “HDMI Setup”. We are only giving descriptions of the menu
options that a typical user would be interested in changing. You access the
different menu options with the enter and arrow buttons. To go “back” press
the left arrow button. Press the “Setup”
(31)
button to exit the menu.
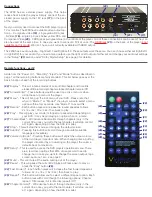
General Options
(37)
• TV Display - Allows you to switch between Normal Pan Scan (PS) / Normal
Letterbox (LB) / Wide / Wide Squeeze. While changing these options you can
see the screen change live, while still on the menu.
• OSD Language - On screen display. The only options are English and Chi-
nese. English is the default.
• Captions - Turns “Closed Captions” on and off.
• Screen saver - When no disc is loaded and the player is on, a screen saver
will appear in about 5 minutes. You can turn this option on or off here.
• Logo type - This allows you to select a different screen when no disc is
loaded and when the player is on. “Default” is the Videotel screen. “Blue
BSR” is a basic blue screen and “Captured” is a screen you can capture
from a DVD (see instructions under “Video Options”
(39)
.
Audio Options
(38)
• Speaker Setup - Would be used if you are using the “Digital Output” on
the back of the DVD player. It allows you to change surround sound options,
stereo out and sub woofer options.
• Dolby Digital Set Up - Allows you to switch between Stereo, L-Mono, R-
Mono and Mix Mono.
• Equalizer - This section allows you to change the audio output between
preset options such as Normal, Rock, Pop, etc... You can also turn on and
off Bass Boost, Super Bass and Treble Boost (off is the default).
Video Options
(39)
• Component - Allows you to change between YUV (component video stan-
dard), RGB, VGA (with VGA out, you would need an 3-RCA to VGA connec-
tor adaptor) or off.
• TV Mode - You can change between P-Scan (progressive) and Interlaced.
Most newer TV’s convert the video signal to progressive anyway, but you
have the option to change it if you like.
• Quality - This section allows you to change Sharpness / Brightness / Con-
trast / Gamma / Hue / Saturation / Luma Delay. All changes made are saved
when a disc is changed, the player is powered off or power is lost.
• Logo - This allows you to “Capture” your own default screen (screen that
plays when no disc is inserted) if you desire. Load a DVD with your desired
image. Press pause when you get to the image you want to capture, then
select this option. Your image is now saved and will be played when there is
no disc. To change back to default or a blue screen, see “Logo type” under
the “General options” above.
Password
(40)
• Password mode - This section is not available because your remote does
not have a numbered key pad, so no password can be entered.
Exit
(41)
You can select this option to exit the menu or simply press “Setup”
(31)
at
anytime.
(37)
(38)
(39)
N/A
(40)
(41)