background image

Menu Adjustments      

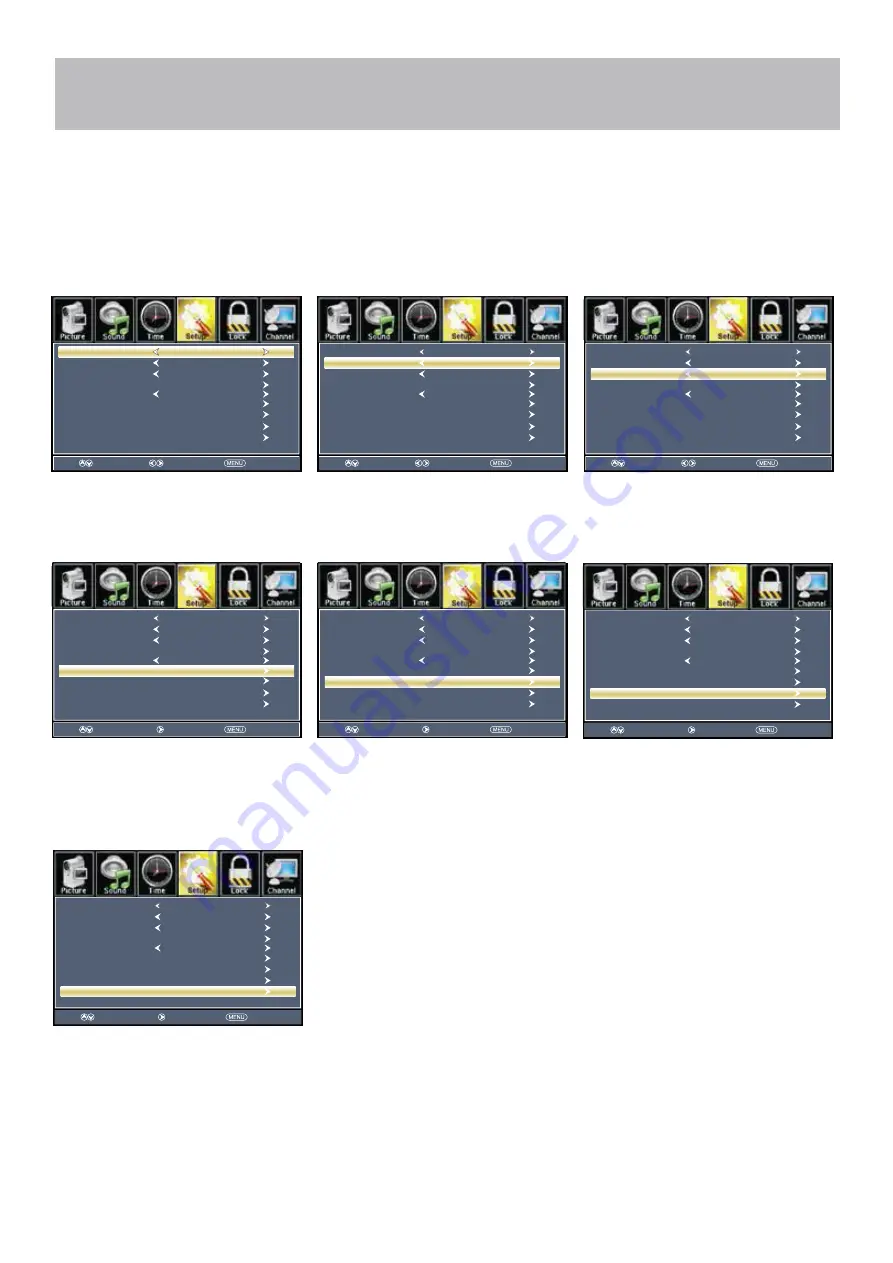
Setup Settings

In the 

Setup

 menu you may change the initial set up of preferences that include settings for language, menu display, 

computer monitoring, closed captions, enhancement of black detail in the picture and resetting your TV back to its 

factory default status.

How to Navigate:

Press the

 MENU 

button on the remote control. Navigate using arrow 

 

 buttons to select 

Setup

. Gain access to 

display options by pressing the down 

 arrow button to highlight 

Menu Language

 or other options, then press  


arrow button on your remote to select.

NOTE: Closed Caption and Advanced are features described on the following pages.

Select

Move

Exit

Menu Language

Transparent

Closed Caption
Over Scan

OSD Time out

Other Settings

Input Label

Restore Default
Setup Wizard

English

25%

30Sec.

Move

Next

Return

Menu Language

Transparent

Closed Caption

Over Scan

OSD Time out

Other Settings

Input Label

Restore Default

Setup Wizard

English

On

25%

30Sec.

Move

Return

Menu Language

Transparent

Closed Caption

Over Scan

OSD Time out

Other Settings

Input Label

Restore Default

Setup Wizard

English

On

25%

30Sec.

Select

Move

Exit

Menu Language

Transparent

Closed Caption
Over Scan

OSD Time out

Other Settings

Input Label

Restore Default
Setup Wizard

English

25%

30Sec.

CEC

Select

Move

Exit

Menu Language
Transparent

Closed Caption
Over Scan

OSD Time out

Other Settings

Input Label

Restore Default
Setup Wizard

English

25%

30Sec.

CEC

Select

Move

Exit

Menu Language
Transparent

Closed Caption
Over Scan

OSD Time out

Other Settings

Input Label

Restore Default
Setup Wizard

English

25%

30Sec.

CEC

Select

Move

Exit

Menu Language
Transparent

Closed Caption
Over Scan

OSD Time out

Other Settings

Input Label

Restore Default
Setup Wizard

English

25%

30Sec.

CEC

Select

Move

Exit

Menu Language
Transparent

Closed Caption
Over Scan

OSD Time out

Other Settings

Input Label

Restore Default

Setup Wizard

English

25%

30Sec.

CEC

Select

Move

Exit

Menu Language
Transparent

Closed Caption
Over Scan

OSD Time out

Other Settings

Input Label

Restore Default

Setup Wizard

English

25%

30Sec.

CEC

Other languages include English, 

Français, Español.

Navigate using the 

 

 arrow but-

tons to adjust the transparency of the

Adjust the duration of the 

OSD (on screen display) menu.  

Press 

 

 button to select. 

•  Menu Languages

•  Transparent

•  OSD Time Out

on screen display menu.

Create labels for the devices         

connected to your TV.

Press 

ENTER

 / 

 button to enter.

Adjust the settings for Audio Only,

No Signal Power Off, and No 

Operation Power Off.

Press 

ENTER

 / 

 button to enter. 

Press the 

 arrow button to 

automatically reset all adjustments 

back to their original factory settings.

•  Input Label

•  Other Settings

•  Restore Default

•  Setup Wizard

Set the first time installation.

Press 

ENTER

 / 

 button to enter.

The TV will request confirmation.

40V41UHD-23

Move

Return

Menu Language

Transparent

Closed Caption

Over Scan

OSD Time out

Other Settings

Input Label

Restore Default

Setup Wizard

English

On

25%

30Sec.

Move

Next

Return

Menu Language

Transparent

Closed Caption

Over Scan

OSD Time out

Other Settings

Input Label

Restore Default

Setup Wizard

English

On

25%

30Sec.

Move

Next

Return

Menu Language

Transparent

Closed Caption

Over Scan

OSD Time out

Other Settings

Input Label

Restore Default

Setup Wizard

English

On

25%

30Sec.

Move

Next

Return

Menu Language

Transparent

Closed Caption

Over Scan

OSD Time out

Other Settings

Input Label

Restore Default

Setup Wizard

English

On

25%

30Sec.

Move

Next

Return

Menu Language

Transparent

Closed Caption

Over Scan

OSD Time out

Other Settings

Input Label

Restore Default

Setup Wizard

English

On

25%

30Sec.

Move

Return

Menu Language

Transparent

Closed Caption

Over Scan

OSD Time out

Other Settings

Input Label

Restore Default

Setup Wizard

English

On

25%

30Sec.

Select

Select

Select

Содержание 40V41UHD

Страница 1: ...ANUAL 40 4K ULTRA HD TELEVISION 40V41UHD Ver 1 1 For technical assistance or troubleshooting please call 1 855 998 4326 or visit www sibrandssupport com Use a VIDĀO HDMI Cable for the Best Possible Video Sound ...

Страница 2: ...apparatus during lightning storms or when unused for long periods of time damaged in any way such as power supply cord or plug is damaged liquid has been spilled or objects have fallen into the apparatus the apparatus has been exposed to rain or moisture does not operate normally or has been dropped 15 WARNING To Reduce The Risk Of Fire Or Electric Shock Do Not Expose This Apparatus To Rain Or Moi...

Страница 3: ...he type of power supply to your home consult your electronics retailer or local power company 6 Power Cord Polarization This TV is equipped with a three wire grounding type plug a plug with a third grounding pin As a safety feature this plug will only t into a grounded power outlet If you are unable to insert the plug into the outlet contact your electrician to replace the obsolete outlet Do not d...

Страница 4: ...re should be taken to keep from touching such power lines or circuits as contact with them might be fatal 11 Overloading 12 Object and Liquid Entry Never push objects of any kind into this TV through openings as they may touch dangerous voltage points or short out TV 13 Servicing Do not attempt to service this TV yourself as opening or removing covers may expose you to dangerous voltage or 14 Dama...

Страница 5: ...en the user is encouraged to try to correct the interference by one or more of the following measures Reorient or relocate the receiving antenna Increase the separation between the equipment and television Connect the equipment into an outlet on a circuit different from that to which the television is connected Consult your dealer or an experienced radio TV technician for assistance authority to o...

Страница 6: ...gs Menu Languages 23 Transparent 23 23 OSD Timeout Closed Captions 24 Connection to a Home Theater System 17 Connect a digital cable box satellite recei ver or DVD player with a Component connection 14 Connect a digital cable box satellite recei ver or DVD player with Composite cables yellow red white Connect a digital cable box satellite recei ver or DVD player with an HDMI cable 13 Connecting th...

Страница 7: ...t o t r e f e r e s a e l P you up and running with the best possible connection type for your devices Enjoy This TV uses a 200x200 VESA mounting bracket attachment pattern Please take this information with you when purchasing a wall mount for this TV Wall Mount Information For technical support the VIDAO Technical Support Center is available 9 00AM to 9 00PM Monday to Friday and 9 00AM to Noon Sa...

Страница 8: ...wn on a soft cloth or cushion Position base as shown Insert 4 screws ST4X12 provided through the holes in the bottom of the base into the post holes and tighten securely Do not over tighten Installing the Base 1 40V41UHD 7 ...

Страница 9: ...e of batteries can result in a chemical leakage or explosion Comcast or Direct TV 10030 Dish Network 506 RCA Universal 0030 IR Receiver Cable Satellite Remote Control Codes NOTE The remote control from your Cable Satellite provider can be programmed to operate most of the major functions of this TV model which include POWER INPUT SOURCE VOLUME VOLUME CHANNEL CHANNEL SELECT OK ENTER based on your r...

Страница 10: ...Remote Control Overview 40V41UHD 40V41UHD 9 ...

Страница 11: ...ss to activate the Sleep function The TV will automatically turn off after 18 MENU Press to display the Main menu 19 ASPECT Select the viewable display aspect options NORMAL WIDE ZOOM CINEMA 20 VOLUME Adjust the volume up or the volume down 21 LAST Press to switch between the current channel and previously viewed channel 22 MUTE Press to temporarily turn off the TV audio Press again to resume 23 C...

Страница 12: ...lume up or down Front Side Panel 1 POWER Press the POWER button to turn the TV ON OFF standby The screen image will appear within a few seconds and the LED will turn on IR Receiver A Red Blue light illuminates when the television power is On 40V41UHD 11 5 INPUT After connecting your DVD cable box etc select the appropriate input source to view Press the INPUT button to display the input options Pr...

Страница 13: ... outdoor antenna cable or satellite for best reception 1 OPTICAL OUT Connect to an AV Receiver for high quality digital audio 2 AV Connect an external device to the composite VIDEO V and AUDIO L R out jacks found on most equipment 3 Component Y Pb Pr Input Connect to an AV device that features component Y Pb Pr video and audio output jacks 5 HDMI1 2 3 4 IN To connect to a High Definition HD signal...

Страница 14: ...MI cable not included Digital set top box gaming console or blu ray w HDMI interface Digital Cable Satellite Set Top Box How to connect On the back of your device connect the HDMI cable from HDMI out on device to HDMI in on the panel How to Use Press the INPUT button on the remote the use the arrows to highlight HDMI Press ENTER NOTE You can also connect a digital cable satellite box using an RF c...

Страница 15: ...ill be black white if hooked up incorrectly You must hook up audio cables separately How to Use Press the INPUT button on the TV remote Then use the arrow buttons to highlight Component Press ENTER Connecting a device with a Component connection Optional Component cables not included Digital set top box gaming console or DVD L R Y Pb Pr 40V41UHD 14 Source Select TV AV Component HDMI1 HDMI2 HDMI3 H...
Страница 16: ...d insert the yellow red and white A V cables into the device and TV How to Use Press the INPUT button on the remote Then use the arrow buttons to highlight AV Press ENTER Audio Video Cable not included Digital set top box gaming console or DVD 40V41UHD 15 Source Select TV AV Component HDMI1 HDMI2 HDMI3 HDMI4 Media ...

Страница 17: ...stance from the local broadcast transmitter and strength of antenna Connecting an antenna or basic cable service Connect the RF coaxial 75 ohm cable from existing roof top in door antenna or wall outlet Finger tighten the Coaxial RF Cable end to the TV input on the panel Coaxial RF Cable not included Ant Cable Wall Outlet Roof Antenna Cable Outlet Installation Connecting to POWER IN Connect the po...

Страница 18: ...separate channel for a subwoofer Connect an optional digital cable directly to the television s OPTICAL OUT audio output How To Setup Digital Output Press the MENU button on the remote control Press the arrow button to select Sound Press the arrow button to highlight Digital Audio output Press to select Raw or PCM Front Left Speaker Front Right Speaker Center Channel Dolby Surround Connection Illu...

Страница 19: ...Language Use the arrow buttons to select English Francais Espanol Use the arrow button to select Go to next step and press the button to complete the step STEP 2 Setting the Time Use the arrow buttons to select Time Zone Daylight Saving Time and Time Format selections Use the arrow buttons to select the desired setting Use the arrow button to select Go to next step and press the button to complete...

Страница 20: ...ox Press the INPUT button on the remote control to display the Input Source screen illustrated to the left Use the arrow buttons to highlight the input where the set top box was installed Press ENTER to select the desired input Once Channel Auto Scan has ended Initial Setup is complete You may now begin enjoying your TV or make further adjustments to the TV settings which are explained in the foll...

Страница 21: ...or decrease contrast intensity Press down arrow button to highlight Color Navigate using the arrow buttons to increase or decrease color intensity Press down arrow button to highlight Tint Navigate using the arrow buttons to adjust colors toward green or reddish tint Press down arrow button to highlight Sharpness Navigate using the arrow buttons to soften or view crisper edges in the picture Press...

Страница 22: ...AP Mono Sets the sound to mono Stereo Sets the sound to stereo when stereo is not available The sound is automatically switched to mono SAP Sets the sound to the second audio program Audio Language Press down arrow button to highlight Audio Language Press button to select English Francais Español Digital Audio Output Press button to highlight Digital Audio Output Press button to select Raw Off PCM...

Страница 23: ...in 15 Min 30 Min 60 Min 90 Min 120Min 180 Min 240 Min OFF Press down arrow button to highlight Time Zone then press the arrow button to select between Eastern Central Mountain Pacific Alaska Hawaii Samoa Newfoundland Atlantic Press down arrow button to highlight Daylight Savings Time Navigate using the arrow buttons to select On or Off Press down arrow button to highlight Time Format Navigate using...

Страница 24: ...age Transparent Closed Caption Over Scan OSD Time out Other Settings Input Label Restore Default Setup Wizard English 25 30Sec CEC Select Move Exit Menu Language Transparent Closed Caption Over Scan OSD Time out Other Settings Input Label Restore Default Setup Wizard English 25 30Sec CEC Other languages include English Français Español Navigate using the arrow but tons to adjust the transparency o...

Страница 25: ...gital CC Navigate using the arrow buttons to select Off Service 1 6 Press down arrow button to highlight Option Press the arrow button to enter a menu with options to customize text fonts colors and opacities Select Move Exit Menu Language Transparent Closed Caption Over Scan OSD Time out Other Settings Input Label Restore Default Setup Wizard English 25 30Sec CEC Select Move Exit CC Mode Analog C...

Страница 26: ...f Note When adjustments are completed you may select another menu by pressing the Menu button Press the arrow button to highlight Connect Press the arrow button to connect TV and DVD Player Press the arrow button to highlight Root Menu Press the arrow button to enter DVD menu Press the arrow button to highlight Device Lists Press the arrow button to enter Move Select Return Device Auto Power Off A...

Страница 27: ...w button to enter the TV Ratings menu and select your preference Highlight MPAA then press the arrow button repeatedly to select your movie rating preference TV Y Appropriate for all children TV Y7 Appropriate for children over 7 TV G General Audience TV PG Parental Guidance Suggested TV 14 Parents Strongly Cautioned TV MA Mature Audience Only G General Audience PG Parental Guidance Suggested PG 1...

Страница 28: ...tton to highlight Canada English then press the arrow button repeatedly to select your ratings preference Navigate using the arrow button to highlight Canada French then press the arrow button repeatedly to select your ratings preference Note When adjustments are completed you may select another menu by pressing the Menu button Off Turn Off C Appropriate for all children C8 Appropriate for everyon...

Страница 29: ...40V41UHD 28 Next Next Next Next Next Return Return Return Return Return ...

Страница 30: ... available inputs on the TV for viewing Note For Cable or Satellite users with a set top box there is no need to run Channel Auto Scan Connect your cable To make changes your TV provider or re scan for available broadcast channels in your area select the Channel Menu Press the arrow button to highlight Auto Scan and press ENTER Press the arrow button to highlight YES and press ENTER to begin Auto ...

Страница 31: ...will crop images somewhat 4 CINEMA n eliminating visible side black bars It may also eliminate or reduce black bars on certain widescreen movies Press ASPECT to cycle through the following widescreen settings The ASPECT function offers several viewing display options on the 16 9 screen Press the ASPECT button to cycle through the following widescreen settings NOTE The ASPECT function is not availa...

Страница 32: ...40V41UHD 31 Media Media in the Source Select TV AV Component HDMI1 HDMI2 HDMI3 HDMI4 Media ...

Страница 33: ...ut requires a special MHL cable Not included To connect an MHL enabled device 3 4 Connect a MHL cable to the micro USB port on the device then connect the other end of the cable to the HDMI4 MHL jack on the TV 1 Press INPUT to open the TV Input Source list 2 Press or to select HDMI4 then press ENTER You should now see the screen image of your connected device on the TV MHL Enabled Device HDMI to M...

Страница 34: ... 9 480p 720p 1080i 1080p 2160p 3840x2160 180 4500 1 178 178 16 7M 120 W 2 x 8W 36 6 W x 21 7 H x 3 6 D 20 lbs Composite Video Y Pb Pr HDMI 4 HDMI with MHL CABLE ANTENNA Optical AUDIO out USB Weight may vary 10 _ 40V41UHD 33 ...

Страница 35: ...default settings See page 23 Cannot use certain functions If the item chosen in a menu is shown in gray text that item cannot be selected in the current input No sound Check that connected audio cables are completely inserted See page 21 Mute function may be enabled press mute on the remote Black box on screen The Text option is enabled and no text is available Press the CCD button on the remote c...

Страница 36: ...r technical support visit our website www sibrandssupport com or call the VIDAO Technical Support Center for technical assistance or troubleshooting at 1 855 998 4326 Monday to Saturday 10 00AM TO 7 00PM EST There are no consumer serviceable parts contained in this product and any attempt by the owner to service or repair the unit will immediately void all warranty coverage This warranty does not ...

Отзывы: