background image

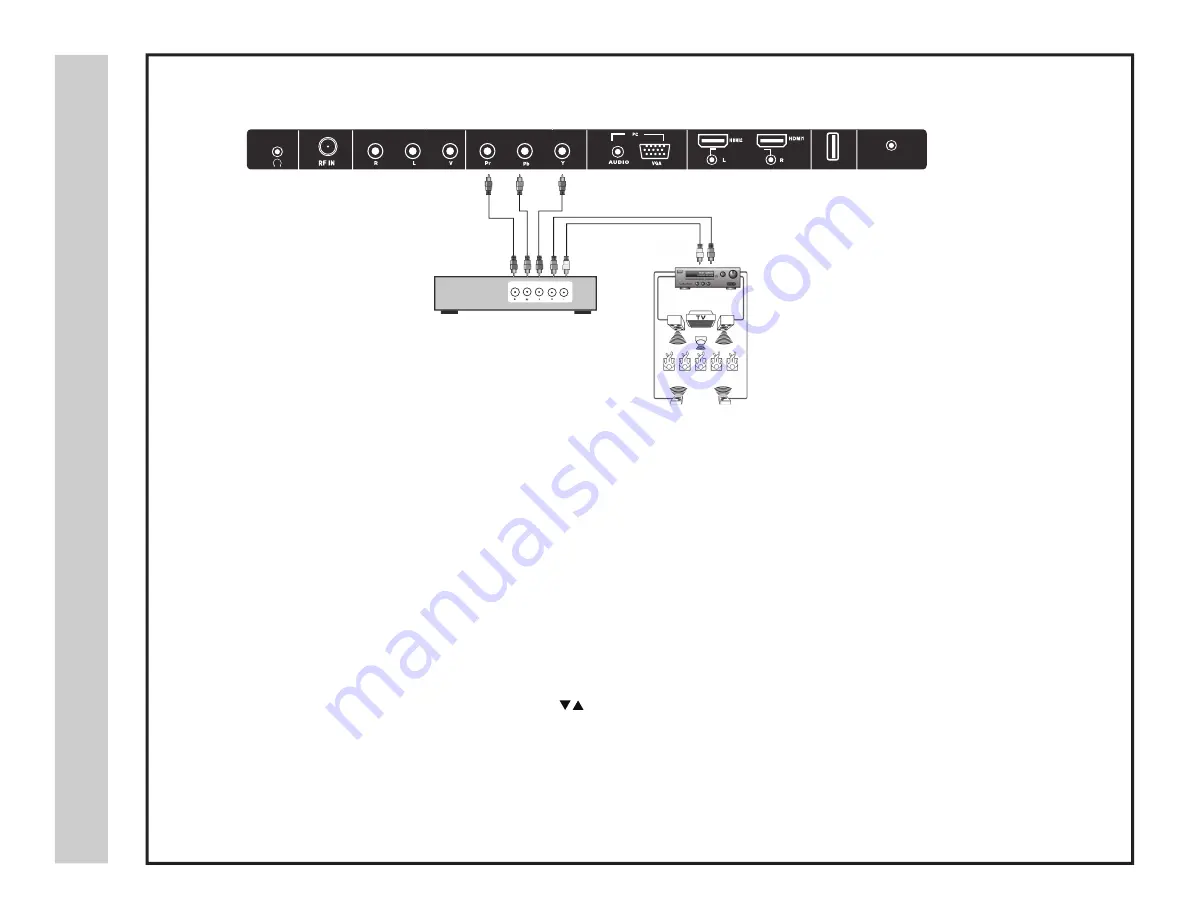
Connection to a Home Theater Audio System

noi

tal

la

ts

nI

*NOTE: Refer to the User Manual from your home theater equipment for recommended audio settings. 

e

mo

H

a

ot

noi

tc

en

no

C

met

sy

Sr

et

ae

hT

19A60-16

TV REAR PANEL

Front Left

Speaker

Front Right 

Speaker

Center Channel 

Surround Right 

Speaker

Surround Left

Speaker

Dolby Surround 

Connection Illustration 

 Prologic 

Surround Receiver 

Digital set top box, gaming

 console or DVD 

optional cables (not included) 

Connecting to a Stereo

Enjoy realistic sound from your home theater system through a stereo / receiver amplifier or Prologic sound system when connected to your AV equipment.

Example: The diagram illustrates the connection of audio cables directly from your AV equipment (like a cable box) to a stereo receiver instead of using the
audio (L/R) jacks on the TV’s rear panel.

NOTE: When audio cables are connected to a stereo / receiver amplifier, no audio sound will be heard from the TVs built-in speakers.

How to Use 

Press the appropriate 

INPUT

 button on the remote control. Use

arrow buttons to highlight the input source to view and then press

ENTER

.

How to Use (Audio )

(Video )

Select the appropriate input from your audio equipment.

AUDIO OUT

USB

DC 12V IN 

Содержание 19A60

Страница 1: ...ER S MANUAL For technical assistance or troubleshooting please call 1 800 936 1168 or email service etecusa com The Technical Support Center is available 24 hours a day 19 LCD TELEVISION 19A60 1 7 day...

Страница 2: ...uant to Part 15 of the FCC Rules These limits are designed to provide reasonable protection against harmful interference in a residential installation This television generates uses and can radiate ra...

Страница 3: ...three wire grounding type plug a plug with a third grounding pin As a safety feature this plug will only fit into a grounded power ourlet If you are unable to insert the plug into the outlet contact y...

Страница 4: ...s n o i t c u r t s n I y t e f a S 19A60 4 qualified service technician technician...

Страница 5: ...tial TV Setup Initial Setup Wizard TV Channel Setup Channel Auto Scan Picture Settings Contrast Brightness Color Tint Sharpness Color Temperature Troubleshooting Specifications Index Audio Settings Ba...

Страница 6: ...en connected to compatible HD sources ie HD set top box high definition DVD player or gaming console We recommend that you read the user manual thoroughly before use to familiarize yourself with the i...

Страница 7: ...s discard used batteries safely Do not expose the remote control to liquids direct sunlight or sources of excessive heat The IR receiver on the TV will not work properly if the set is in direct sunlig...

Страница 8: ...l o r t n o C e t o m e R w e i v r e v O 19A60 8 NOTE When using the remote control point it directly at the TV 1 3 4 5 6 7 8 9 10 12 15 17 20 18 21 22 24 26 27 28 25 14 13 16 19 23 11 2...

Страница 9: ...ess the MENU button to d isplay Press VOL to select from the 6 menu options available Press the CH CH buttons to select a feature from the selected menu then press the VOL VOL buttons to adjust the vo...

Страница 10: ...high definition up to 7 1 channel digital audio all from one cable Recommended for best performance HDMI cable not included 5 PC IN VGA Input Connect an optional VGA cable not included from your perso...

Страница 11: ...onnect the RF coaxial 75 ohm cable from your existing roof top indoor antenna or wall outlet Finger tighten the Coaxial RF Cable end to the TV input on the rear panel See pages 17 18 for TV setup and...

Страница 12: ...ecting to an HD Set Top Box or Blu Ray DVD Player Using HDMI Digital set top box gaming console or Blu ray HDMI interface Optional HDMI cable not included s t u p n I I M D H o t n o i t c e n n o C 1...

Страница 13: ...le or DVD player When connecting external equipment to your television match the colors of the connecting jacks Video Blue Green Red Audio White Red Connect the optional component video cables blue gr...

Страница 14: ...s are recommended for the best performance When connecting external equipment to your television match the colors of the connecting jacks Video Yellow Audio White Red Connect the yellow video cable fr...

Страница 15: ...PC to the VGA input on the TV s rear panel Connect an optional 3 5mm audio cable from the computer s mini audio output jack to the audio input on the TV s rear panel How to Use Press the INPUT button...

Страница 16: ...ealistic sound from your home theater system through a stereo receiver amplifier or Prologic sound system when connected to your AV equipment Example The diagram illustrates the connection of audio ca...

Страница 17: ...w to Navigate Menu Language Cable or AIR Press the button to highlight Menu Language and then press the buttons to select an on screen display OSD language Press the button to highlight CAB LE or AIR...

Страница 18: ...Auto is recommended Press the button to select Auto Scan and press ENTER Cable WITHOUT set top box Cable WITH set top box Use the button to highlight CABLE and press ENTER Auto Channel Scan may take s...

Страница 19: ...nnel To make more critical adjustments based on your own preferences in PERSONAL Contrast Press the button to highlight Contrast Use the buttons to increase or decrease contrast intensity Brightness P...

Страница 20: ...e buttons to increase or decrease low frequency Bass intensity Treble Press the button to highlight Treble Use the buttons to increase or decrease high frequency Treble intensity Balance Press the but...

Страница 21: ...lect TIME Press the button to highlight the Sleep Timer Then press the button to select the amount of time to view before the television timer turns the set off 5 Min 10 Min 15 Min 30 Min 45 Min 60 Mi...

Страница 22: ...button to select the menu choice Languages Other languages include Spanish and French Navigate using the buttons to select a different menu language Transparency Navigate using the buttons to turn OF...

Страница 23: ...ss the arrow button to highlight Closed Caption Press the arrow button to highlight Advanced Selection Navigate using the buttons to select Service 1 6 Press the button to highlight Option Press the b...

Страница 24: ...gate After connecting to a PC press the VGA button on your remote control Press the MENU button on the remote control and navigate using The buttons to select SETUP Access the position adjustment opti...

Страница 25: ...ntrols for television programming or DVD movies press the buttons to highlight US United States Navigate using the buttons to highlight the TV MPAA menu To change the password press the button to disp...

Страница 26: ...page 24 for information on how to change your password Navigate using the button to highlight CANADA ENGLISH then press the button repeatedly to select your ratings preference E C C8 G PG 14 18 Approp...

Страница 27: ...ing the buttons to select channels to be added or deleted from your favorites list Press the ENTER button to add or delete a channel A checkmark indicates a channel has been added You may also display...

Страница 28: ...to cycle through the following widescreen settings Press ASPECT to cycle through the following widescreen settings The Normal aspect is recommended for viewing native widescreen content and undistorte...

Страница 29: ...buttons to select Photo and then press the ENTER button to enter and then press the ENTER button to enter Select the option you want to play using the Navigation buttons Press EXITbutton to go back Pr...

Страница 30: ...Maximum Colors millions Power Consumption Audio Power Dimension without Pedestal Installed Weight without Pedestal Input Connections LCD 18 5 Diagonal 16 9 480i 480p 720p 1080i 1080p 1366 x 768 200 10...

Страница 31: ...ted See page 27 Check parental control settings See pages 25 26 Restore default settings See page 22 Readjust the antenna Keep the TV away from electronic noise sources such as neon lights and microwa...

Страница 32: ...Audio Display Display Modes for PC DLC E F Exit 8 Favorite Channels 8 27 G H Guide 8 HDMI Inputs Headphone Home Theater 12 10 16 I IR Receiver Input 7 9 8 9 12 15 L Languages Last LED light 20 22 8 9...

Страница 33: ...hours a day 7 days a week for technical assistance or troubleshooting at 1 800 936 1168 This warranty does not cover any product which has been subject to damage due to an act of nature misuse neglect...

Отзывы: