background image

Page 20

Carefully inspect all items for damages before accepting delivery. note any damages on the freight bill or 

express receipt. request name and signature of the carrier’s agent and keep copy to support your claim. Upon 

acceptance of items, owner assumes responsibility for its safe arrival. Report damages to the carrier and file 

a claim immediately. Failure to do so may result in the denial of your claim. The carrier will furnish you with 

necessary forms for filing a claim.

Damages caused during transit are not covered under our warranty. Please contact us to file an insurance claim.

Please inspect contents of package(s) carefully upon receiving! We must be notified of any damages and/or 

missing parts within five (5) days upon your receipt of package(s). Claims will not be accepted after five (5) 

days. NOTE: Items were thoroughly tested and carefully packed in our factory before shipping.

Products must be returned in good working condition with ALL original parts and documentation packed in 

ALL original cartons, fillers and shipping cartons. A restocking fee of 15% will be charged for all approved 

return(s). Exchanges or returns may not be accepted if any packaging is missing.

Make sure to inspect the hood for damages and defects before installation. Appearance flaws of the hood found 

after installation and not affecting hood performance is not covered under our warranty for returns or exchang

-

es. Service visits not covered under warranty will carry a service charge.

Before Installation: Return for exchange or refund (please see above for acceptable returns).

After Installation: 

NO

 exchange or refund.

If you need any assistance, please contact your local reseller. Please have your order number and model of the 

range hood ready. This information will help them better respond to your request.
If you need replacement parts, we recommend that you only use genuine parts. Our accessories and parts are 

engineered and designed specifically for this series of range hood, each is rigorously tested assuring the utmost 

in durability and reliability, providing a factory match, factory-installed appearance and functionality tailored to 

each individual range hood model.

Contact Us

Disclaimer

The  information  in  this  document  is  subject  to  change  without  notice,  please  contact  your  local  reseller  for  updated  details.

Содержание 218B2-30

Страница 1: ...Hood NOTICE Installer Leave this guide with the homeowner Homeowner Keep this guide for future reference IMPORTANT Read and save these instructions Rev 1024u 4a VICTORY 218 Series Wall Mounted Range H...

Страница 2: ......

Страница 3: ...authorities Before servicing or cleaning unit switch power OFF at service panel and lock service panel to pre vent power from being switched ON accidentally Clean grease laden surfaces frequently To...

Страница 4: ...o out immediately EVACUATE AND CALL THE FIRE DEPARTMENT or dial your local emergency service immediately DO NOT USE WATER including wet dishcloths or towels a violent steam explosion will result Use a...

Страница 5: ...tion 9 Installation 10 11 Installation overview 11 USE AND CARE Range hood operations 12 13 Troubleshooting 14 Use and care information 15 Specifications 15 Wiring diagram 16 MAINTENANCE Cleaning repl...

Страница 6: ...en ordered together with range hood Parts supplied Hex Key Qty 1 PCS Optional with glass canopy Glass Canopy Screw Qty 4 PCS Optional with glass canopy Qty 6 PCS For sheet rock only A Qty 6 PCS B Qty...

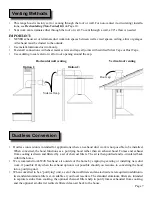
Страница 7: ...of the vent should be uniform Use no more than three 90 elbows Make sure there is a minimum of 24 61 cm of straight vent between the elbows if more than one elbow is used DO NOT install two elbows tog...

Страница 8: ...elbows transitions and caps ALWAYS when possible reduce the number or transitions and turns If long duct run is required increase duct size from 6 to 7 or 8 If a reducer is used install a long reduce...

Страница 9: ...esellers The standard aluminum filters are intended to capture residue from cooking the optional charcoal filters help to purify fumes exhausted from cooking and the optional air diverter redirects fi...

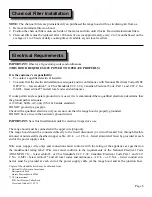
Страница 10: ...0 Hz AC only USA Canada standard DO NOT ground to a gas pipe Check with a qualified electrician if you are not sure that the range hood is properly grounded DO NOT have a fuse in the neutral or ground...

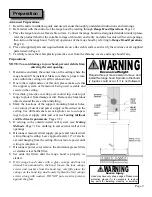
Страница 11: ...the 1 range hood will be installed Make sure there is proper clear ance within the ceiling or wall for exhaust vent Due to the weight and size of this unit please make sure that 2 the support system o...

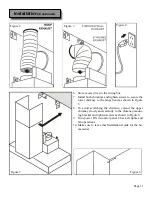
Страница 12: ...he venting duct between the hood and the ex 4 haust opening either on the ceiling or wall Use alumi num tape to make all joints secure and air tight Connect the range hood to a designated standard out...

Страница 13: ...To avoid scratching the chimney extend the upper 8 chimney slowly and carefully to the chimney mount ing bracket and tighten screws as shown in Figure 6 Turn power ON in control panel Check all light...

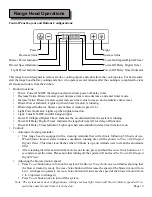
Страница 14: ...tem is running Power Off Delay Digital Timer Indicates the length of time left for delay off function Power Off Delay Timer Indicator Lights up when auto shutdown delay timer function is on Controls A...

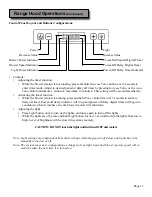
Страница 15: ...will shut down Adjusting the light Press Light button once to turn on the lights and once again to turn off the lights While the lights are off press and hold Light button for over 3 seconds to dim th...

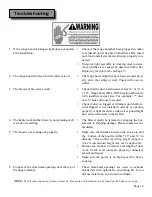
Страница 16: ...t installed correctly or opening properly A tight mesh on a side wall cap unit might also cause restriction to the air flow The lights work but the blower is not spinning at all 4 is stuck or is rattl...

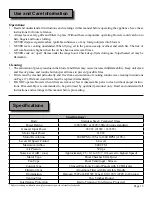
Страница 17: ...s operating blowers could catch on to hair fingers and loose clothing NEVER dispose cigarette ashes ignitable substances or any foreign objects into blowers NEVER leave cooking unattended When frying...

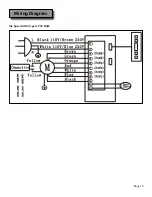
Страница 18: ...Page 16 Wiring Diagram Six Speed with Type GU10 Bulb...

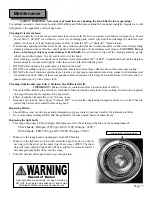
Страница 19: ...steel wool or steel brushes Small bits of steel may adhere to the surface and cause rusting DO NOT allow salt solutions disinfectants bleaches or cleaning compounds to remain in contact with stainless...

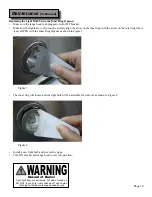
Страница 20: ...s unplugged or turn OFF breaker Make sure the lights are cool to touch carefully align the arrow on the inner ring with the arrow on the outer ring where it says OPEN with the Inner Ring Opener as sho...

Страница 21: ...sumable parts such as light bulbs metal and charcoal filters The natural wear of finish and wear due to improper maintenance use of corrosive and abrasive cleaning products pads and oven cleaner produ...

Страница 22: ...ng fee of 15 will be charged for all approved return s Exchanges or returns may not be accepted if any packaging is missing Make sure to inspect the hood for damages and defects before installation Ap...

Страница 23: ...Your Notes Page 21...

Страница 24: ...7272 Buller Ave Burnaby BC V5J4S3 Canada VICTORY range hoods...

Отзывы: