background image

22

closing operations. 

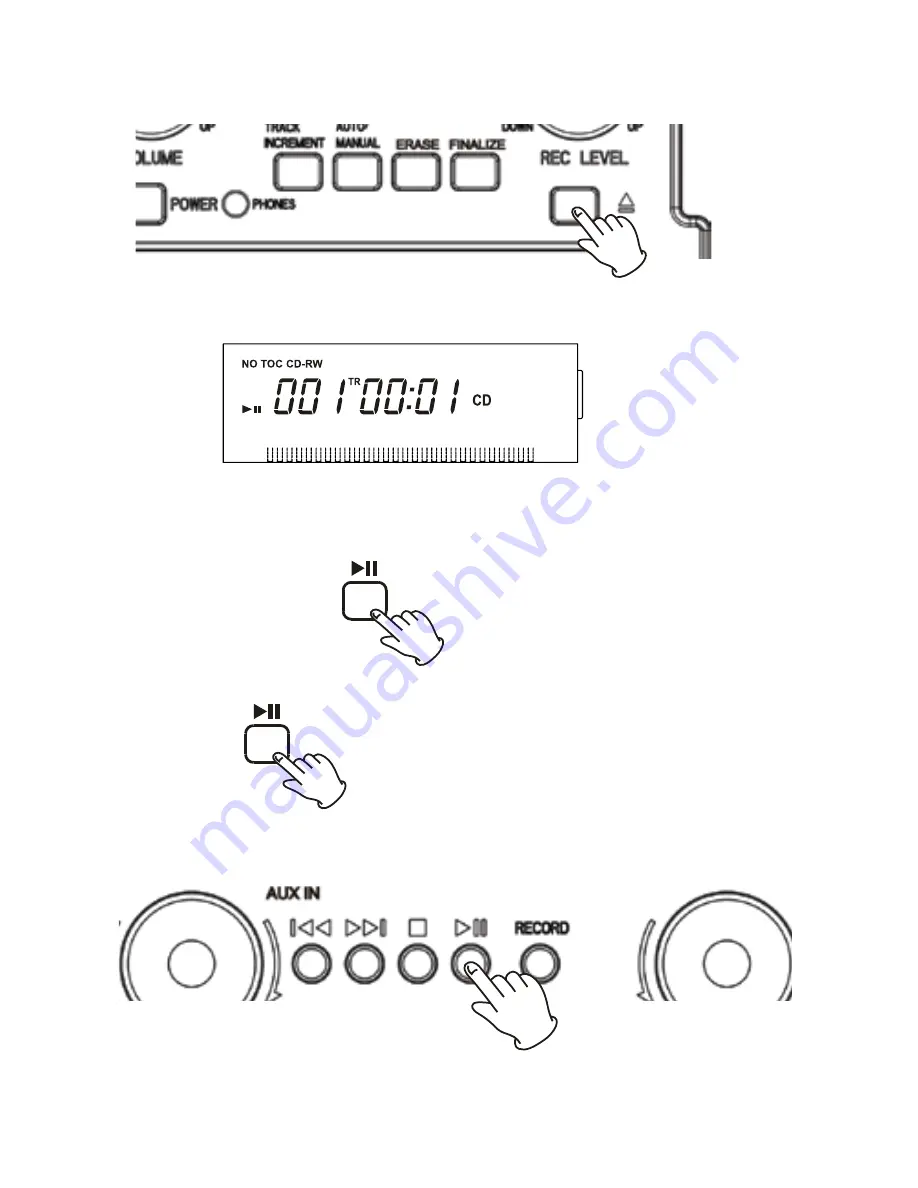
4. Press the OPEN/CLOSE button to close the tray.

• It takes a few seconds for the unit to load the disc. No buttons will work during loading. 

Wait until the total number of the tracks and the total play time of the disc are displayed. 

• The disc type indicator shows the type of disc currently loaded. 

5. Press the PLAY/PAUSE button ( ) to start playback. 

A To suspend playback temporarily (pause mode). 

Press the PLAY/PAUSE button ( ) during playback. Playback stops at the current position. 

To resume playback, press the PLAY/PAUSE button ( ).

Содержание ITC-TWCDRW

Страница 1: ...1 OWNER S MANUAL MODEL ITC TWCDRW Turntable with Compact Disc CD RW Recorder Cassette Player and AM FM Radio ...

Страница 2: ... 5 Unit Functions 10 Parts of the Turntable Unit Functions 12 Remote Control 14 Preparation for use 17 Basic Operation 17 Listening to Radio 18 Aux Operation 19 Listening to a Record 19 Listening to a CD 21 RECORDING to a CD 29 Specifications 36 Trouble Shooting 37 ...

Страница 3: ...ssory recommended by the manufacturer 9 Transporting This product should be moved with care to avoid damage or injury 10 Ventilation Slots and openings in the cabinet are provided for ventilation to ensure reliable operation of the product and to protect it from overheating These openings must not be blocked or covered The openings should never be blocked by placing the product on a bed sofa rug o...

Страница 4: ...maged B If liquid has spilled or objects have fallen into the product C If the product has been exposed to rain or water D If the product does not operate normally by following the operating instructions Adjust only those controls that are covered by the operating instructions An improper adjustment of other controls may result in damage and will often require extensive work by a qualified technic...

Страница 5: ...e parts inside Refer servicing to qualified service personnel The light flash with arrowhead symbol within an equilateral triangle is intended to alert users to the presence of uninsulated dangerous voltage within the product s enclosure that may be of sufficient magnitude to constitute risk of electric shock to persons The exclamation point within an equilateral triangle is intended to alert user...

Страница 6: ... to unplug the unit if you do not intend to use it for an extended period of time such as while on a vacation 8 Keep this manual in a safe place for future reference When the player or a compact disc is moved from a cold to a warm place or is used after a sudden temperature change there is a danger of condensation Water vapor in the air could condense on the mechanism or the laser pickup If drople...

Страница 7: ... use of a worn out stylus may damage the record The highest speed setting of 78 RPM will wear out the stylus more quickly How to Replace the Stylus Do not remove or bend the stylus Do not touch the needle which may injure your hand finger Turn off the unit s power before you replace the stylus Keep out of the reach of children Avoid direct sunlight and being close to a source of heat Caution Remov...

Страница 8: ... outer edge with a soft dry cloth Never use chemicals such as record spray antistatic sprays or fluid benzine or thinner to clean the discs Such chemicals will do irreparable damage to the disc s plastic Surface Discs should be returned to their cases after use to avoid dust and scratches that could cause the laser to skip Do not expose discs to direct sunlight or high humidity and temperature for...

Страница 9: ...tenna may need to be repositioned if you move your unite to a new location B AUX IN Jacks You can connect an MP3 player CD player cassette tape deck etc to this unit Connect components with RCA jacks on the back of player Make sure to connect the white plug to the white jacks left and the red plug to the red jacks right C AC Power Cord Plug this power cord into an AC wall socket CAUTION Switch off...

Страница 10: ...se this AUX IN jack to listen the external source 2 DISPLAY PANEL frequency When the unit is on this display will light 3 DISPLAY 4 AUX Press the AUX button and select AUX to listen to the external source connected to the AUX IN jacks ...

Страница 11: ...o play cassette 12 STOP Use this button to stop playback or recording 13 PLAY PAUSE Use this button to start playback pause playback recording finalizing and erasing 14 RECORD Use this button to initiate record pause mode 15 REC LEVEL In record pause mode use this knob to adjust the recording level 16 OPEN CLOSE In CD PHONO or AUX mode use this button to open and close the disc tray This button do...

Страница 12: ...e headphones are plugged in 23 VOLUME Turn this knob to adjust the volume sound NOTE The volume control level is from 00 to 63 Typical listening level is from 18 and upward 24 POWER Press this button to turn the unit on or off NOTE If you experience the malfunction occurred during operation you may power off the unit and re start 25 MUSIC SKIP In CD mode use these buttons to skip tracks Hold down ...

Страница 13: ...panel of the unit Even if the remote control unit is operated within the effective range remote control opera tion may be impossible if there are any obstacles between the unit and the remote control If the remote control unit is operated near other appliances which generate infrared rays or if other remote control devices using infrared rays are used near the unit it may operate incorrectly Conve...

Страница 14: ...type never use different types of batteries together Rechargeable and non re chargeable batteries can be used Refer to the precautions on their labels When the remote control unit will not be used for a long time more than a month re move the batteries from the remote control unit to prevent them from leaking If they leak wipe away the liquid inside the battery compartment and replace the batterie...

Страница 15: ...on to program tracks F SHUFFLE In CD mode use this button for shuffle playback G DISPLAY In CD mode use this button to change the display H TRACK INCREMENT During recording use this button to divide tracks I MANUAL AUTO INCREMENT Use this button to select the mode of track number assignment J RECORD Use this button to record CD K REC VOL REC VOL Use this button to adjust the record volume L FINALI...

Страница 16: ...ss the FM AM button to listen to the radio R TAPE Press the TAPE button to play cassette S MUSIC SKIP In CD mode use these buttons to skip tracks Hold down these buttons to search for a part of a track T VOL VOL Use this button to adjust the volume U PLAY PAUSE Use this button to play pause recording finalizing and erasing V STOP Use this button to stop playback or recording ...

Страница 17: ...wards front of unit 3 Release TONE ARM by gently pushing hold down clip to the right This will unlock the tone arm from its armrest Re lock the hold down clip when moving the unit to another location BASIC OPERATION 1 Press the POWER switch to turn the unit on Wait until the busy disappeared on the display before next step ...

Страница 18: ...e FM AM button 2 Tune to the desired frequency The TUNED INDICATOR lights when a station is correctly tuned in The STEREO INDICATOR lights when an FM stereo broadcast is tuned in The volume reading 1 63 but no sound hear until 20 the volume will change along with the number If the reception is poor AM Broadcast Adjust the unit s location to find the best position for AM stations FM Broadcast Exten...

Страница 19: ...end of the cable into the headphone or Line Out socket of the external source 3 Once the aux cable plug in it will cut all other function You should remove the cable to resume normal operation of the unit LISTENING TO A RECORD 1 Press the PHONO button once to select PHONO 2 Gently open the dust cover Be carefully not to pinch your finger ADAPTER 45 rpm records 3 Put the record on the turntable Whe...

Страница 20: ...pport 7 Move the tone arm gently to the edge of the record or the starting point of a track The turntable will begin to turn 8 Gently lower the tone arm by slowly releasing the cue lever You can lower the tone arm manually if the cue lever has not been raised Playing records with the dust cover down will prevent dust from setting on the turntable ...

Страница 21: ...G TO A CD 1 Press the CD button BUSY CD blinks for a few seconds When no disc is set NO DISC appears on the display 2 Press the OPEN CLOSE button to open the tray 3 Place a disc on the tray with the printed label face up Never place more than one disc on the tray The disc must be placed in the center of the disc tray If the disc is not correctly loaded it may not be possible to open the tray again...

Страница 22: ...l the total number of the tracks and the total play time of the disc are displayed The disc type indicator shows the type of disc currently loaded 5 Press the PLAY PAUSE button to start playback A To suspend playback temporarily pause mode Press the PLAY PAUSE button during playback Playback stops at the current position To resume playback press the PLAY PAUSE button ...

Страница 23: ... track When the button is press during playback the track being played will be played from the beginning To return to the beginning of the previous track press the button twice C Search for a part of a track During playback hold down the SKIP button and release it when the part you want to Listen to is found D To stop playback Press the STOP button to stop playback If the distance required between...

Страница 24: ...24 Each time the DISPLAY button is pressed the display changes as follows Un finalized CD R CD RW stopped During recording ...

Страница 25: ...atedly If you press the MUSIC SKIP button and select another track the track you select will be played repeatedly It is also possible to select a track to be repeated in the stop mode Press the REPEAT button twice and then select the track number by pressing the MUSIC SKIP button Press the PLAY button to start playback If one of the following buttons is pressed repeat mode will be cancelled OPEN C...

Страница 26: ...be played from the begin ning A track cannot be replay during shuffle playback Shuffle playback doesn t work during programmed playback If one of the following buttons is pressed shuffle mode will be cancelled SHUFFLE in the stop mode OPEN CLOSE POWER FM AM PHONO AUX Shuffle playback works with finalized disc only Programmed Playback Up to 32 tracks can be programmed in the desired order Insert a ...

Страница 27: ...utton The track is programmed and P 02 is display Repeat step 2 and 3 to program more tracks You can program up to 32 tracks To cancel the program mode press the STOP button 4 When the selection of track numbers has been finished press the PLAY button to start program playback ...

Страница 28: ...utton and then press the PROGRAM button The track is added to the end of the program To delete the last track from the program In the stop mode press the CLEAR button to delete the last track from the program To clear the program If one of the following buttons is pressed the programmed contents will be cleared OPEN CLOSE POWER FM AM PHONO AUX STOP in the stop mode ...

Страница 29: ... the same way as a CD R disc but the last track or tracks recorded can be erased and the space on the disc can be re used for other recordings However you should note that an audio CD created using a CD RW disc may not play back satisfactorily on every audio CD player CD R by contrast may be played satisfactorily on the majority of audio CD players RECORDING to a CD 4 AUX 5 PHONO 11 TAPE 12 STOP 1...

Страница 30: ...ss the button lightly and playback will resume Press the button all the way to end playback and eject the tape STEP 2 LOAD RECORDABLE CD Load a recordable CD R or CD RW disc into the unit Press the OPEN CLOSE button place a disc on the disc tray with the printed label side up and then press the OPEN CLOSE button to close the disc tray The display will show Busy CD and the disc is reading waiting u...

Страница 31: ...BUTTON Press the RECORD button REC and will appear on the display No button will work while busy is displayed Wait a few seconds until busy disappear from the display B Select track assignments automatically with AUTO MANUAL If you are busy select assignments automatically with the AUTO MANUAL button When the sound level has dropped below the 20db 30db 40db record signal for more than 2 seconds th...

Страница 32: ...Y PAUSE button to start recording To stop recording Press the STOP button to stop recording The display will show Busy after the Busy disappears press the CD button and the display will show the record track time STEP 5 SELECT RECORDING LEVEL optional If necessary adjust the recording level using the REC LEVEL knob the display will show from 00 to 79 Play the source to be recorded and adjust the r...

Страница 33: ...ing into tracks while recording While recording is taking place press the TRACK INCREMENT button The current track number will increment by one The TRACK INCREMENT button works regardless of the MANUAL AUTO REC setting This section deals with the actions taken after recording Once finalized CD R discs are truly final No more tracks can be recorded on them By contrast CD RW disc can be un finalized...

Страница 34: ...ome cases When the operation has been finished the NO TOC indicator turns off and the display returns to the track time display During finalizing no buttons will work Never turn the power off nor unplug the power cord while finalizing Although finalized CD R discs may be played on ordinary CD players remember that finalized CD RW discs may not play on ordinary CD players Erase or Un finalize a CD ...

Страница 35: ...ecorded on the disc To ERASE All Select this to erase all the tracks from the disc To cancel the erasing or un finalizing process press the STOP button 4 1 Press and hold the ERASE button until the display shows Erase All 2 Press PLAY button to begin to erase the tracks from the disc 3 The display will show 0000000 to confirm the disc is clear The remaining time for the operation appears in the di...

Страница 36: ...r 0 4 WRMS Frequency Response 125 to 6300 Hz 6 dB RECORD PLAYER Section Motor DC servo motor Drive System Belt Drive Speeds 33 1 3 rpm 45 rpm and 78 rpm Wow Flutter Less than 0 35 WTD S N Ratio More than 50 dB Cartridge Type Ceramic Stereo Cartridge Stylus 402 M208 165 Output Level 160 380 mV 5 cm sec at 1 KHz SPEAKER SYSTEM Section Type 1 way Impedance 4 ohms Input Power Max 10 W GENERAL Power Re...

Страница 37: ...37 Need additional help Call us Monday thru Friday 8 00 AM to 5 00 PM Pacific Time at 866 446 0961 ...

Страница 38: ...38 MODEL ITC TWCDRW Turntable with Compact Disc CD RW Recorder Cassette Player and AM FM Radio Grace Digital Inc San Diego CA ...

Отзывы: