background image

4/15

Dust-tight product.  Protec-

ted against water trickles.

Not meant for submersion.

Produit totalement étanche 

à la poussière. Protégé con-

tre les projections d’eau.

Ne doit pas être plongé 

dans l’eau.

Alternating current. 

Courant alternatif.

This lamp can be used in 

locations subject to saturation 

with water.

Cette lampe peut être utilisée 

dans des endroits sujets à 

saturation avec de l'eau.

Voltage range:

Gamme de tension : 

100-240V

Step 1/6

Product Spec Sheet

Technical specifications / Caractéristiques techniques 

Net Weight  /  Poids net  8.37 lbs.

Wet Location 

Wet Location 

4635

3 X LED  2.1 W  700 mA.

50/60 Hz.

IP65

IP65

Bi-volt

Bi-volt

Содержание Brisa

Страница 1: ...Version U01 Assembly instructions Instructions de montage Brisa Design by Lievore Altherr Molina ...

Страница 2: ...ations suivantes ATTENTION avant de réaliser toute connexion électrique vérifiez que le courant au compteur de votre installation est bien coupé afin d éviter de possibles décharges électriques L installation électrique de ce produit doit être conforme aux normes électriques nationales ou locales Si vous n êtes pas habitué aux travaux d électricité lors de cette installation veuillez employer les ...

Страница 3: ...3 15 Index Step 1 Product Spec Sheet Step 2 Supplied Materials Step 3 Installation Preparation Step 5 Product Assembly Step 4 Electrical Connection Step 6 Adjustments Maintenance ...

Страница 4: ...rrent Courant alternatif This lamp can be used in locations subject to saturation with water Cette lampe peut être utilisée dans des endroits sujets à saturation avec de l eau Voltage range Gamme de tension 100 240V Step 1 6 Product Spec Sheet Technical specifications Caractéristiques techniques Net Weight Poids net 8 37 lbs Wet Location Wet Location 4635 3 X LED 2 1 W 700 mA 50 60 Hz IP65 IP65 Bi...

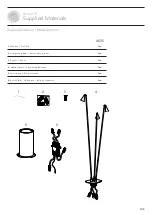
Страница 5: ...tériel fourni 2 4 3 1 4635 1 Allen key Clé Allen 2 Components Bag Sachet d accessoires 3 Screws Des vis 4 Lighting fixture Structure du luminaire 5 Inset casing Pièce encastrée 6 Acces VIBIA Wiring box Boîte de connexion 1 un 1 un 3 un 1 un 1 un 1 un 5 6 ...

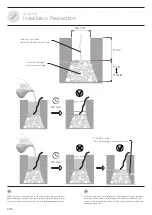
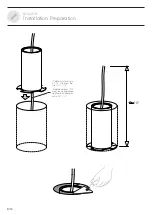
Страница 6: ...adéquat Make a hole in the ground to set the casing into and provide a gravel drainage system if the ground is sandy If the lamp is to be set into concrete provide for the most suitable drainage system Step 3 6 Installation Preparation Ø6 7 8 Mains power cable Câble d installation électrique Gravel for drainage Gravier de drainage 9 1 4 30 min 30 min 7 7 8 11 13 16 Extra drain pipe Tube de drainag...

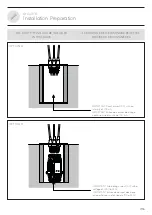
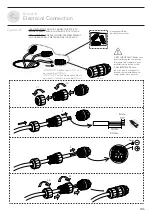
Страница 7: ...ÊTRE RÉALISÉ DE DEUX MANIÈRES OPTION A OPTION B IMPORTANT Direct current DC with an intensity of 700mA IMPORTANT Entrée de courant électrique continu d une intensité de 700 mA IMPORTANT Alternating current AC with a voltage of 100V to 240V IMPORTANT Entrée de courant électrique alternatif avec une tension de 100 à 240V ...

Страница 8: ...8 15 16 Cable must be type SJTW thickness be twen 1 4 1 2 Modèle câble SJTW électrique obligatoire de diamètre compris entre 1 4 1 2 Step 3 6 Installation Preparation ...

Страница 9: ...e de votre installation est coupé avant de connecter Components Bag Sachet d accessoires x 3 uts 1 1 1 2 2 3 Poles 4 1 4 2 6 mm IMPORTANT Direct current DC with an intensity of 700mA IMPORTANT Entrée de courant électri que continu d une intensité de 700 mA VERY IMPORTANT DO NOT CONNECT DIRECTLY TO MAINS CURRENT WITH A VOLTAGE OF 100V TO 240V TRÈS IMPORTANT NE PAS CONNECTER DIRECTEMENT AU COURANT A...

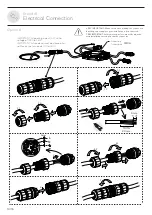
Страница 10: ...ke sure before making the connection that the power supply to your installation is disconnected TRÈS IMPORTANT Assurez vous que le courant électrique de votre installation est coupé avant de connecter 2 2 IMPORTANT Alternating current AC with a voltage of 100V to 240V IMPORTANT Entrée de courant électrique alter natif avec une tension de 100 à 240V ...

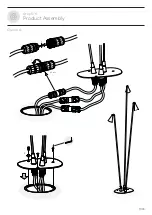
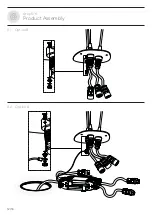
Страница 11: ...11 15 Step 5 6 Product Assembly Option A 1 2 3 x 3 uts ...

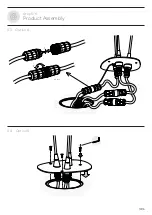
Страница 12: ...12 15 Step 5 6 Product Assembly 5 1 Option B 5 2 Option B ...

Страница 13: ...13 15 Step 5 6 Product Assembly 5 3 Option B 5 4 Option B 1 2 x 3 uts ...

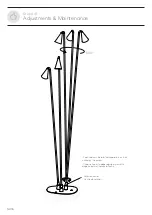
Страница 14: ...djustments Maintenance Step 6 6 Rotation center Centre de rotation 360 Each rod can be rotated separately as indi cated by the arrow Chaque tige est indépendante et peut être dirigée comme l indique la flèche ...

Страница 15: ...who sold the lamp Entretien Pour nettoyer le luminaire utilisez un chiffon en coton légèrement humidifié d eau En cas d incident ou de non fonctionnement du luminaire con tactez directement l établissement où vous l avez acheté VIBIA INC 272 Fernwood Ave Edison NJ 08837 USA Phone 732 417 1700 sales vibia com www vibia com ...

Отзывы: