Rev. 2/4/2021
DKL, MANUAL.doc
Copyright 2021 Vestil Manufacturing Corp. Page 9 of 10
RECORD OF SATISFACTORY CONDITION (THE “RECORD”)
Before putting the ladder into service, record its condition. Make written records that describe the locations of
labels and the soundness of all anchor bolt connections. Take photographs from multiple angles. Take close-range
photographs of all anchor bolts, each mounting bracket, each label, and all bracket fasteners (bolts, lock nuts). Collect
all photographs and writings in a file and mark the file appropriately to identify it. This file is a record of the ladder in
satisfactory condition. Use the contents of this file to determine whether the ladder is in satisfactory condition during
all inspections. Do not use the ladder unless it is in satisfactory condition. Purely cosmetic changes, like damaged
finish (paint or powder coat), do not constitute changes form satisfactory condition. However, touchup paint should be
applied to the affected areas as soon as damage is noticed.
NATIONAL STANDARDS
This product is a fixed ladder (FL).
(the “Standard”) applies to FL’s. You
should
acquire
a copy of the latest version of the Standard. Follow all use and maintenance/care instructions provided in the
Standard as well as all other provisions for FL owners and users. If any content in this manual conflicts with any
mandatory provision(s) in the Standard, apply the provision(s) from the Standard. Please contact
personnel and report the conflict.
INSPECTIONS & MAINTENANCE
Regular inspections and maintenance is required for the ladder to function properly for as long as possible. Inspect
the unit as instructed. Inspections and all necessary repairs should only be performed by qualified persons. Compare
the results of each inspection to the
. Do not use the ladder unless every
part is in satisfactory condition. If you have any questions about the condition of your ladder, contact the
department. The phone number is provided on the cover page of this manual.
Never make temporary
repairs of damaged or missing parts
. Only use manufacturer-approved replacement parts to restore the ladder to
satisfactory condition.
Before each use
inspect the ladder for any sustained damage, such as unusual wear, deterioration, or corrosion.
Look for loose connections. Tighten all loose connections.
Regular inspections
—
At least once per month
inspect the following items. Replace all parts not in satisfactory
condition before returning the ladder to service. DO NOT continue to use the ladder if damage cannot be repaired.
•
Frame elements (siderails and rungs): Inspect both siderails. Confirm that they are solidly fastened to the rungs
and to the wall. Each siderail and each rung/step should be straight, rigid, and undamaged. Look for excessive wear,
bends, cracks, damaged welds, and looseness. All frame elements should be square, rigid, and free of rust and
corrosion. Remove rust and apply touch-up paint to the affected area. Check the areas where components are
fastened/bolted together. Check all fasteners (bolts, lock nuts) for damage. Examine the metal around bolt holes for
cracks, elongations, etc. All rung fasteners must be tight. If a lock nut must be removed, it must be replaced with a
new lock nut.
•
Anchor bolts: Examine the anchor bolts and the wall material around the anchor bolts. Bolts must be solidly
attached to the wall. The wall material must not be cracked or damaged in other ways around the anchor bolts.
Maintenance
: In addition to correcting issues discovered during inspections, maintain the ladder.
•
Clean the ladder with a damp cloth to remove dirt and grime, especially from step surfaces. Let the ladder dry
completely before returning it to service.
•
Apply touchup paint wherever the finish is damaged. Apply touchup paint as soon as damage occurs.
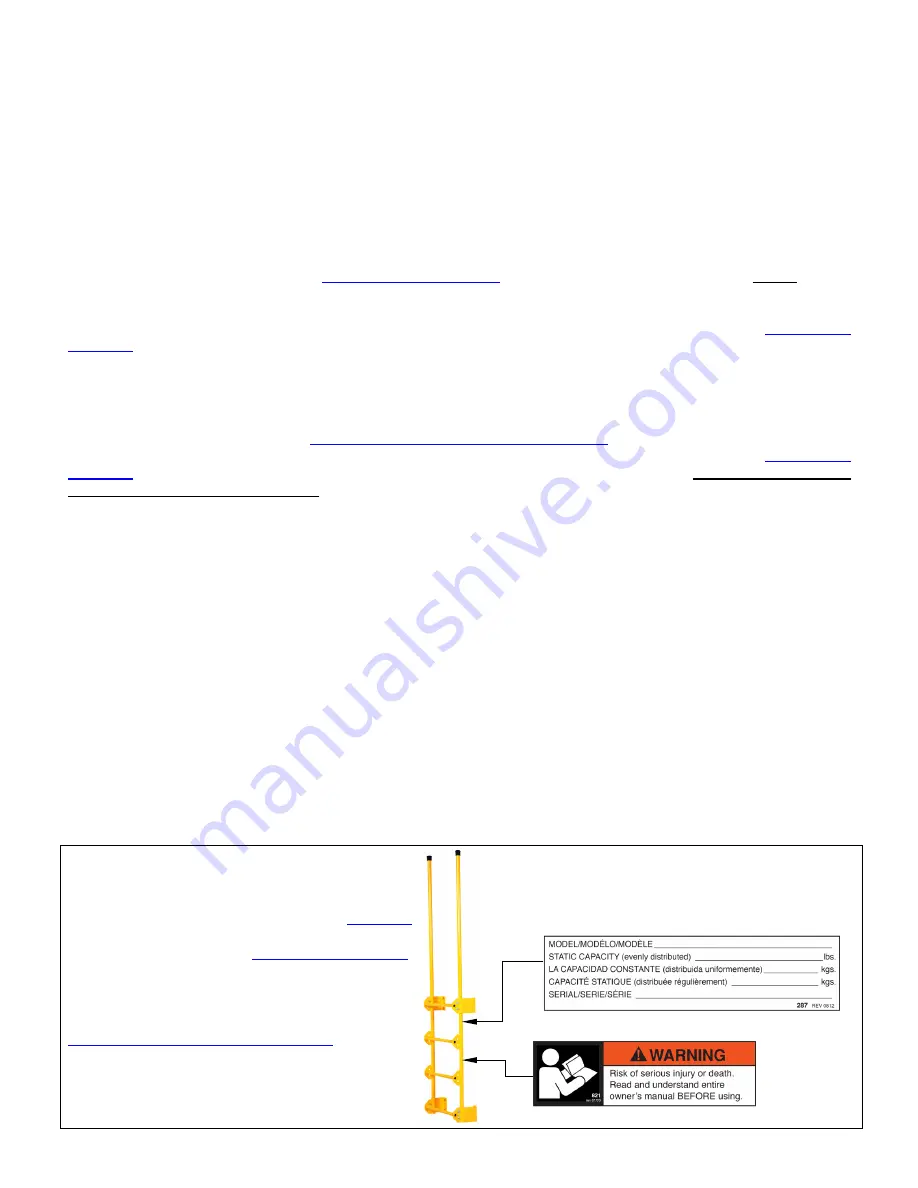
LABELING DIAGRAM
Label content and location are subject to
change. Your product might not be labeled exactly
as shown. Compare this diagram to the
on p. 9
.
If differences exist between the diagram
and the
RECORD,
contact
Replace all labels that are damaged, missing, or
not easily readable (e.g. faded). To order
replacement labels, contact the technical service
and parts department online at
http://www.vestilmfg.com/parts_info.htm
Alternatively, you may request replacement parts,
including labels, and/or service by calling (260)
665-7586 and asking the operator to connect you to
the Parts Department.
Label 287: Model designation and capacity;
covered with label 770
Label 821: Read instruction manual


