5
5. SAFETY
Do not
store explosive substances in the refrig-
erator section, such as gas, cigarette lighters, pe-
trol, ether or similar. Scrapped cabinets may
become dangerous to children at play. Therefore,
remove the doors or place the scrapped cabinet
in such a way that children cannot enter it.
Never store liquids with carbon dioxide in the
freezing section.
6. TECHNICAL DATA
This appliance meets the provisions of the
following directives: 89/336/EEC (electromagnetic
compatibility), 73/23/EEC (electrical equipment
designed for use within certain voltage limits) as
amended.
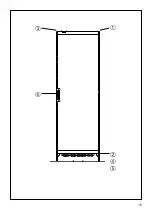
The rating plate, which is placed inside the
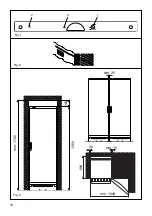
appliance (see fig. (2) page 16), provides various
technical information as well as type and serial
number.
7. INSTALLATION
See drawings page 17.
Install the cabinet in a dry place and so that it is
not exposed to direct sunlight or any other source
of heat.
Place the cabinet in a level position. This is easily
achieved by adjusting the adjustable feet at the
front edge of the base. The cabinet may not rest
against a wall on its hinged side. When placing
the cabinet on a carpet or on a wooden floor you
should adjust it once more after some time as the
cabinet might settle in soft foundations.
If you want to build the appliance into a cupboard
you must consider 3 factors:
1. There must be space above the appliance in
order to make the cooling system work
satisfactorily. - Fig. (3) page (16).
2. When the door is opened the appliance takes
up more room in the width and therefore the
door must either be placed outside the cup-
board or there must be a space of at least 1,5
cm at the hinge side. - Fig. (3) page 16).
3. The distance to the wall at the hinge side must
be of a sufficient size. - Fig. (3) page 16.
In addition, the bottle cooler may be built in or
positioned alongside another unit – fig. (3) page
16.
If the appliance is to be placed next to another
unit, a 25 mm gap must be left.
Any local installation rules for appliances of this
kind must be observed.
During a storm the electricity supply might be cut
off.
You should be aware of this when installing the
appliance in weekend cottages or elsewhere
where you would not immediately observe that
the power has been cut off. Construction and
details in the accessories are subject to alter-
ation without previous notice..
8. ELECTRICAL REQUIREMENTS
Check that the voltage stamped on the rating
plate of your machine corresponds with your
house electricity supply. Your machine is already
fitted with a plug incorporating a 13 amp fuse. If it
does not fit your socket the plug should be cut off
from the mains lead and an appropriate plug
fitted. Carefully dispose of the cut off plug after
removing the fuse; do not insert it in a 13 amp
socket elsewhere in the house as this could cause
the hazard of electric shocks.
With alternative plugs not incorporating a fuse the
circuit must be protected with a 15 amp fuse.
The mains lead may only be replaced by a mains
lead supplied by the supplier.
WARNING - THIS APPLIANCE MUST BE
EARTHED.
IMPORTANT
Should an alternative plug need to be fitted, the
wires in this mains lead are coloured in accord-
ance with the following code:
Green & Yellow - Earth
Blue - Neutral
Brown - Live
As the colours of the wires in the mains lead of
this appliance may not correspond with the
coloured markings identifying the terminals in
your plug, proceed as follows:
The wire which is coloured green and yellow must
be connected to the terminal in the plug which is
marked with the letter "E" or by the earth symbol
or coloured green or green and yellow.
The wire which is coloured blue must be
connected to the terminal which is marked with
the letter "N" or coloured black.
The wire which is coloured brown must be
connected to the terminal which is marked with
the letter "L" or coloured red.
Содержание CFS 344
Страница 1: ...FREEZERS MANUAL OF INSTRUCTIONS FOR USE AND INSTALLATION...
Страница 3: ...3 GB 4 D 7 F 10...
Страница 12: ...12 Fig 3 Fig 1 Fig 2 2 3 1 min 1700 1550 150 min 25 min 1040 600 min 15 25...
Страница 13: ...13 Fig 4...
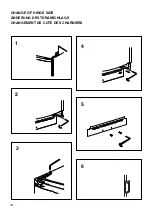
Страница 14: ...14 1 2 3 6 4 5 CHANGE OF HINGE SIDE NDERUNG DES T RANSCHLAGS CHANGEMENT DE COTE DES CHARNIERS...
Страница 15: ...15...
Страница 16: ...95 56 188 01...

